By: Team SE-EDU Since: Aug 2019 Licence: MIT
Team: T17-2
Content
- 1. Introduction
- 2. Quickstart
- 3. Preface
- 4. Main
- 5. Calendar
- 6. Itinerary
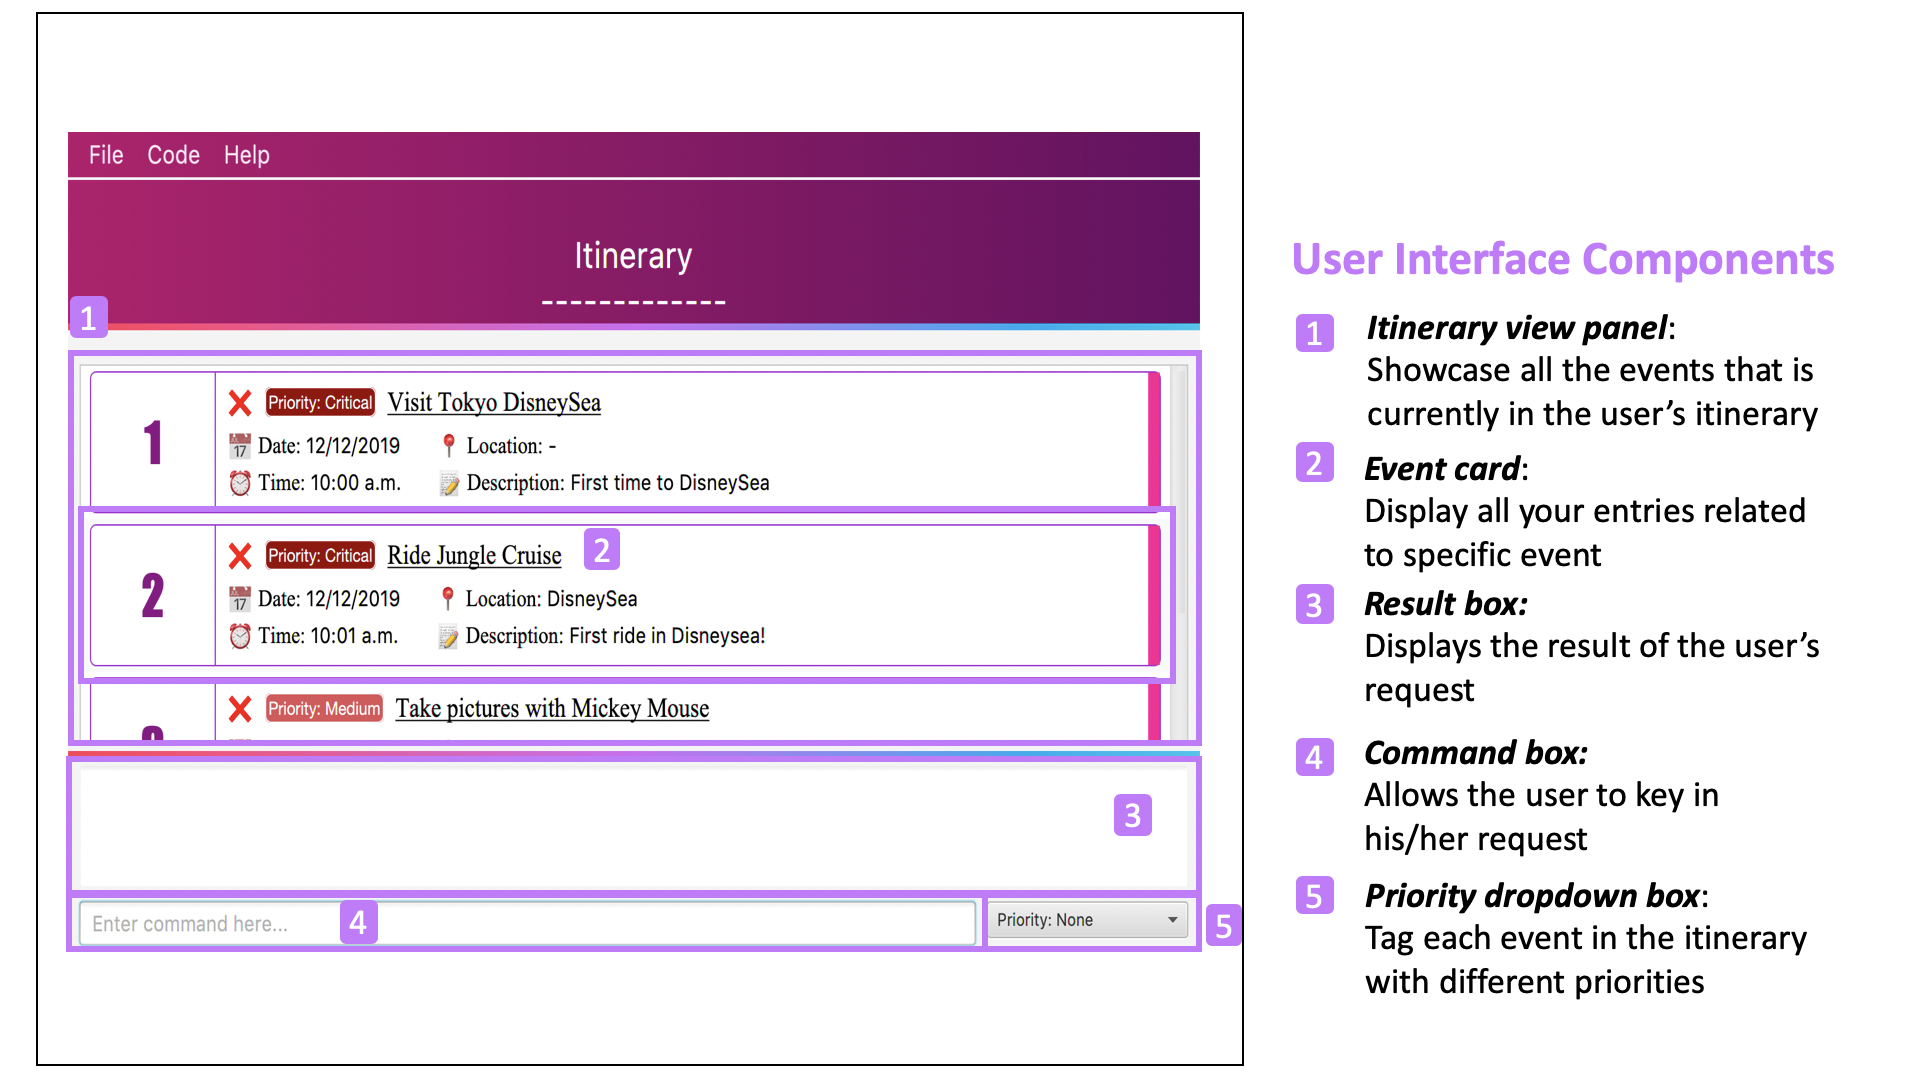
- 6.1. Interface
- 6.2. Adding an event:
add - 6.3. Deleting an event:
delete - 6.4. Editing an event:
edit - 6.5. Checking a command as done:
done - 6.6. Listing all events:
list - 6.7. Clearing all entries:
clear - 6.8. Greet TravEzy itinerary:
greet - 6.9. Showing past commands:
history - 6.10. Searching for an event:
search - 6.11. Sorting the events:
sort - 6.12. Auto-completion feature
- 7. Address Book
- 8. Financial Tracker
- 8.1. Interface
- 8.2. Adding an expense:
add - 8.3. Deleting an expense:
delete - 8.4. Editing an expense:
edit - 8.5. Clears an expense list:
clear - 8.6. Undo your previous action:
undo - 8.7. Switching between countries:
switch - 8.8. Sort out your expense list:
sort - 8.9. Generate an overview of your spending:
summary
- 9. Diary
- 9.1. Adding diary entries to your diary
add - 9.2. Deleting diary entries from your diary
delete - 9.3. List all your diary entries
list - 9.4. Find diary entries
find - 9.5. Find specific diary entries
findSpecific - 9.6. Private personal memories
private - 9.7. Unprivate personal memories
unprivate - 9.8. Keep your diary protected
setDetails - 9.9. Unlock your private diary entries
unlock
- 9.1. Adding diary entries to your diary
- 10. Achievements
- 11. FAQ
- 12. Command Summary
1. Introduction

Welcome to TravEzy! 😊
Firstly, thank you for downloading our application. We greatly appreciate your support and we promise to make travel easy with TravEzy.
What is TravEzy?
TravEzy is a desktop application with a command line interface (CLI) and is perfect for NUS students who love travelling as much as we do. With a CLI, you will be able to type in your commands much faster than similar applications which require you to keep using your mouse. Furthermore, since this is a desktop application, you do not need a web browser (like Chrome, Firefox, Internet Explorer, etc.) to start using TravEzy.
TravEzy is perfect for:
-
Managing your busy calendar and finding the best time to take that much needed holiday!
-
Crafting the ideal itinerary for your trip :)
-
Tracking your expenses during your trip, so that you have enough money left for the trip home
-
Journaling and looking at fond old memories in your diary
-
Keeping in contact with your old and new friends with the help of TravEzy’s address book
So, is TravEzy for you?
-
Are you a busy university student with a passion for travelling?
-
Are your summers and winters swamped with internships, projects and CCA activities?
-
Do your numerous commitments get in the way of your travel plans?
IF you answered yes to the questions above, then yes it is. If not, it still is :)
What are you waiting for? Hop on to this user guide and we will travel to Section 2, “Quick Start” to start TravEzy 😊
2. Quickstart
-
Grab a cup of coffee.
-
Ensure that you have Java 11 or above installed in your computer.
-
Download the latest TravEzy.jar
-
Copy the file to the folder you want to use as the home folder for your TravEzy.
-
Double-click the file to start the app. The GUI (Graphical User Interface) should appear in a few seconds.
-
You are now in the Main Page of TravEzy.
-
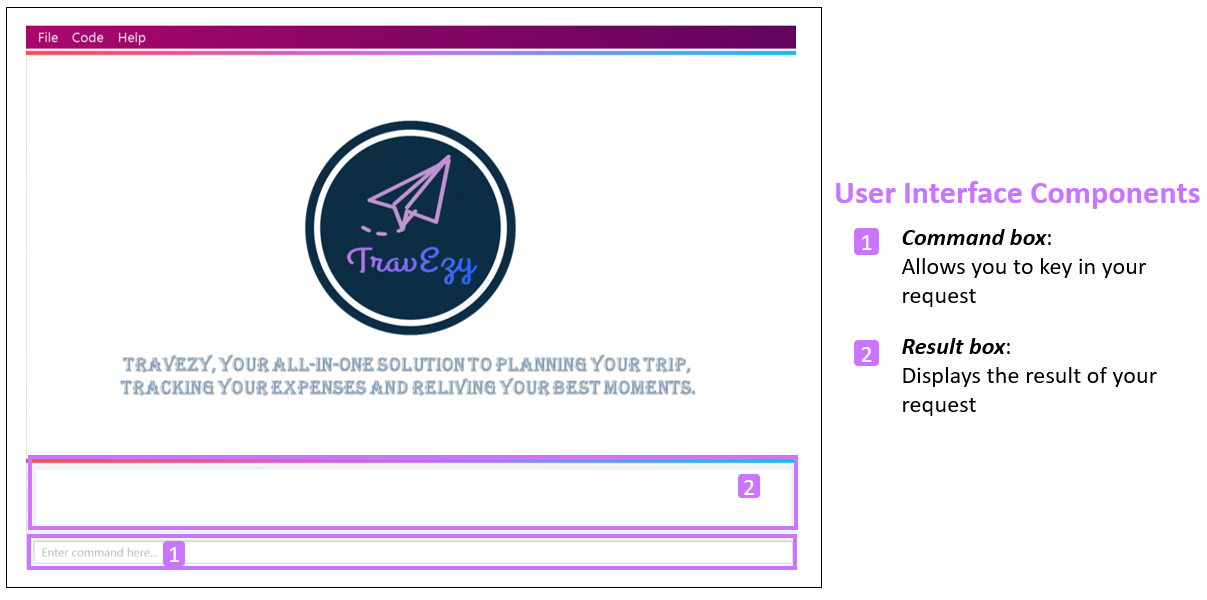
At the bottom of the screen, type the command in the command box and press <Enter> on your keyboard to execute it. E.g. typing help and pressing <Enter> will open the help window.
Refer to Section 3, “Features” for details of each command.
3. Preface
Excited to start using TravEzy? Read this section to find out how this document is structured, and what all the symbols and special fonts mean. We promise that this will help you to get started with TravEzy more quickly! 😊
3.1. Structure of this Document
There are alot of things that TravEzy can do. So, we have organised this document such that you can easily look for what you need.
We’ve split up this guide into the different features of our application, namely:
-
Main
-
Calendar
-
Itinerary
-
Address Book
-
Diary
-
Achievements
In each of the above sections, you will be introduced to the Interface of the feature and the Commands that will help you make travel easy.
| Interface refers to how TravEzy will be presented to you and how you can interact with TravEzy. In this guide, we have included images of exactly what you should see in TravEzy at every step, so don’t worry! 😊 |
| Commands refers to what you wil be typing into TravEzy to start making travel easy. Again, there are plenty of images to ensure clarity. 😊 |
3.2. Reading this Document
Symbols and exquisite (okay, different) fonts are exciting, aren’t they? Let’s find out more about what they mean in this document!
| Symbol/font | What does it mean? |
|---|---|
italics |
Italicised text indicates that the text has a definition that is specific to the application. Do look out for the definitions of these words along the way. If not, please look at the glossary in section 13). |
|
A grey highlight means that you can type the words into TravEzy and it will start performing tasks to make travel easier for you |
|
Uppercase letters that are highlighted in grey indicate that the word is a parameter.[1] |
|
The slash and letter (or word) before the parameter is a prefix. It is used to separate the current parameter from other parameters. |
|
Square brackets imply that the the stated prefix and parameter are optional. (This means less typing! 😆) |
💡 |
A light bulb indicates that the enclosed text is a tip. |
⚠️ |
A warning sign indicates that enclosed text is important. |
4. Main
Main is the welcome screen for TravEzy. From here, you can easily navigate to the other pages (which contains the interface of the features): calendar, itinerary, address book, financial tracker, diary and achievements. You can also the exit the application from here.
4.2. Going to another page: goto
Trying to open up the another page? Use this command!
Format:
goto PAGE TYPE
where PAGE TYPE can be any of the following: calendar, itinerary, address_book, financial_tracker, diary or achievements
Example:
goto itinerary
Step by step:
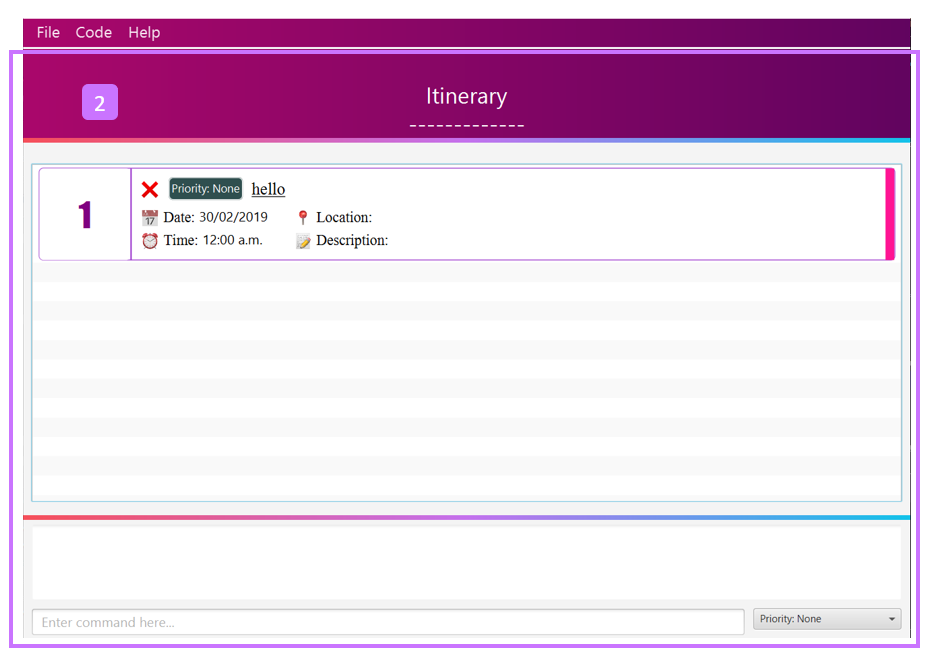
Step 1. Type goto itinerary in the command box and press Enter.
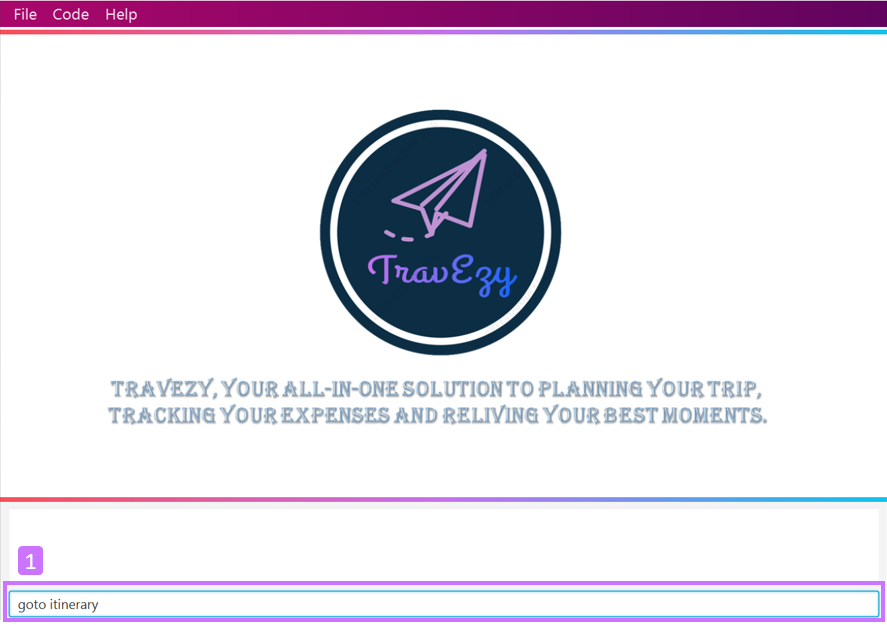
Step 2. You will be directed to the itinerary page.
4.3. Viewing help: help
If you are lost, this command will be helpful.
Format:
help
Step by step:
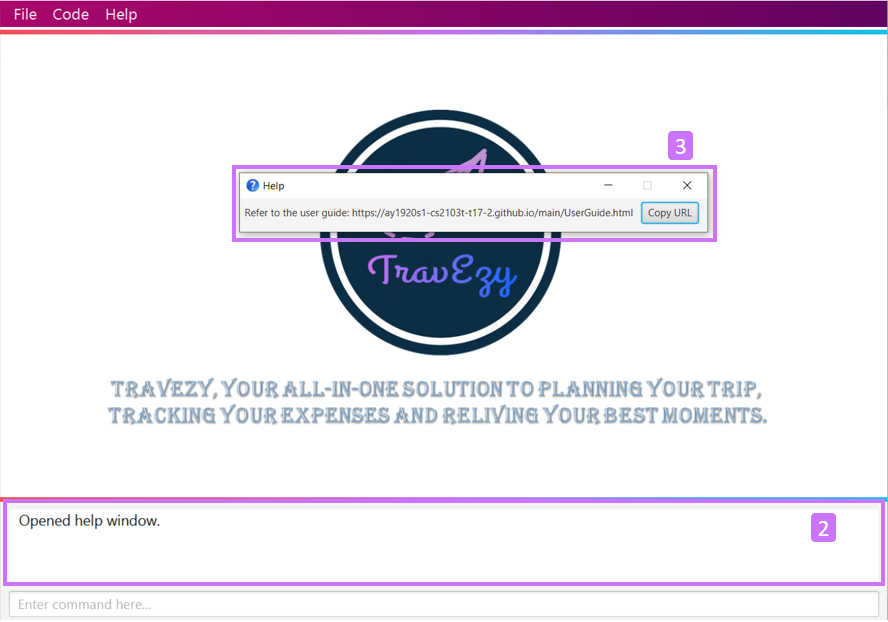
Step 1. Type help in the command box and press Enter.

Step 2. The message in the result box will be updated to indicate that the help window has been opened.
Step 3. The help window will appear as a pop-up and you may click the "copy link". This link will direct you to TravEzy’s user guide (i.e. this document).😊
4.4. Exiting the application: exit
It’s time to catch your flight, exit TravEzy and start your trip!
Format:
exit
Step by step:
Step 1. Type exit in the command box and press Enter.
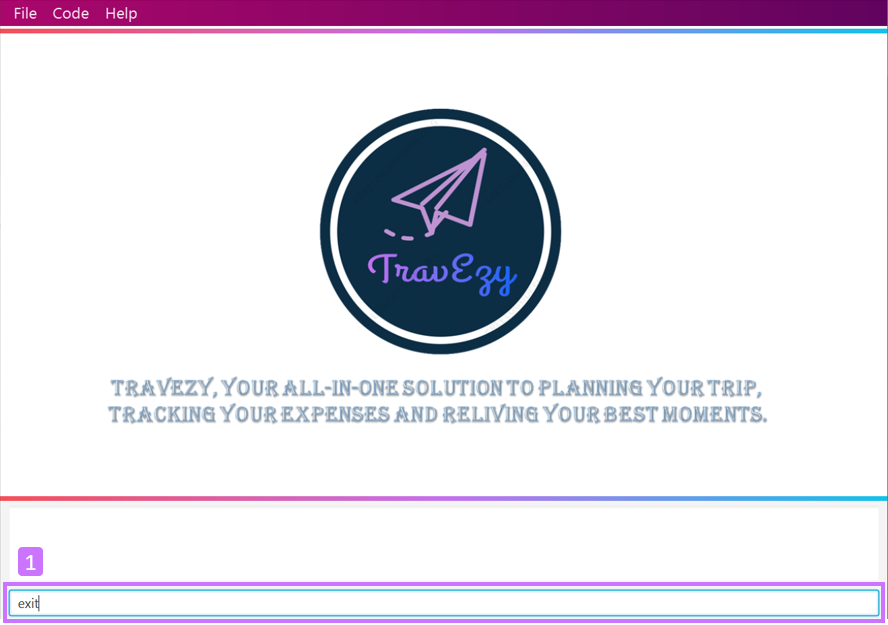
Step 2. All TravEzy’s windows will close.
The above commands goto, help and exit can also be executed from the other pages.
|
5. Calendar
It’s the end of the semester but there are still orientation camps, internships, and family commitments to attend to. However, after a long and tiring semester, the desire to unwind by travelling is just too strong. Sounds like you?
Well, TravEzy has got you covered. Simply inform TravEzy of your schedule (your commitments, school breaks, public holidays and trips) and TravEzy will suggest periods of time when you can travel! Excited to find out more? Well… Read on!
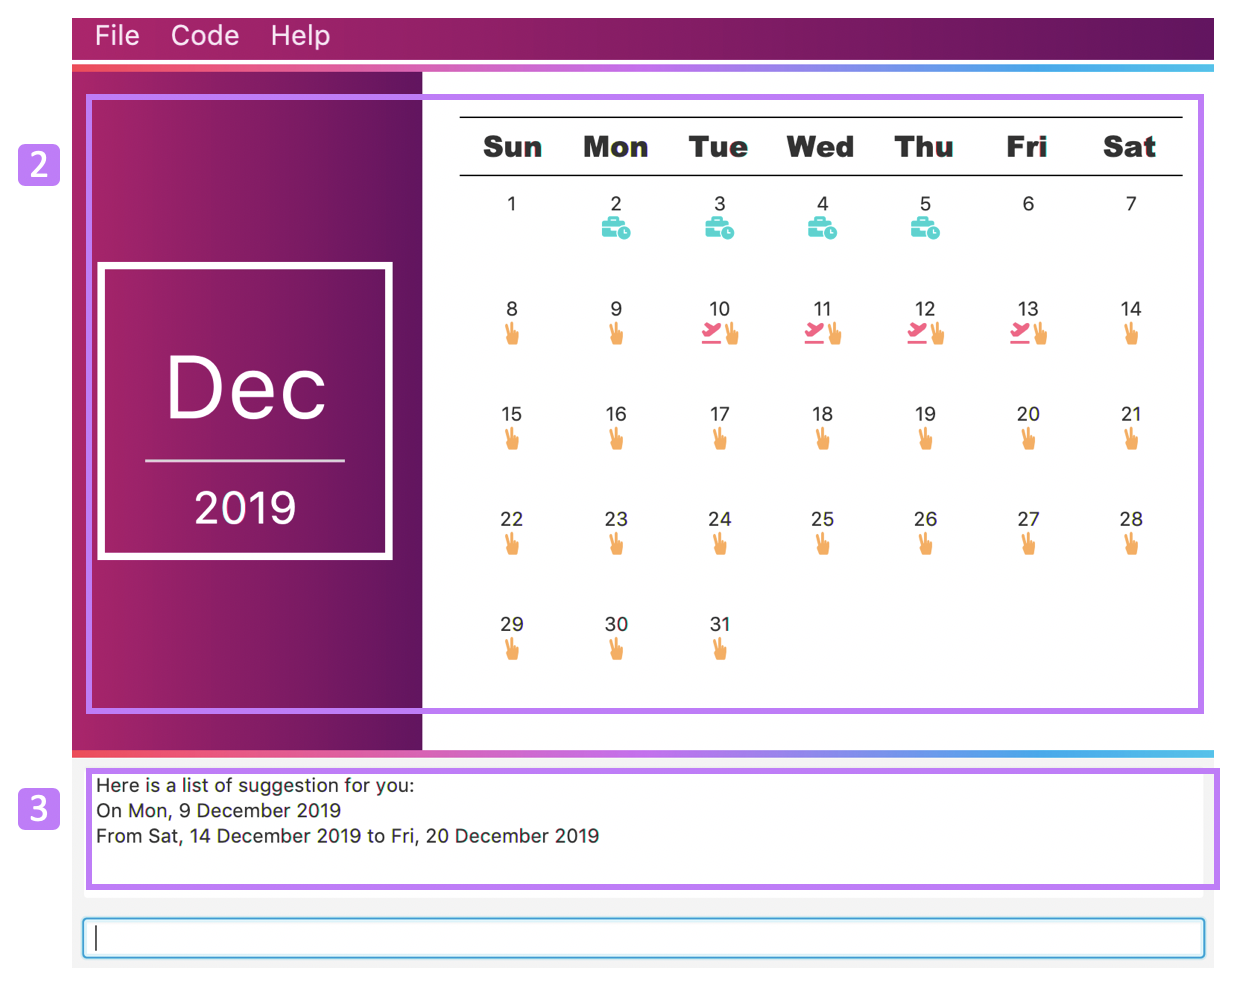
5.1. Interface
This is how TravEzy’s calendar looks like:
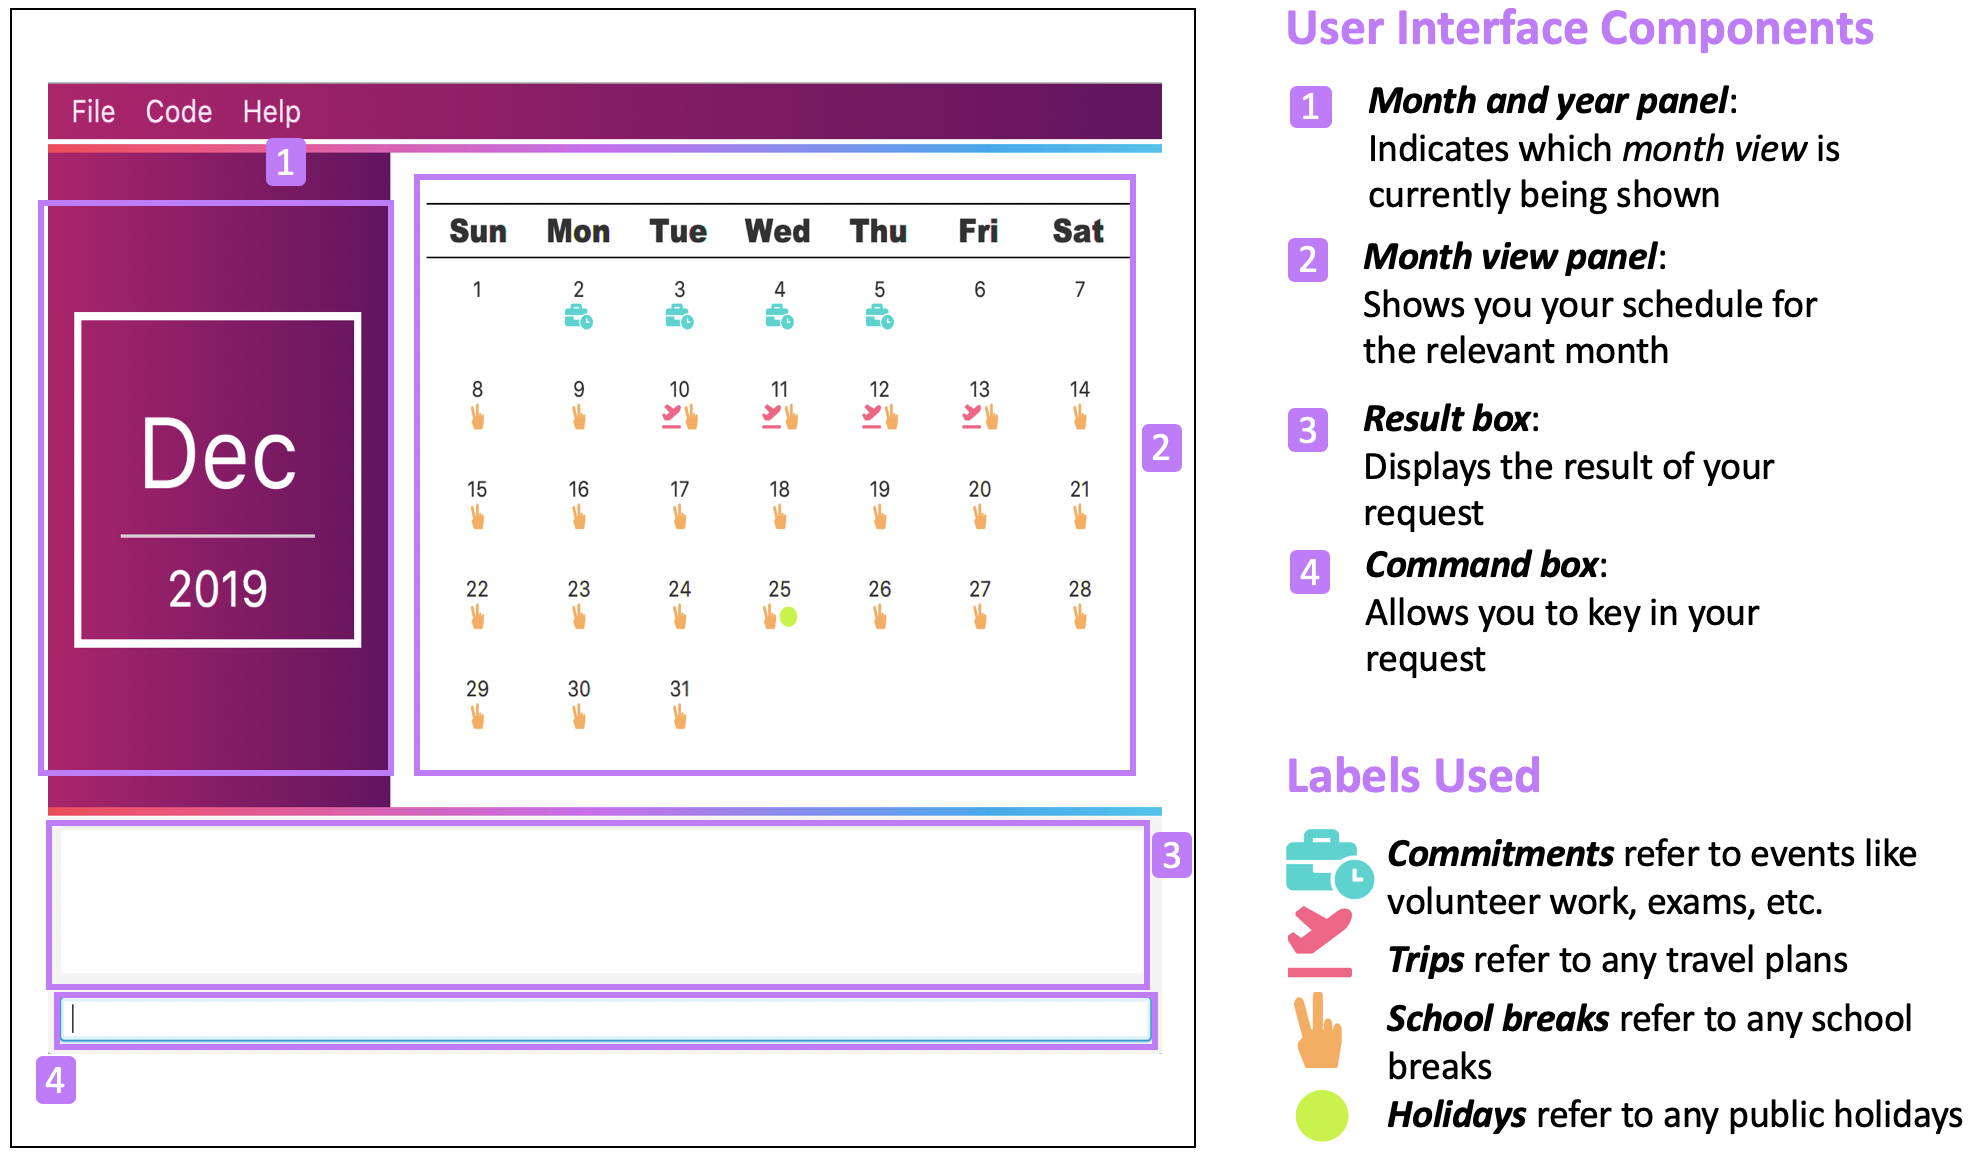
To help you easily differentiate between various types of events, TravEzy has categorised the events into four types: commitment, holiday, school break and trip. Visually, TravEzy also uses different labels for the different types of events, as shown in the image above.
| The labels indicate the type of event you have for that particular day. It does not indicate the number of events. |
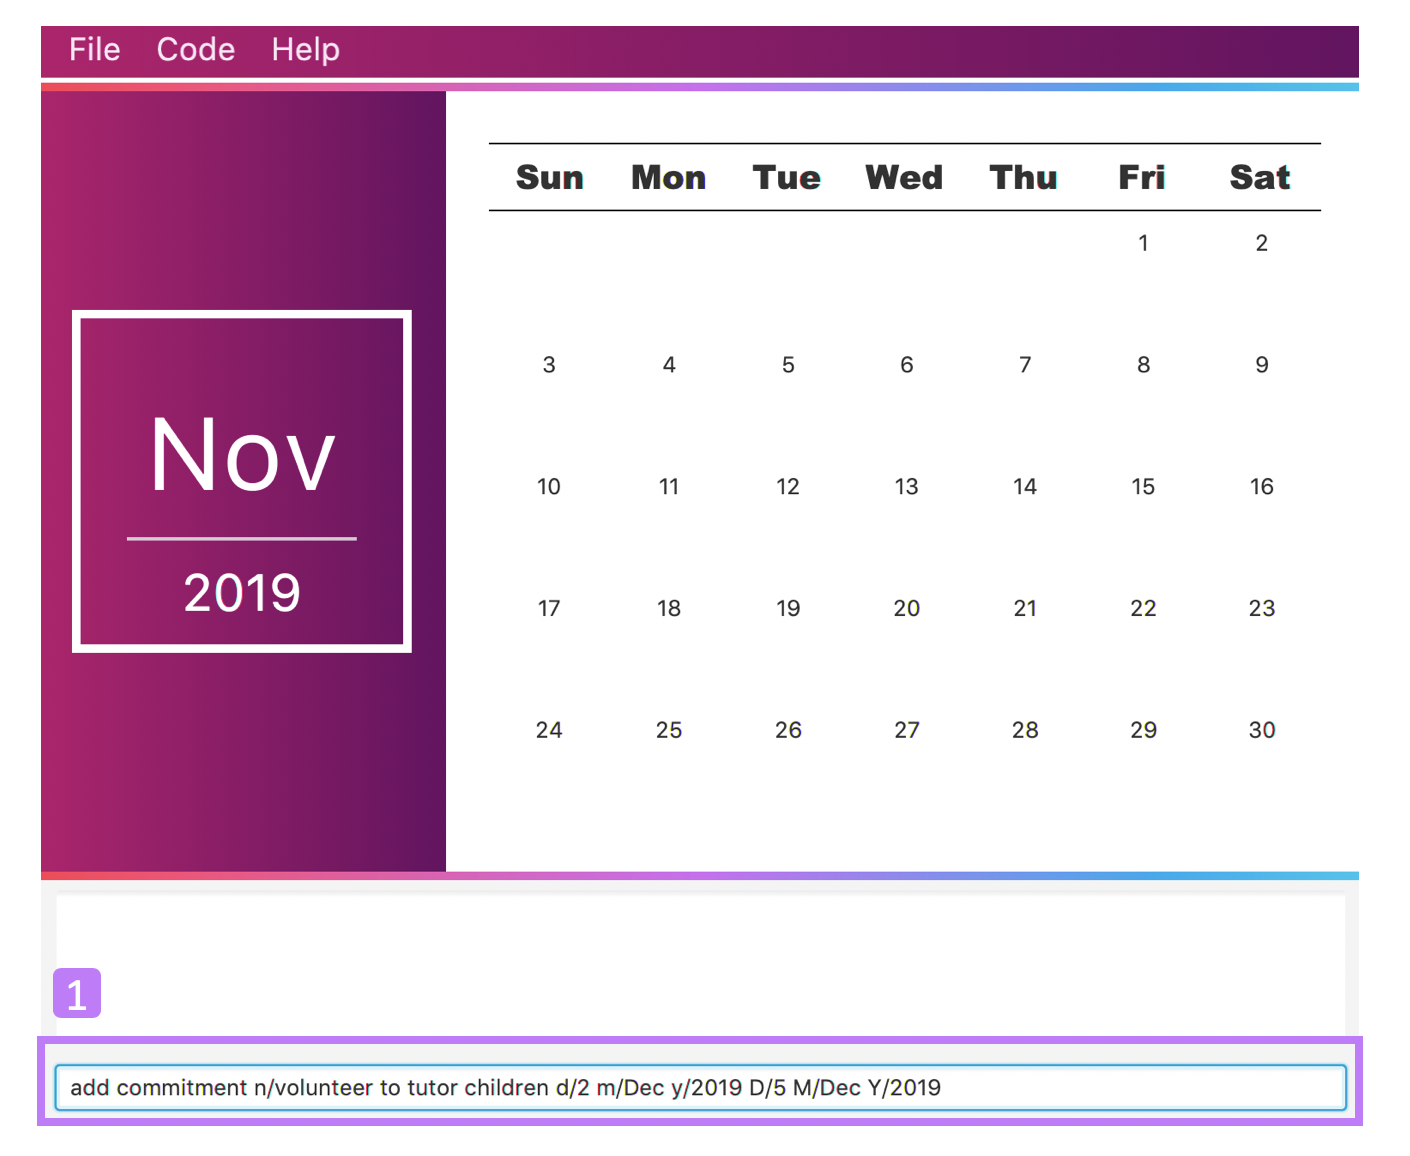
5.2. Adding an event to your calendar: add
Whew! After reading so much, it is time to find out how you can add your event so that TravEzy can start suggesting when you can travel! 😊
Format:
add EVENT TYPE n/NAME d/START DAY [m/START MONTH] [y/START YEAR] [D/END DAY] [M/END MONTH] [Y/END YEAR]
Examples:
Step by step:
Step 1. Type add commitment n/volunteer to tutor children d/2 m/Dec y/2019 D/5 M/Dec Y/2019 in the command box and press Enter.
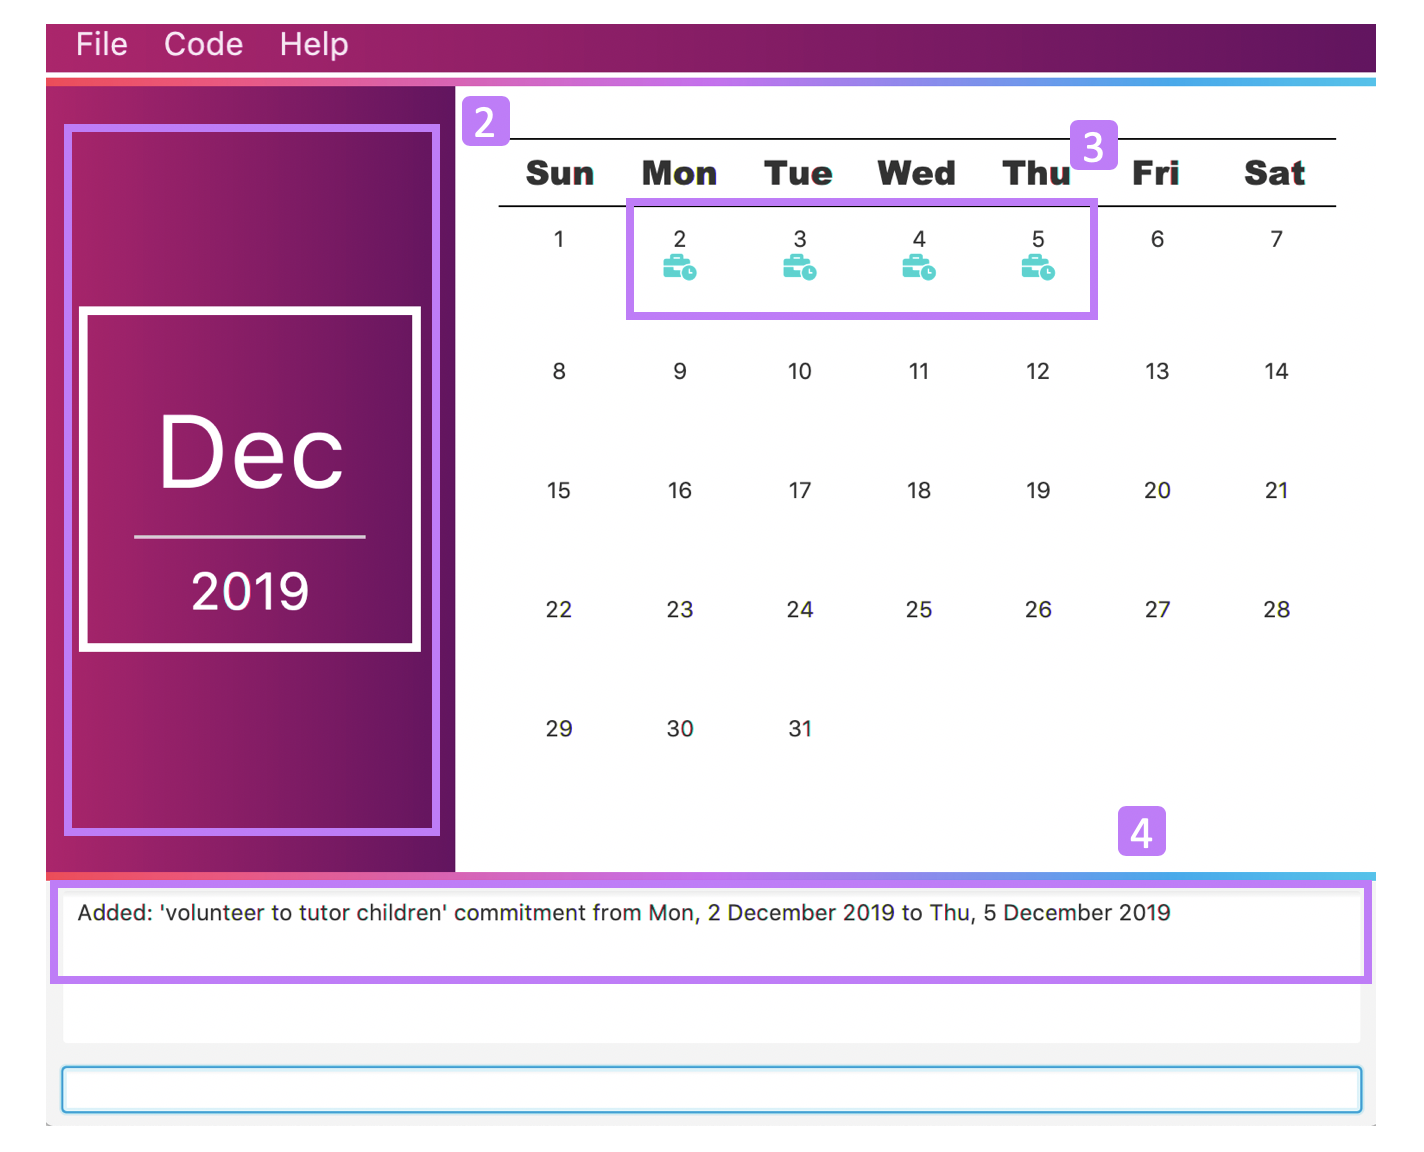
Step 2. The month and year panel will change to "December" and the relevant view will be shown.
Step 3. In the month view panel, you will be able to see the newly added commitment labels.
Step 4. The result box will also display a message to indicate that your commitment has been successfully added.
You do not have to specify the END YEAR, END MONTH and/or END DAY if they are the same as START YEAR, START MONTH and/or START DAY, respectively. This applies to the following commands as well.
|
| If you leave out the month and/or year, the current month and/or year will be used. This applies to the following commands as well. |
5.3. Deleting an event from your calendar: delete
Yes, we have all had that experience. We thought that next Friday is a public holiday even though it isn’t. However, you have added this holiday to TravEzy! 😧 What should you do now? Delete it!
But how? Well, this is the section for you. 😀
Format:
delete EVENT TYPE n/NAME d/START DAY [m/START MONTH] [y/START YEAR] [D/END DAY] [M/END MONTH] [Y/END YEAR]
Examples:
Step by step:
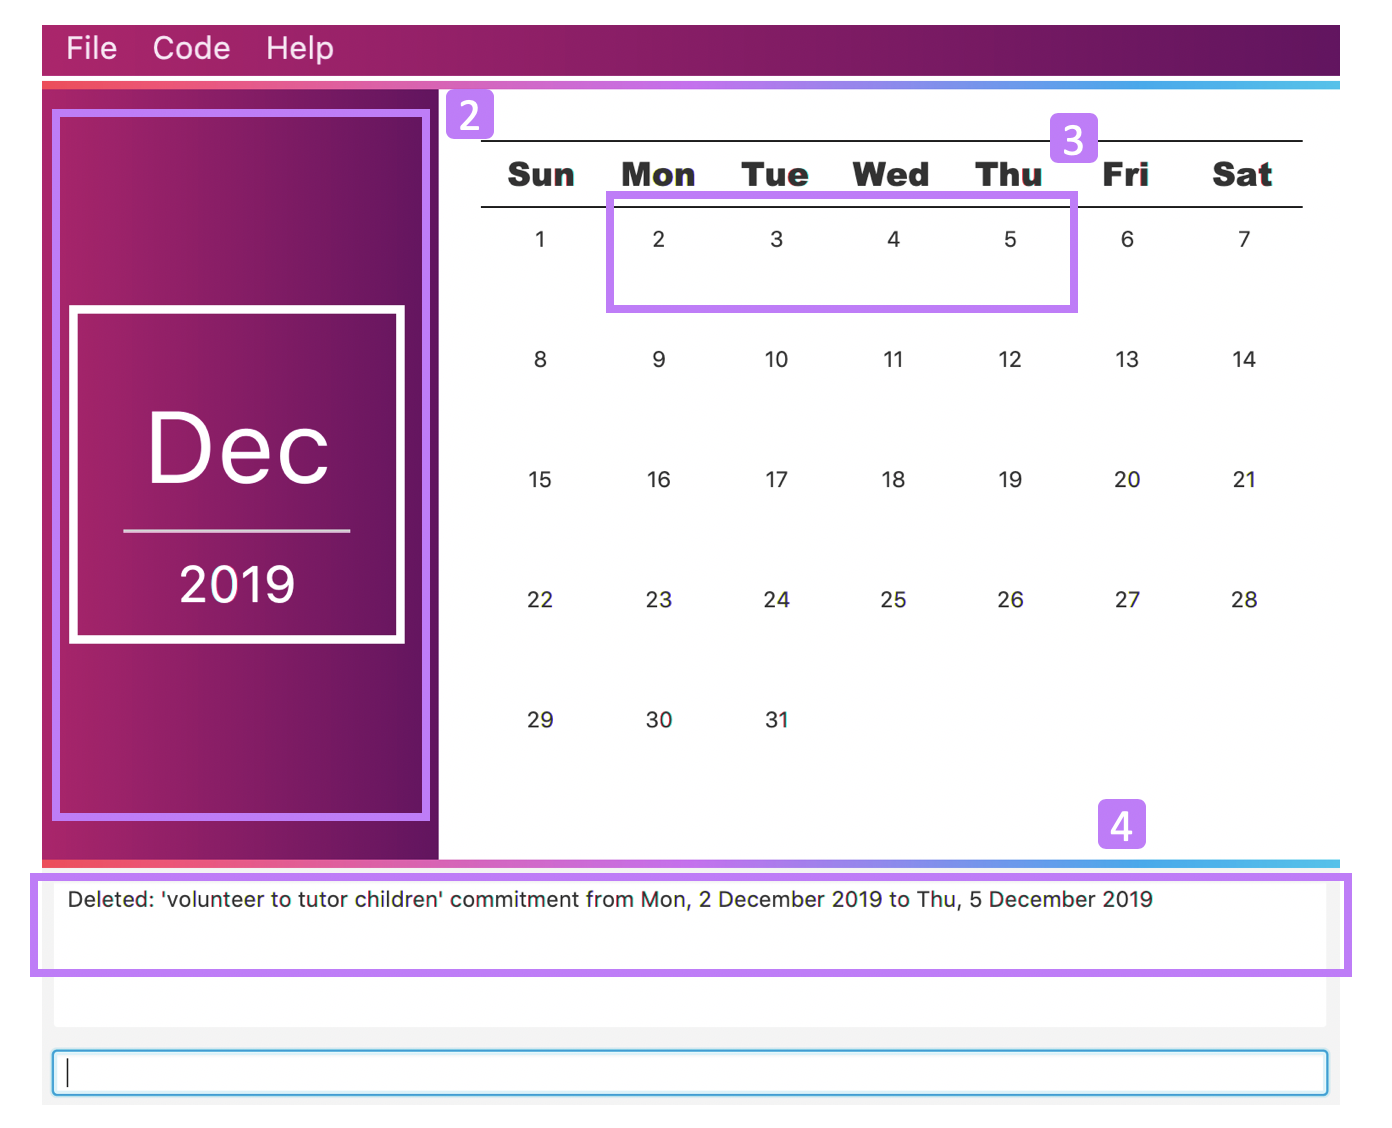
Step 1. Type delete commitment n/volunteer to tutor children d/2 m/Dec y/2019 D/5 M/Dec Y/2019 in the command box and press Enter.
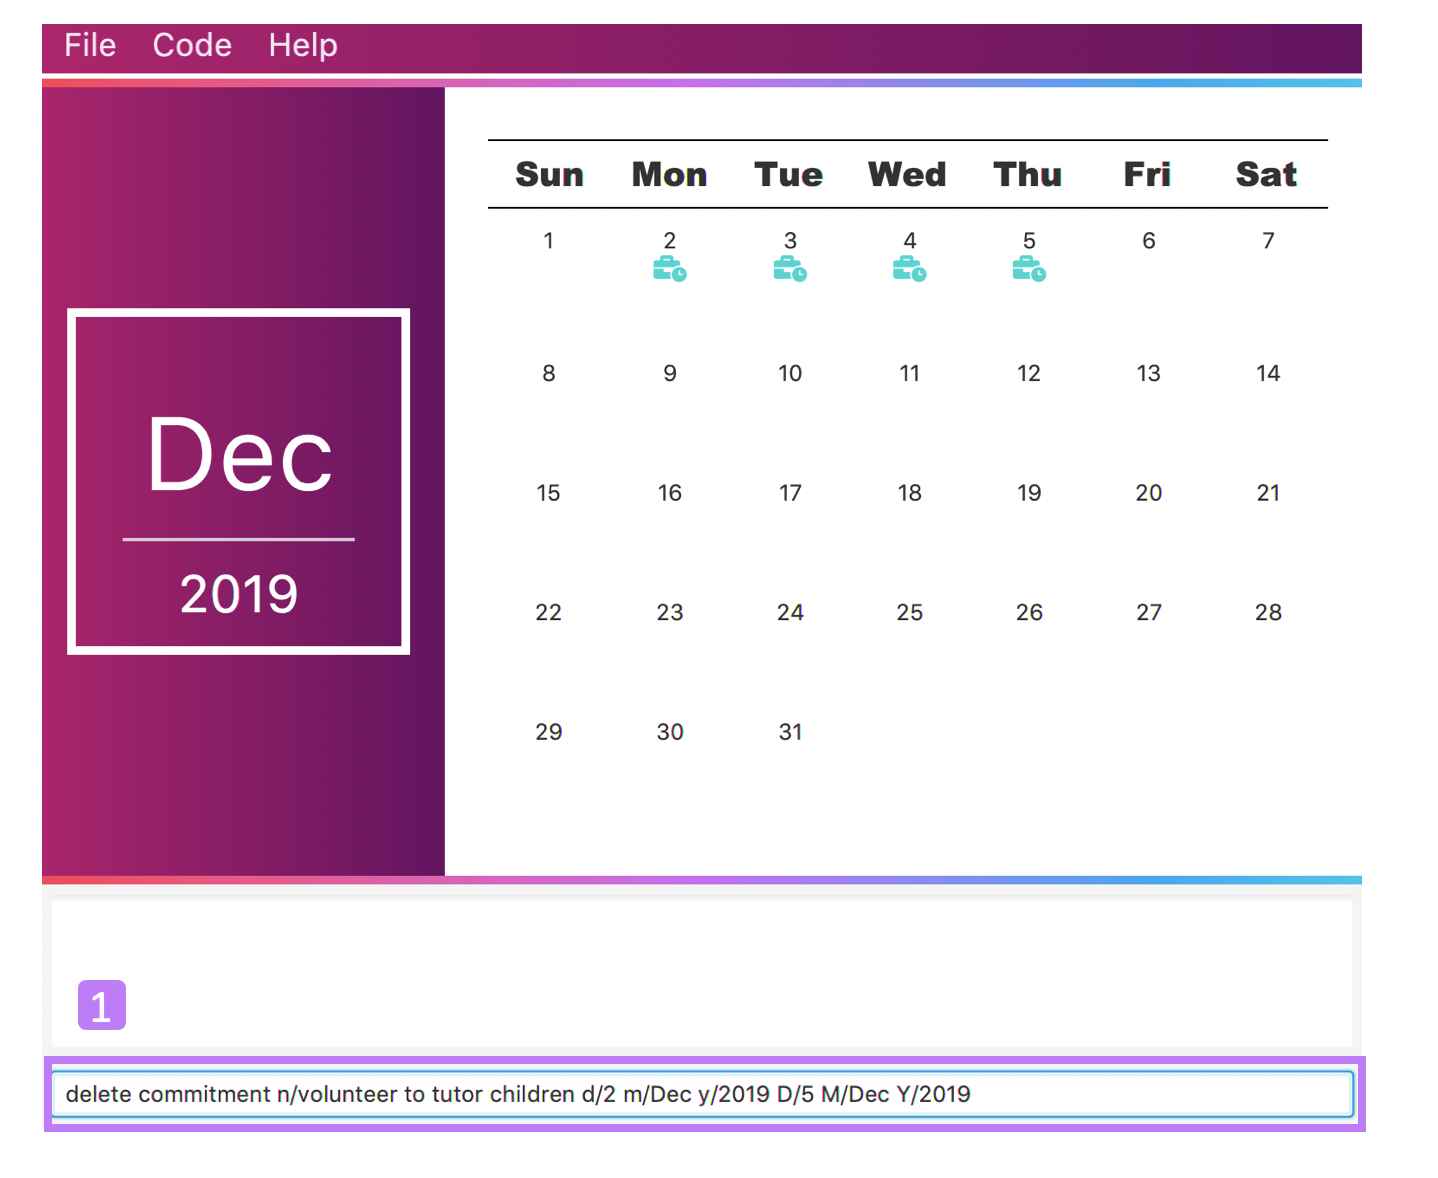
Step 2. The month and year panel will change to "December" and the relevant view will be shown.
Step 3. In the month view panel, you will be able to see that the commitment labels have been removed.
Step 4. The result box will also display a message to indicate that your commitment has been successfully deleted.
5.4. Showing your schedule for the month: show
After adding and deleting your events, you can have an overview of them!
How easy is it?
Format:
show m/MONTH [y/YEAR]
Example:
show m/Dec
Step by step:
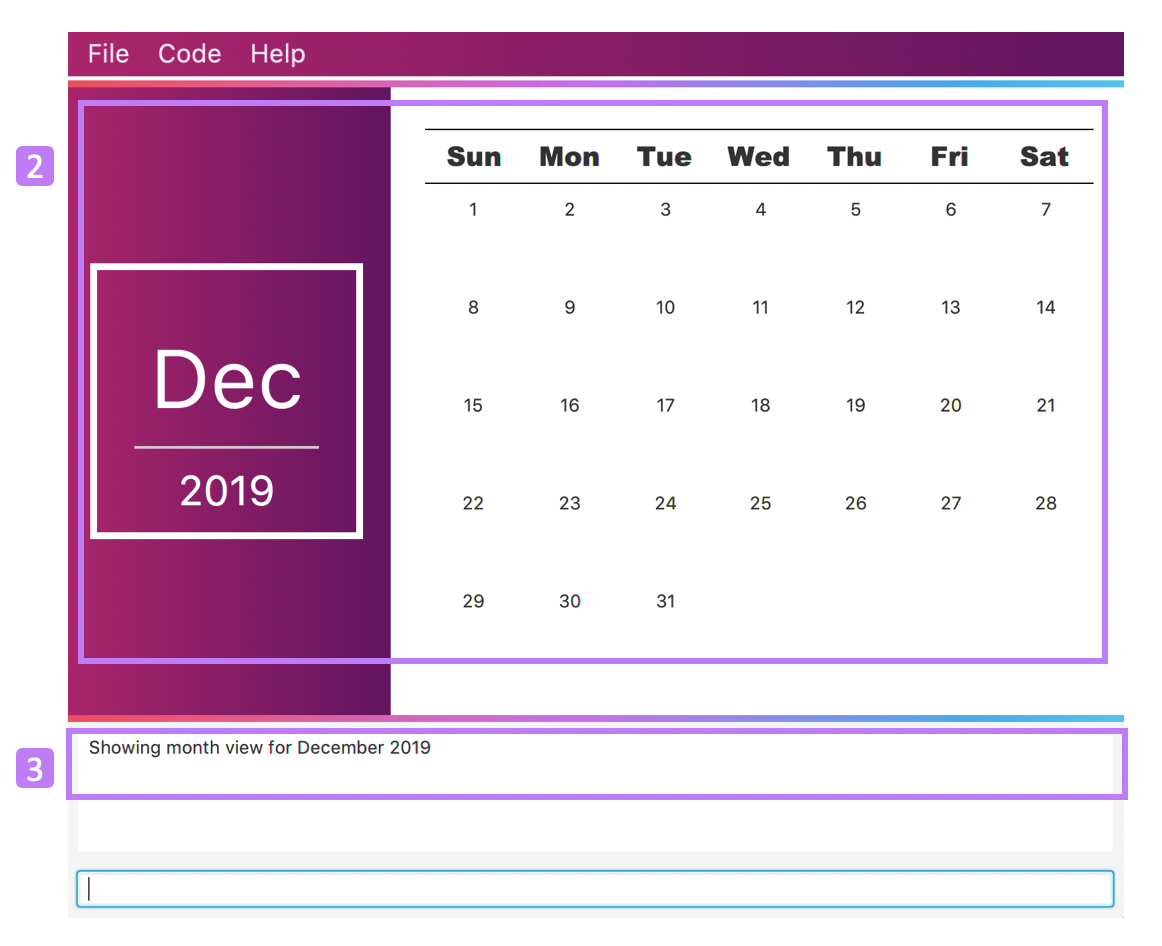
Step 1. Type show m/Dec in the command box and press Enter.
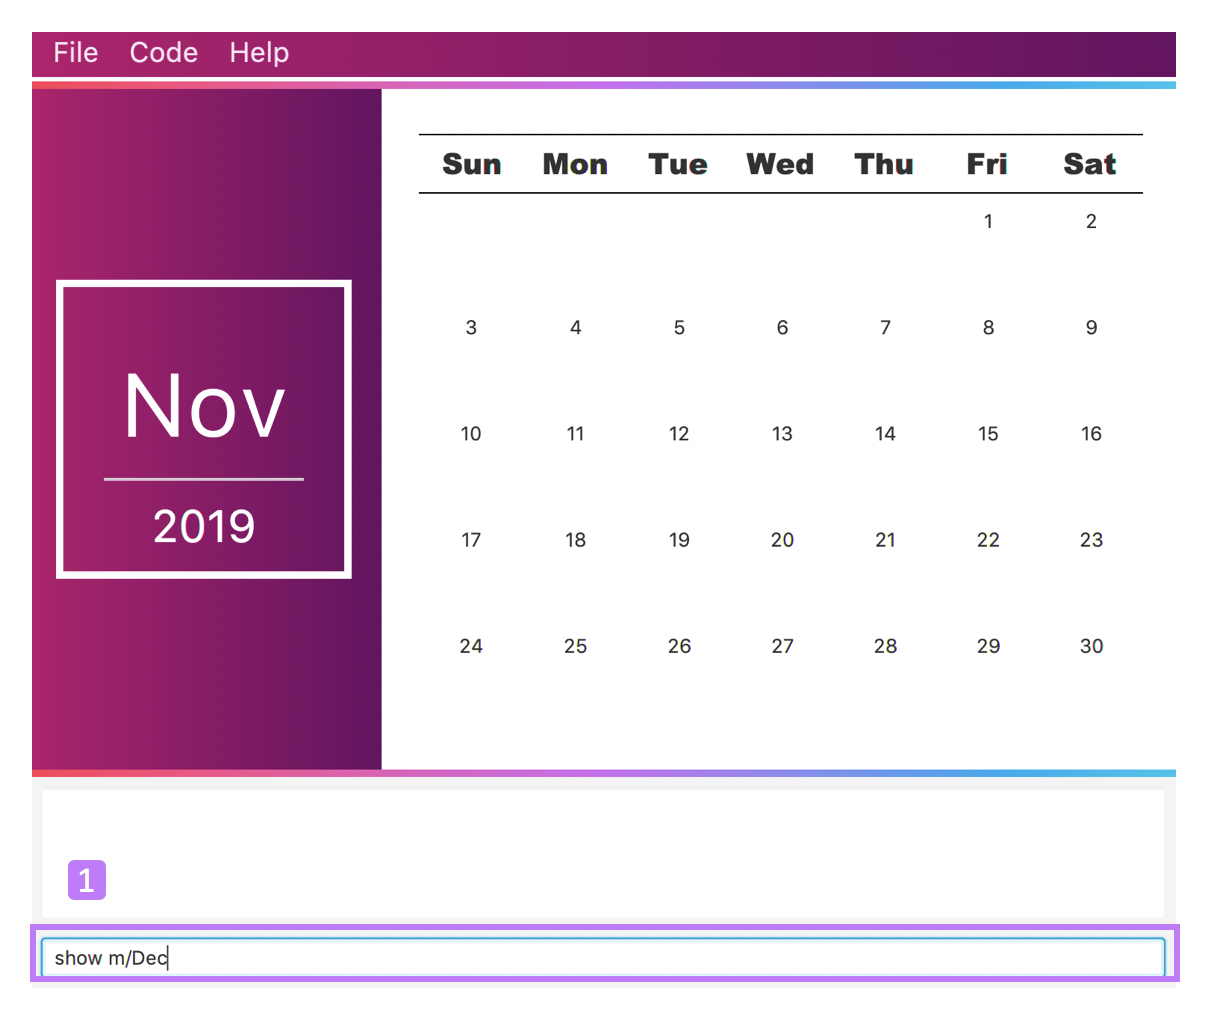
Step 2. The month and year panel and month view panel will change to show you your schedule for this December.
Step 3. The result box will also display a message to indicate that TravEzy is currently showing you your schedule for December.
| Do remember that if you leave out the year (as we have done in this example), the current year will be used. This applies to the following commands as well. |
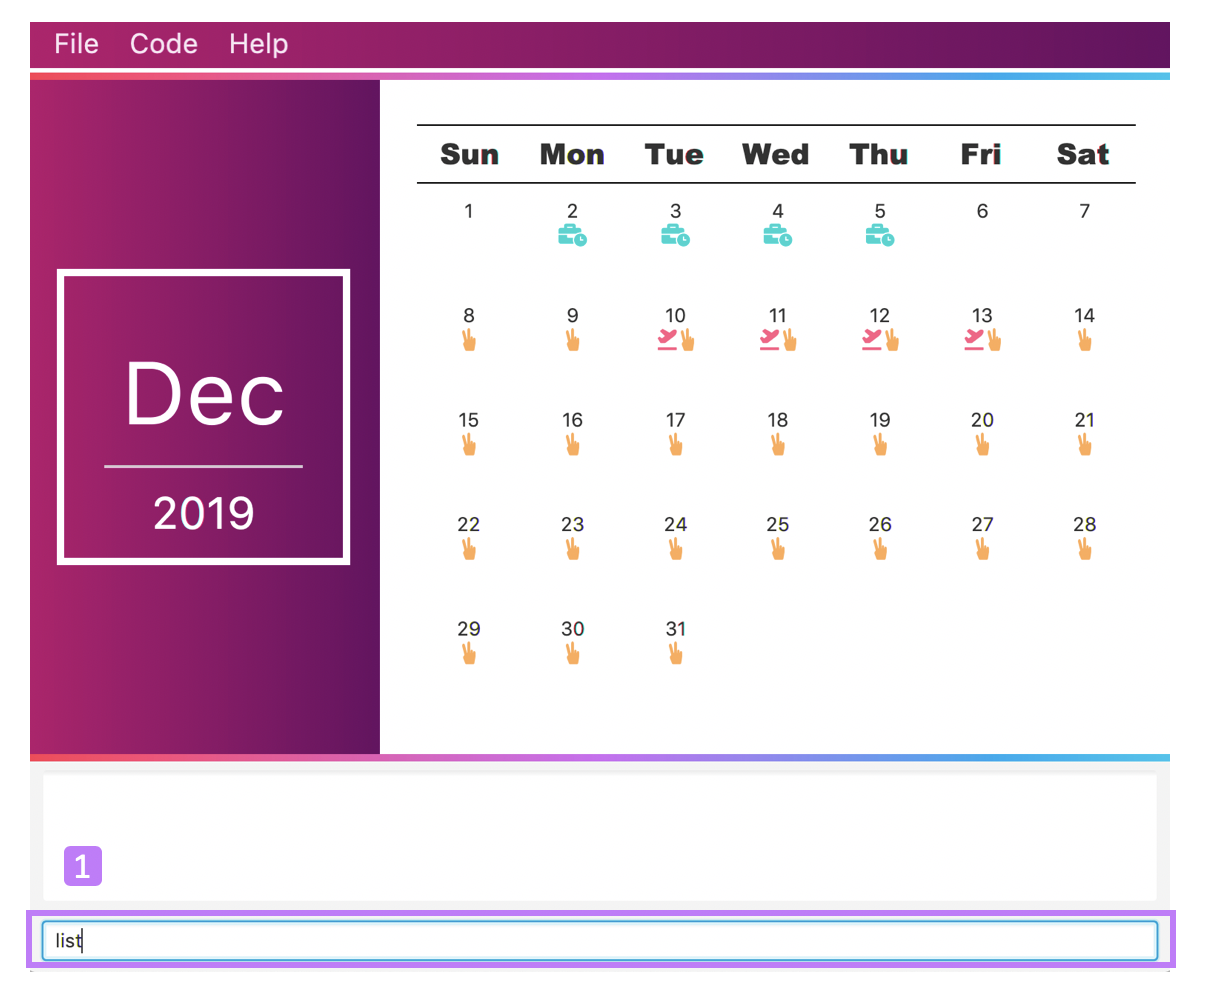
5.5. Listing your events: list
If you would like to view your events as a list instead, this command would be helpful!
Format:
list [d/START DAY] [m/START MONTH] [y/START YEAR] [D/END DAY] [M/END MONTH] [Y/END YEAR]
Examples:
Step by step:
Step 1. Type list in the command box and press Enter.
Step 2. A pop-up will appear to show you all your events.
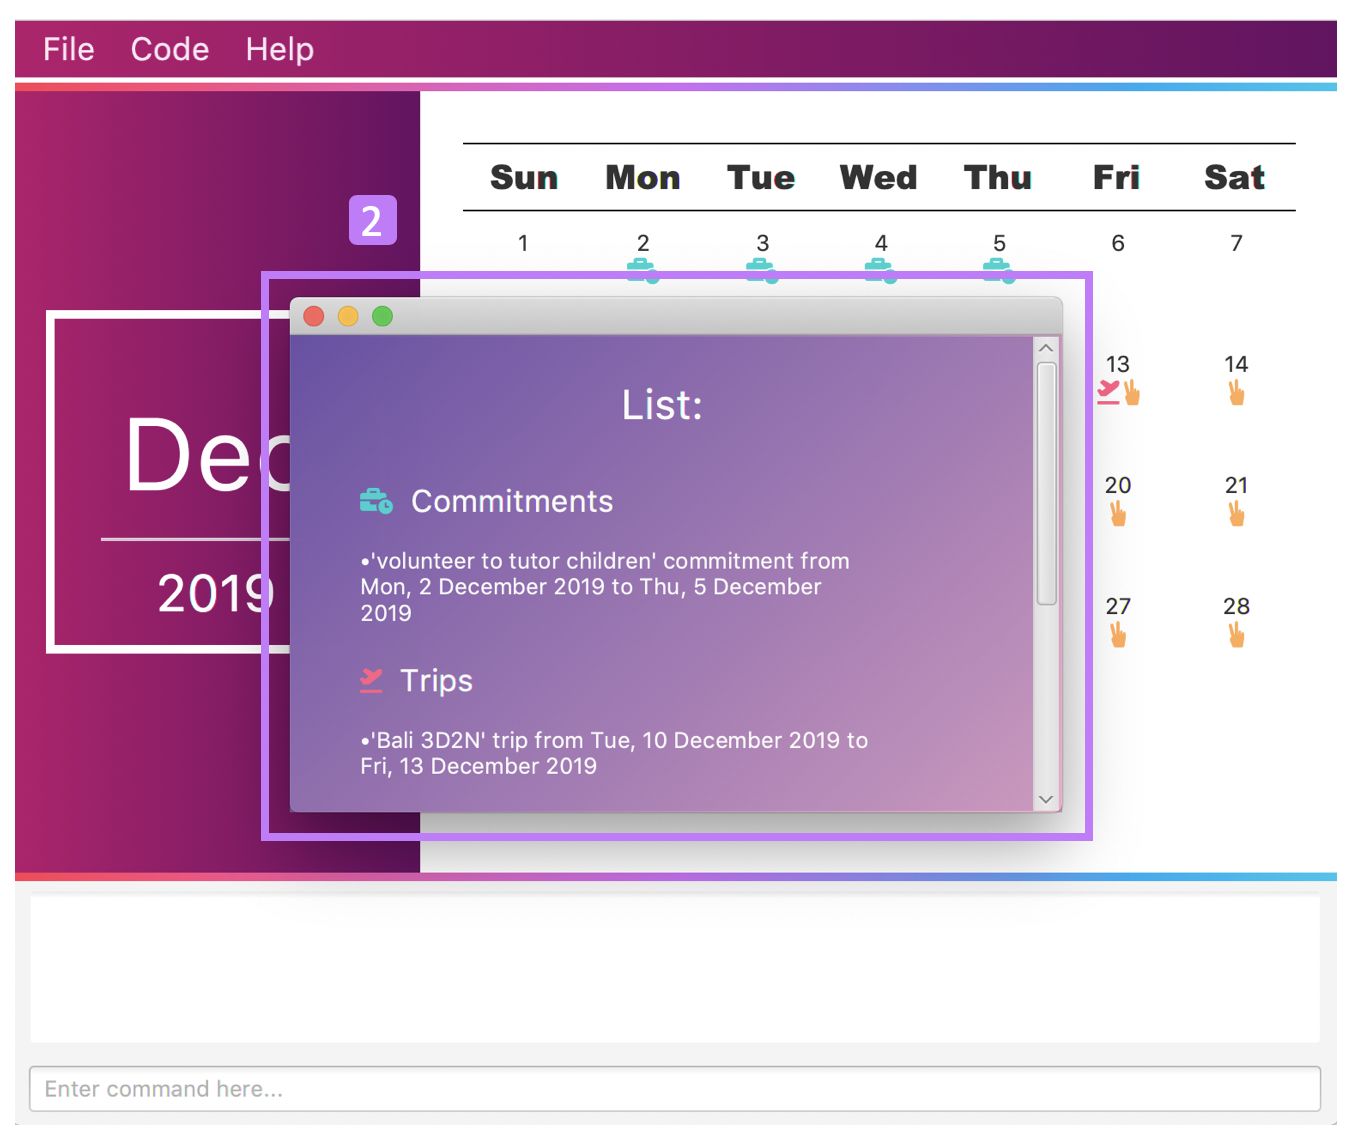
Step 3. When you click at a region outside of the pop-up, the pop-up will disappear. How neat is that?
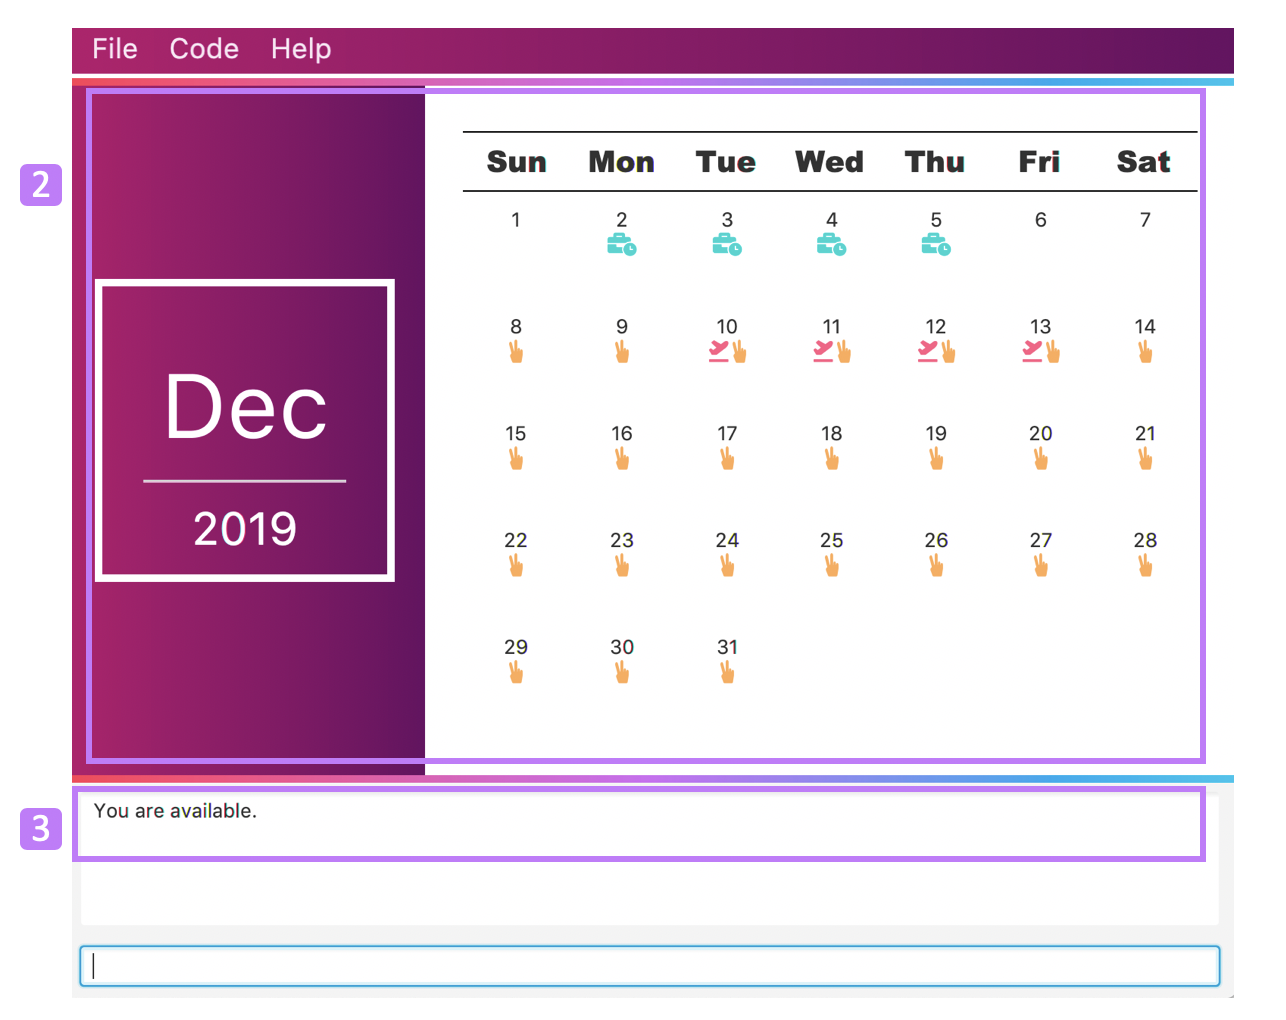
5.6. Checking your availability for a trip: check
Do you need to find out whether you are available to go for a trip? You can get TravEzy to find that out for you (i.e. when you happen to have a school break/holiday and do not have any commitment/trip).
Let’s find out how!
Format:
check d/START DAY [m/START MONTH] [y/START YEAR] [D/END DAY] [M/END MONTH] [Y/END YEAR]
Examples:
Step by step:
Step 1. Type check d/9 m/Dec y/2019 in the command box and press Enter.

Step 2. The month and year panel and month view panel will change to show you your schedule for this December.
Step 3. The result box will display a message to indicate whether you are available to travel during the specified time. If you happen to be free (like in this case), you may start booking your trip! 😀
5.7. Suggesting a suitable time for a trip: suggest
The end of the semester is near. It is time to look for some cheap flights🛫! However, before deciding which flight to book, you need to find out when you can travel. Need some help with that? No worries! TravEzy has got you covered. 😊
How so? Just ask TravEzy to suggest a suitable time!
Format:
suggest d/START DAY [m/START MONTH] [y/START YEAR] [D/END DAY] [M/END MONTH] [Y/END YEAR] [p/PERIOD]
Examples:
Step by step:
Step 1. Type suggest d/9 m/Dec y/2019 D/20 M/Dec Y/2019 in the command box and press Enter.
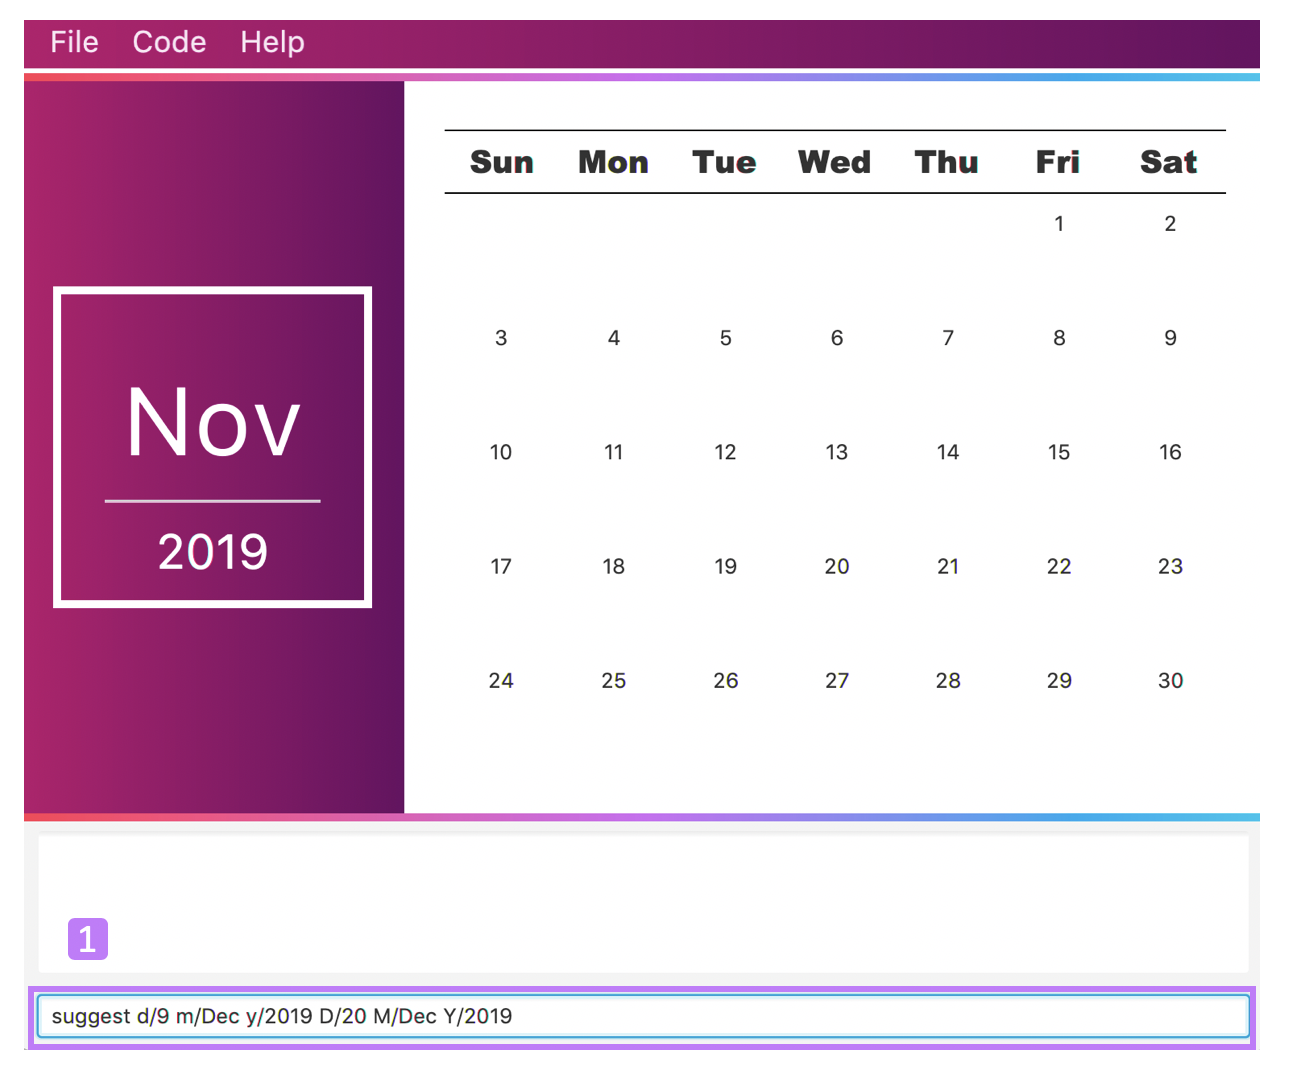
Step 2. The month and year panel and month view panel will change to show you your schedule for this December.
Step 3. The result box will display a message to indicate when you are able to travel during the specified time.
6. Itinerary
Now that you have booked your flight, it’s time to start planning your trip using TravEzy’s Itinerary.
In TravEzy, we have broken down your events into 6 key parts, namely Title, Date, Time, Location, Description and Tag.
For example, here is an Itinerary entry about our trip to Japan
-
Title → Visit Tokyo DisneySea
-
Date → 12122019
-
Time → 1000
-
Location → DisneySea
-
Description → Remember to take pictures with the Disney Mascots!
-
Tag → Priority: Critical
In the Itinerary, you will be able to add, delete, edit, list and show your entries. There are also a few more special tasks that you can do with your Itinerary. Read on to find out more! 😊
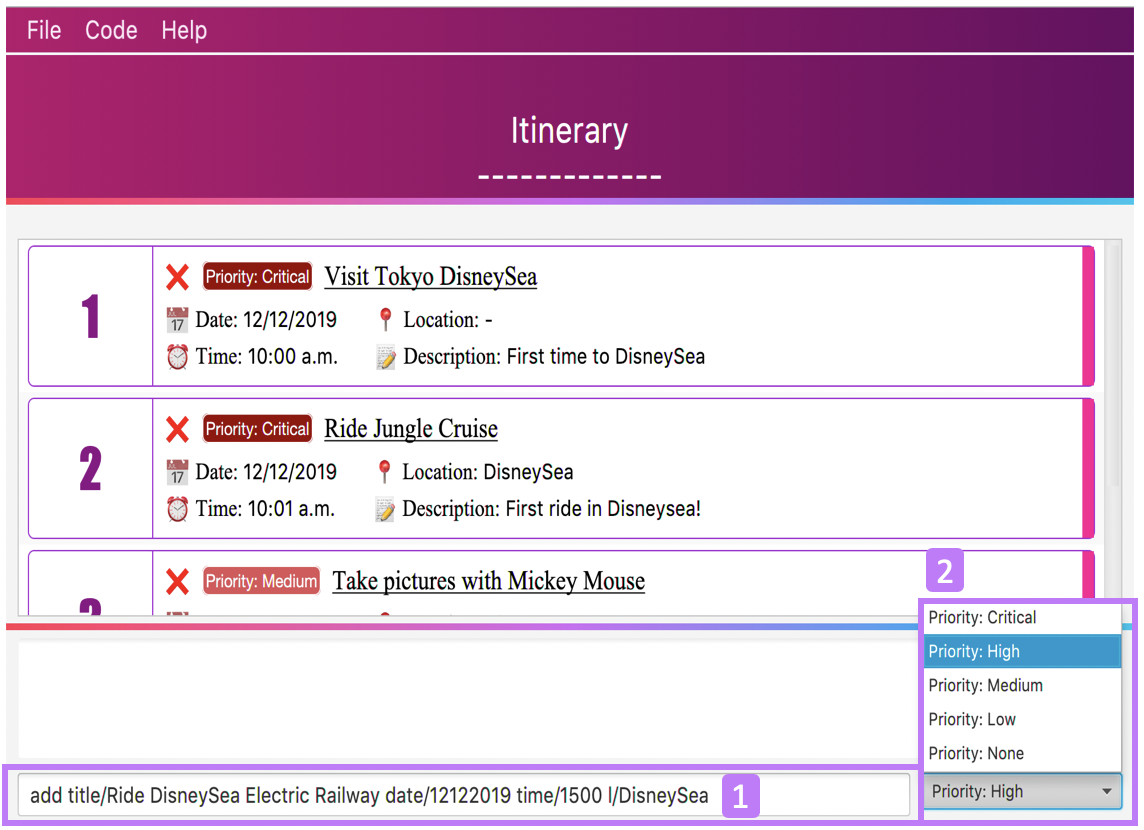
6.2. Adding an event: add
Planning to visit DisneySea tomorrow? Add some rides that you plan to take then! 🎢
Format:
add title/TITLE date/DATE time/TIME [l/LOCATION] [d/DESCRIPTION]
Example:
add title/Ride DisneySea Electric Railway date/12122019 time/1500 l/DisneySea
Step by step:
Step 1. Type add title/Ride DisneySea Electric Railway date/12122019 time/1500 l/DisneySea in the command box.
Step 2. Remember to prioritize your events using the Priority dropdown box, to one of the 5 different priorities:
-
Priority: None
-
Priority: Low
-
Priority: Medium
-
Priority: High
-
Priority: Critical
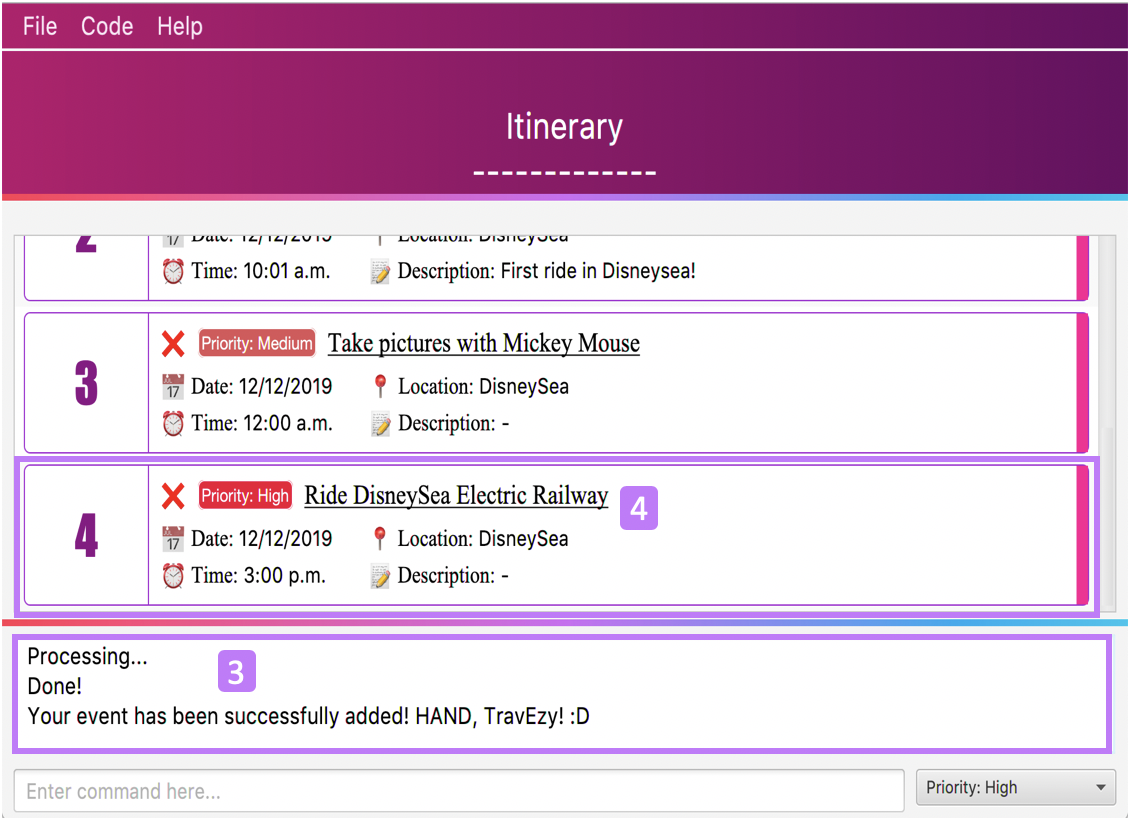
After selecting the priority for the event, press Enter.
Step 3. The result box will display the message "Processing… Done! Your event has been successfully added! HAND, TravEzy! :D"
Step 4. Now you can find your added event in the the event list.
6.3. Deleting an event: delete
Had a change in plan during your trip but have already keyed in the event into TravEzy’s Itinerary? Don’t worry you can always remove it from the event list.
Read on to find out more!
Format:
delete INDEX
Example:
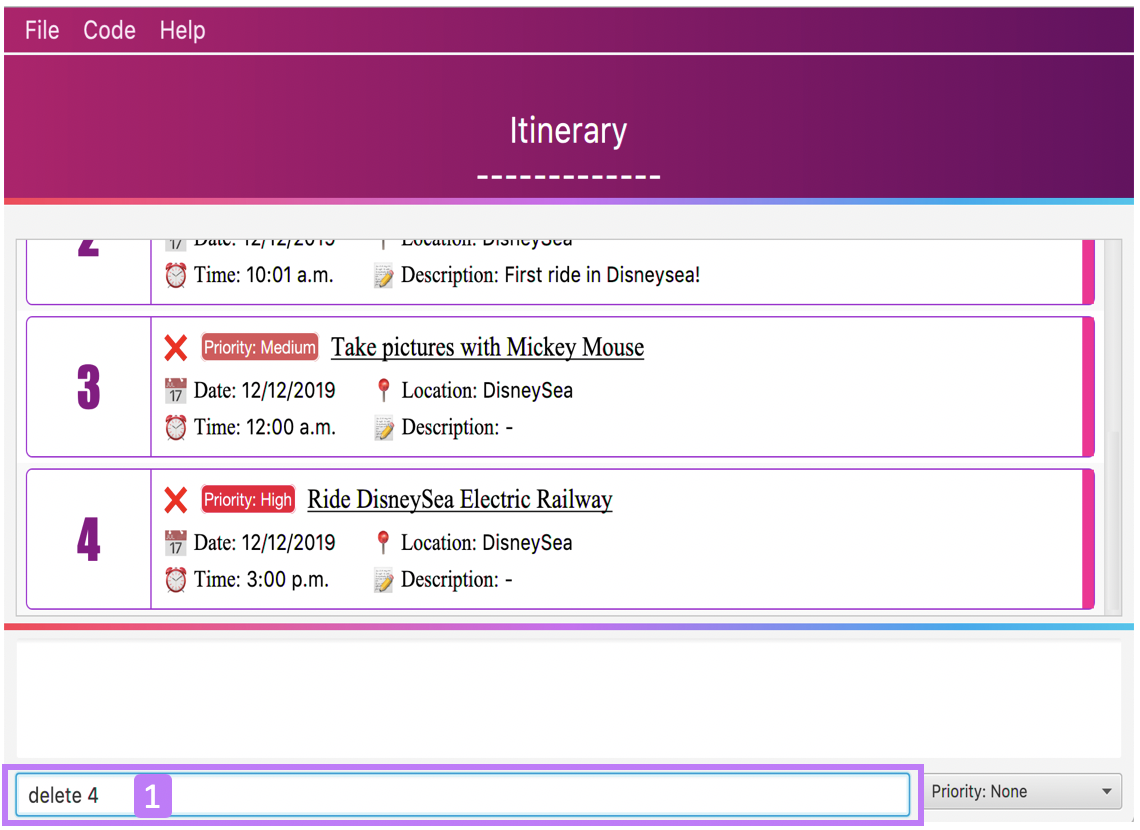
delete 4
Step by step:
Step 1. Type delete 4 in the command box and press Enter.
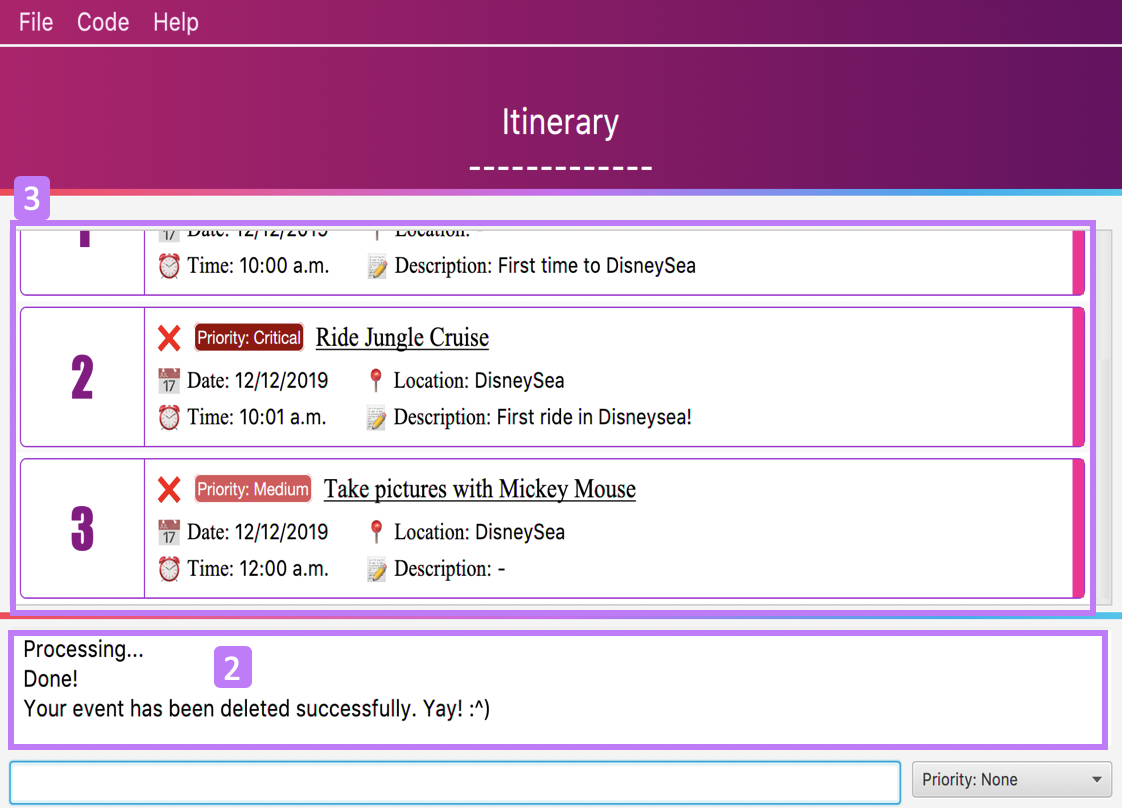
Step 2. The result box will display the message "Processing… Done! Your event has been deleted successfully. Yay! :^)"
Step 3. The new event list will be shown with the specified event being removed.
6.4. Editing an event: edit
Rather than deleting an event when you have a change of plans, why not edit the details of the event instead?
Format:
edit INDEX [title/TITLE] [date/DATE] [time/TIME] [l/LOCATION] [d/DESCRIPTION] [tag/]
If you wish to edit the tag field in the event, indicate it with the prefix tag/ and use the Priority Dropdown Box
to select the new priority.
|
Example:
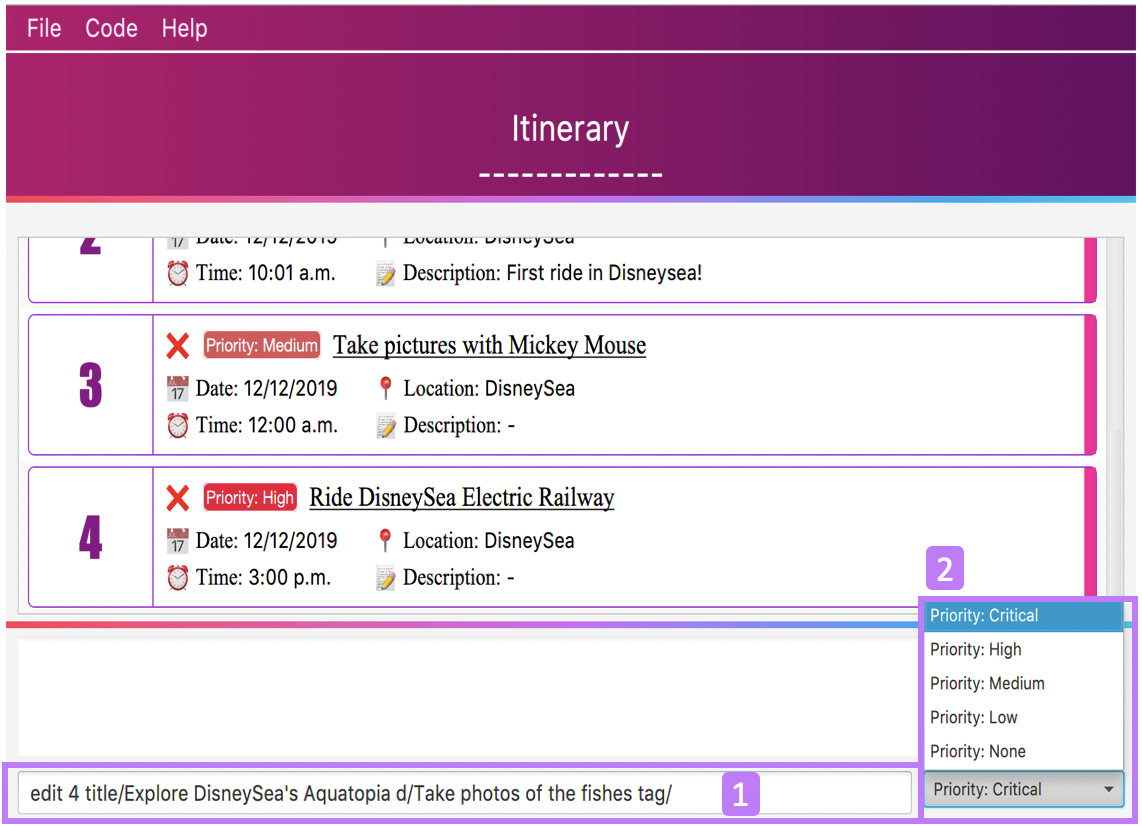
edit 4 title/Explore DisneySea's Aquatopia d/Take photos of the fishes tag/
Step by step:
Step 1. Type edit 4 title/Explore DisneySea’s Aquatopia d/Take photos of the fishes tag/ in the command box.
Step 2. If you indicate a change of the priority in the edit command using tag/, do remember to select the new priority using
the Priority Dropdown Box.
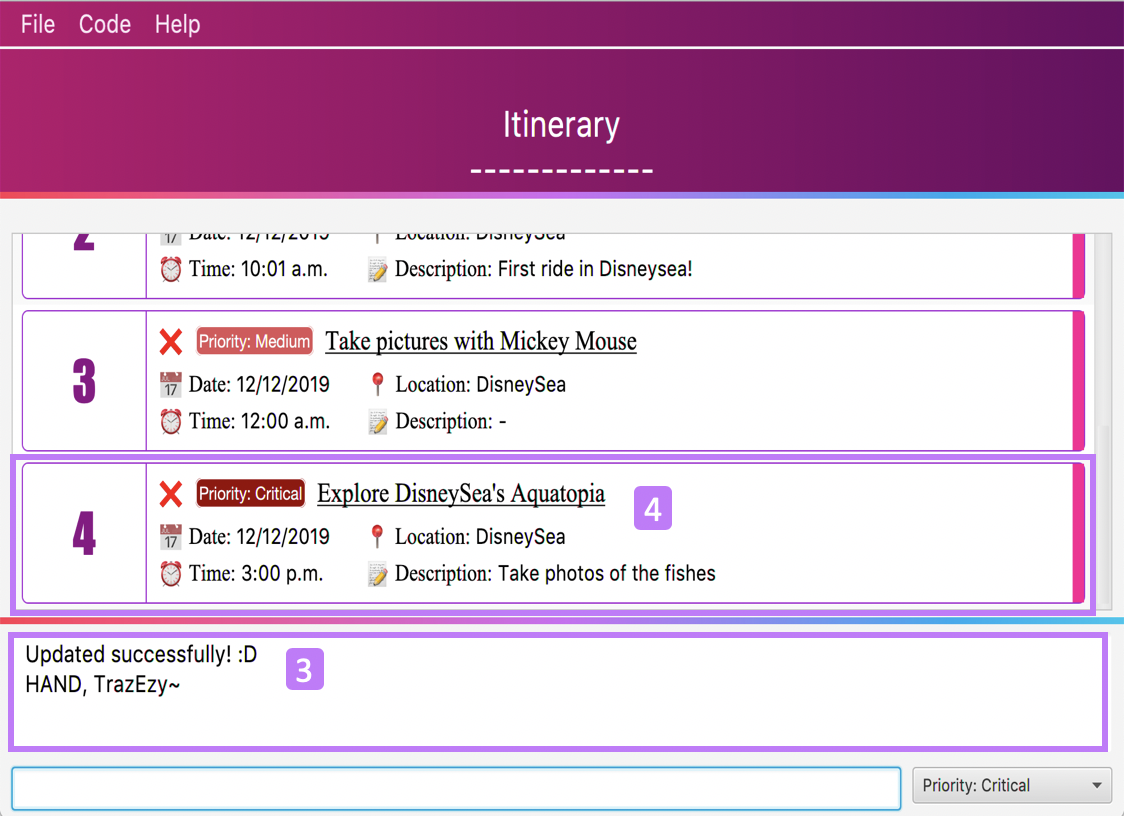
Step 3. The result box will display the message "Updated successfully! :D HAND, TrazEzy~"
Step 4. TravEzy’s Itinerary will showcase the new event list with the edited event.
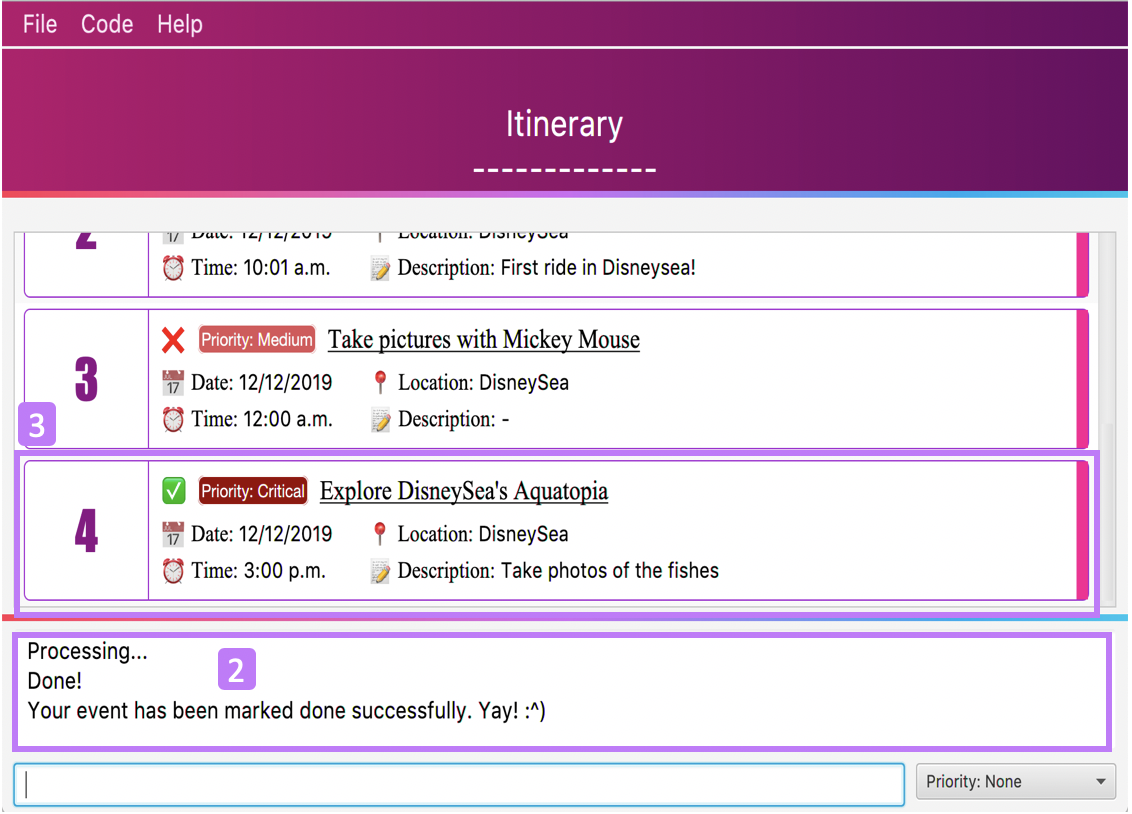
6.5. Checking a command as done: done
Impressive! After you have completed an event that you have planned for the day, TravEzy itinerary lets you check that event as done. ✅
Format:
done INDEX
Example:
done 4
Step by step:
Step 1. Type done 4 in the command box and press Enter.

Step 2. The result box will display the message "Processing… Done! Your event has been marked done successfully. Yay! :^)"
Step 3. In the event list, that event will be marked as done. Great Job! 👍
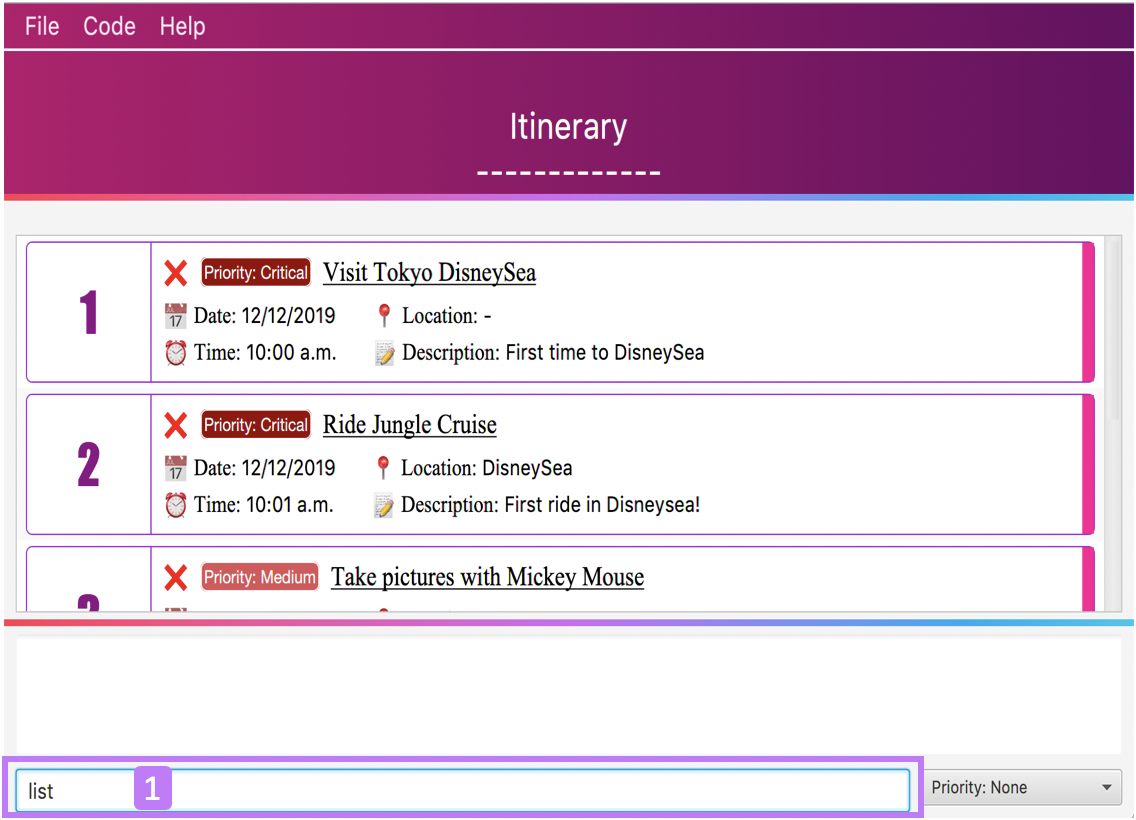
6.6. Listing all events: list
What if you want to see all your events in ONE, CONTINUOUS list? The Itinerary allows you to see everything in one, convenient list!
Format:
list
Step by step:
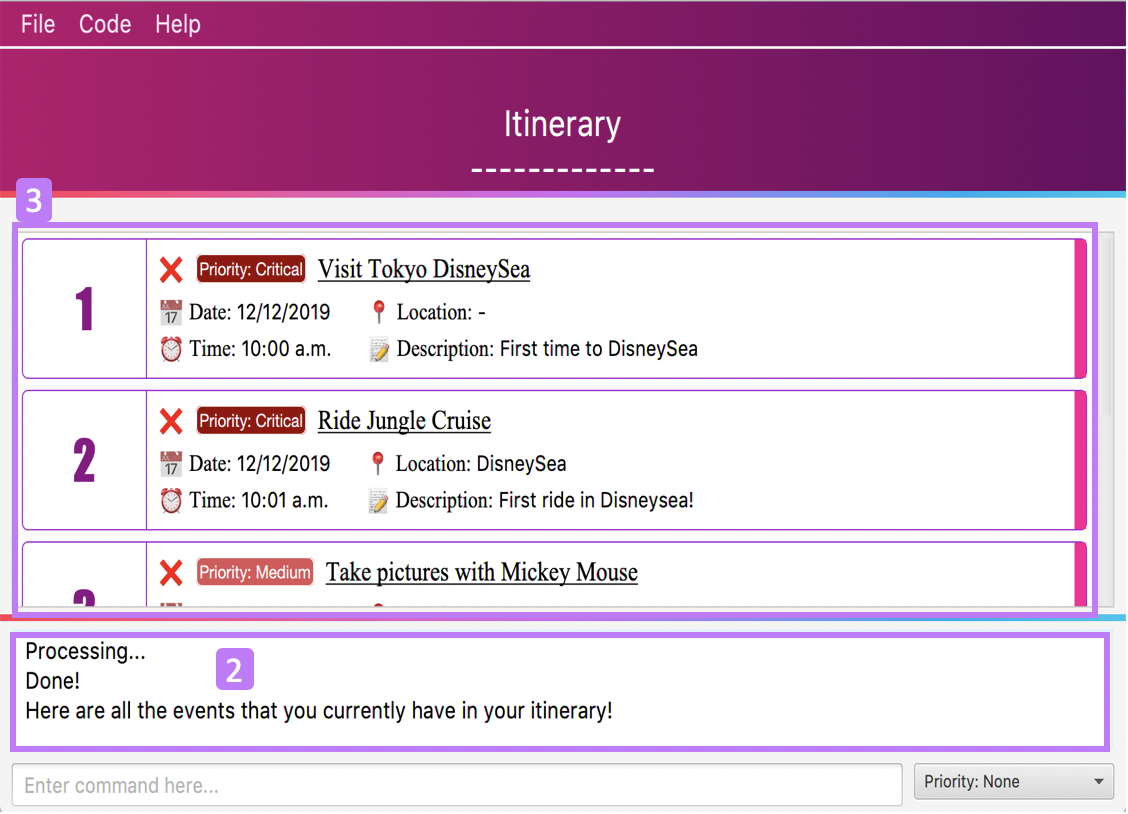
Step 1. Type list in the command box and press Enter.
Step 2. The result box will display the message "Processing… Done! Your event has been marked done successfully. Yay! :^)"
Step 3. A continuous event list will be shown with all the events in the Itinerary.
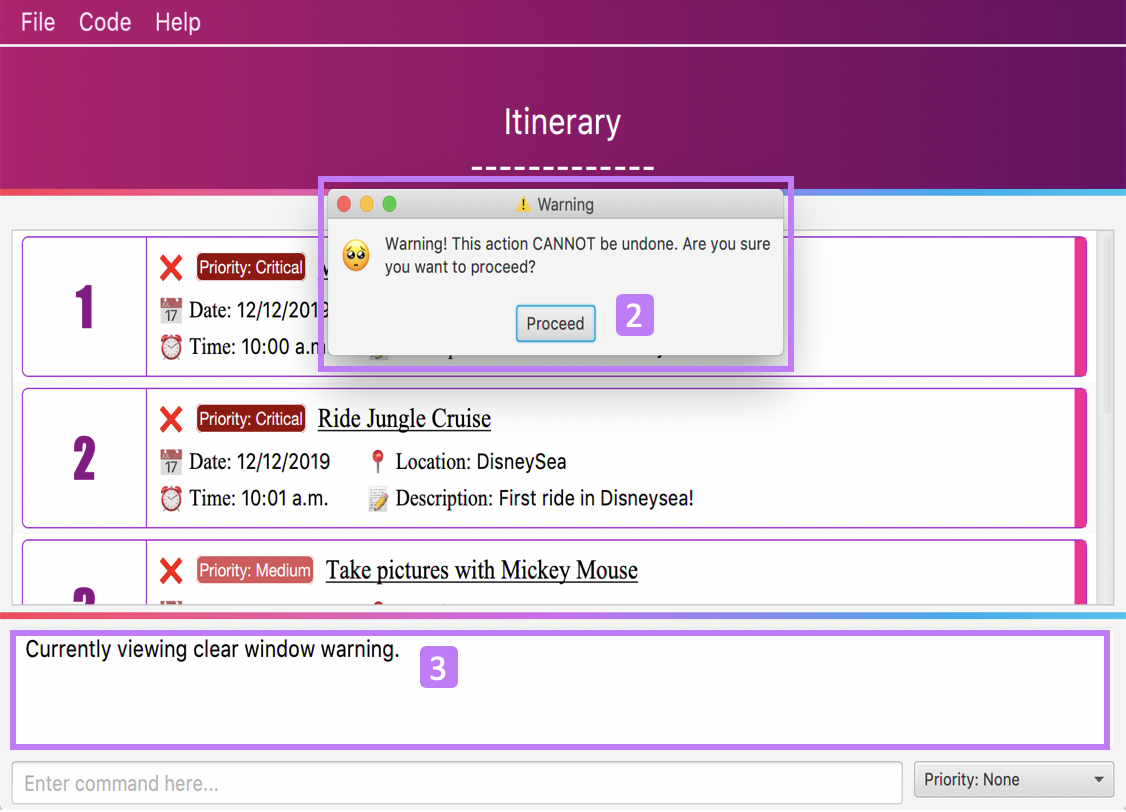
6.7. Clearing all entries: clear
After using TravEzy Itinerary for a long time, you might find that your Itinerary is cluttered with many past events. However, it might be a hassle to delete each events one by one.
Don’t worry, TravEzy’s Itinerary got you covered and allows you to clear the entire event list instead.
How convenient is that! 😄
| The clear function removes ALL the events that you have planned in your event list. This action CANNOT be undone. Hence, only click on the Proceed button if you are sure that you want to clear your event list. |
Format:
clear
Step by step:
Step 1. Type clear in the command box and press Enter.
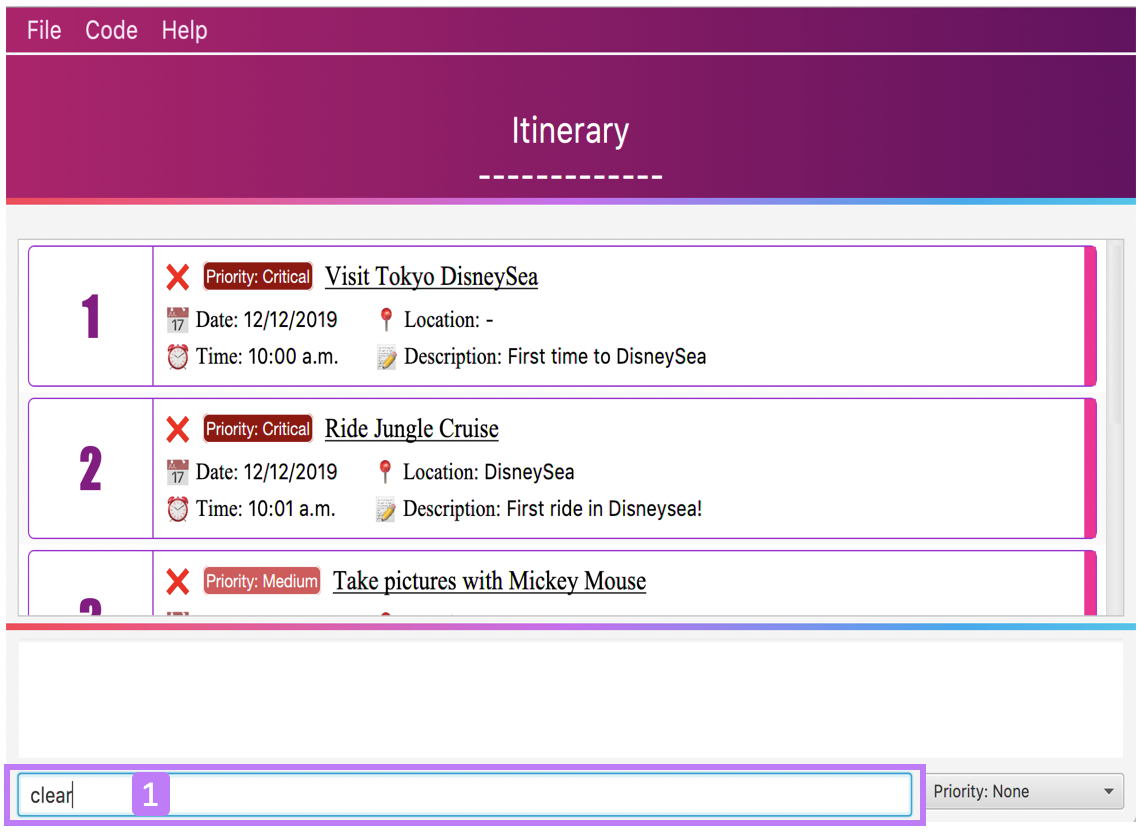
Step 2. A popup window will appear prompting whether you would like to Proceed in clearing all your events from the event list.
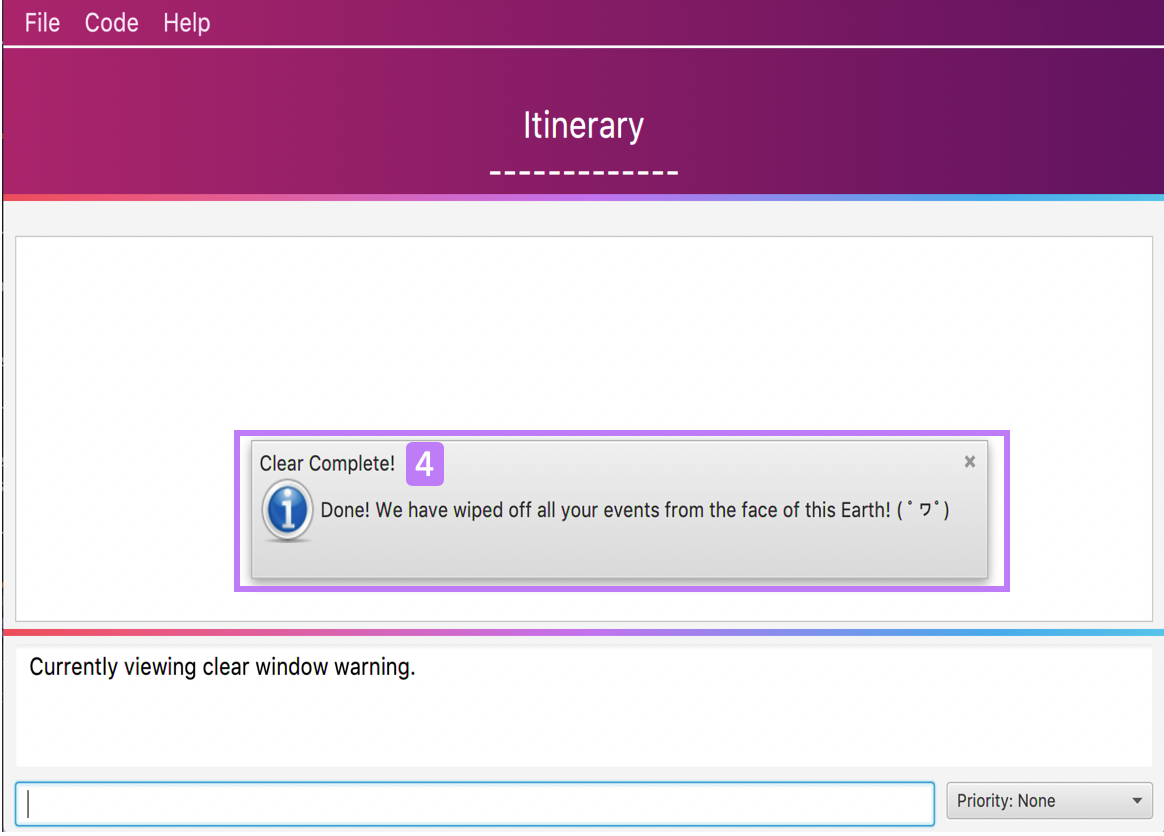
Step 3. The result box will display the message "Currently viewing clear window warning.".
Step 4. Upon selecting Proceed, a notification will be shown on the screen with the message, "Done! We have wiped off all your events from the face of this Earth! ( ゚ヮ゚)".
6.8. Greet TravEzy itinerary: greet
Start you day right by saying hello to TravEzy Itinerary and it will greet you back with the current time and date. TravEzy will also filter the event list to showcase events that are due today.
Format:
greet
Step by step:
Step 1. Type greet in the command box and press Enter.
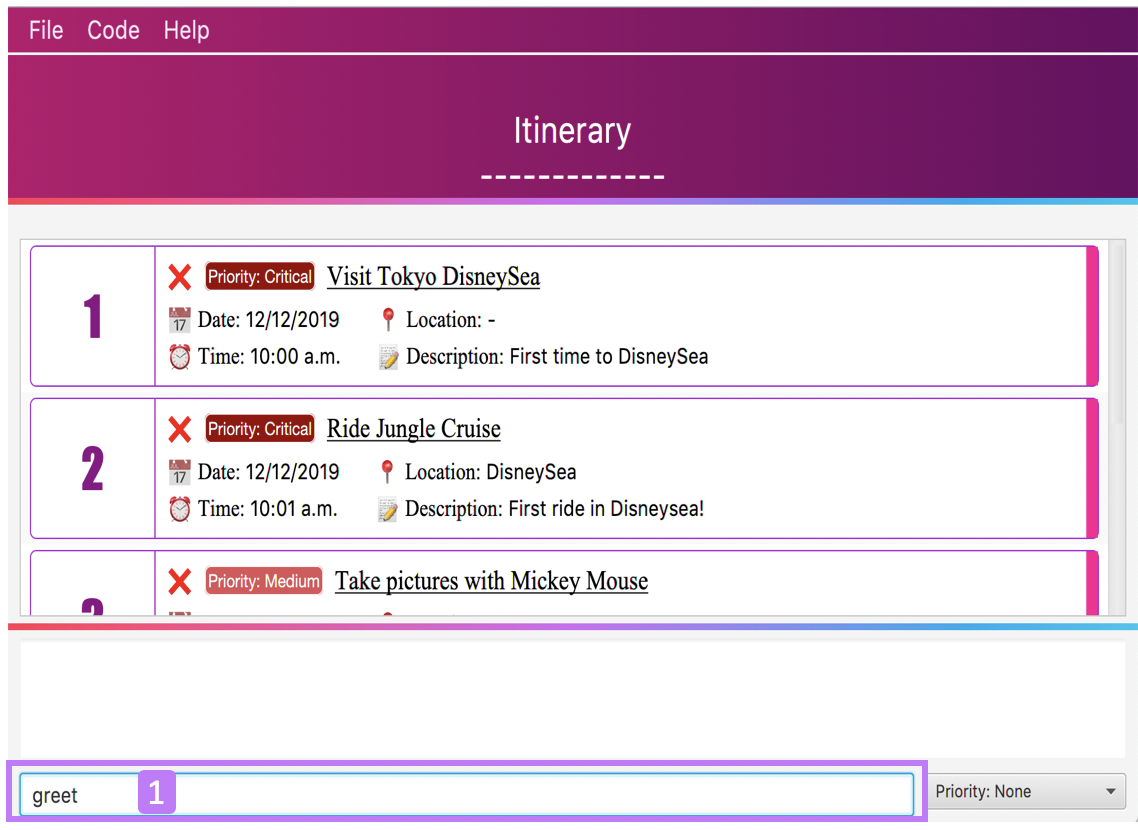
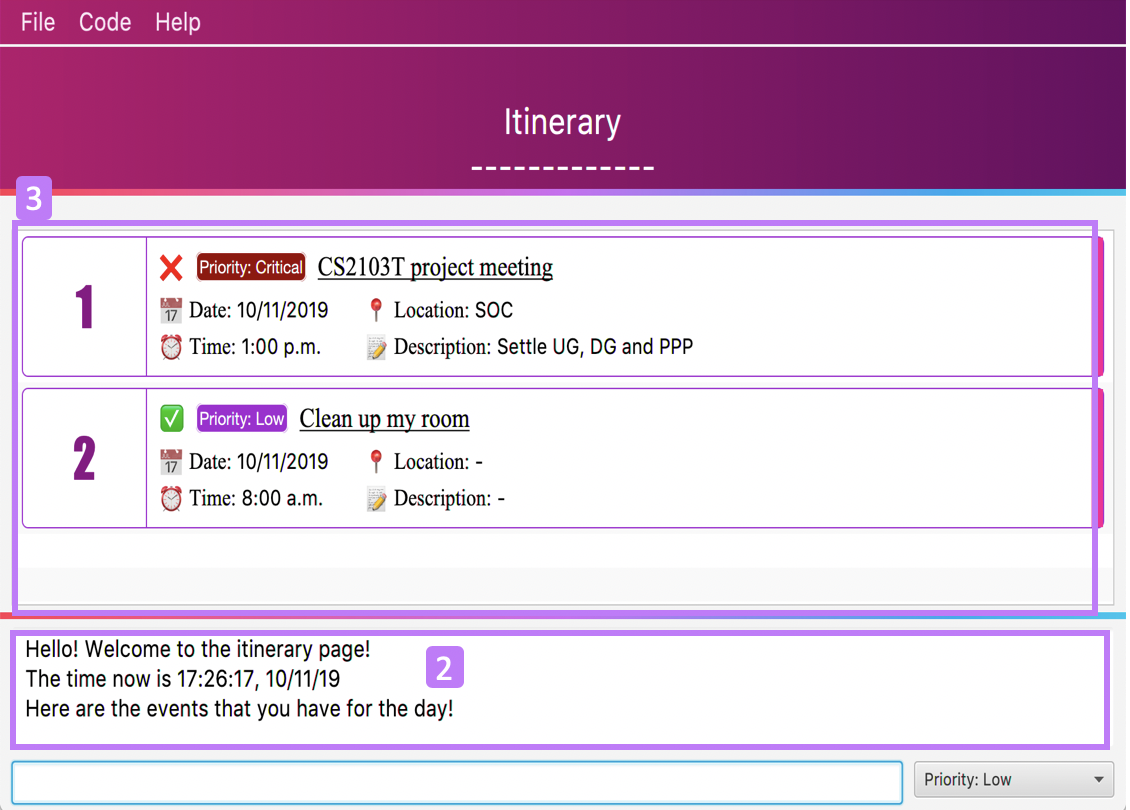
Step 2. The result box will display the message "Hello! Welcome to the itinerary page!" this will be followed by the current date and time.
Step 3. The event list in the Itinerary will only showcase events that are due for the day.
6.9. Showing past commands: history
Curious on what are the past commands that you have inputted during the current session? TravEzy will show you a list of your past commands for the Itinerary.
Let’s find out how!
Format:
history
Step by step:
Step 1. Type history in the command box and press Enter.
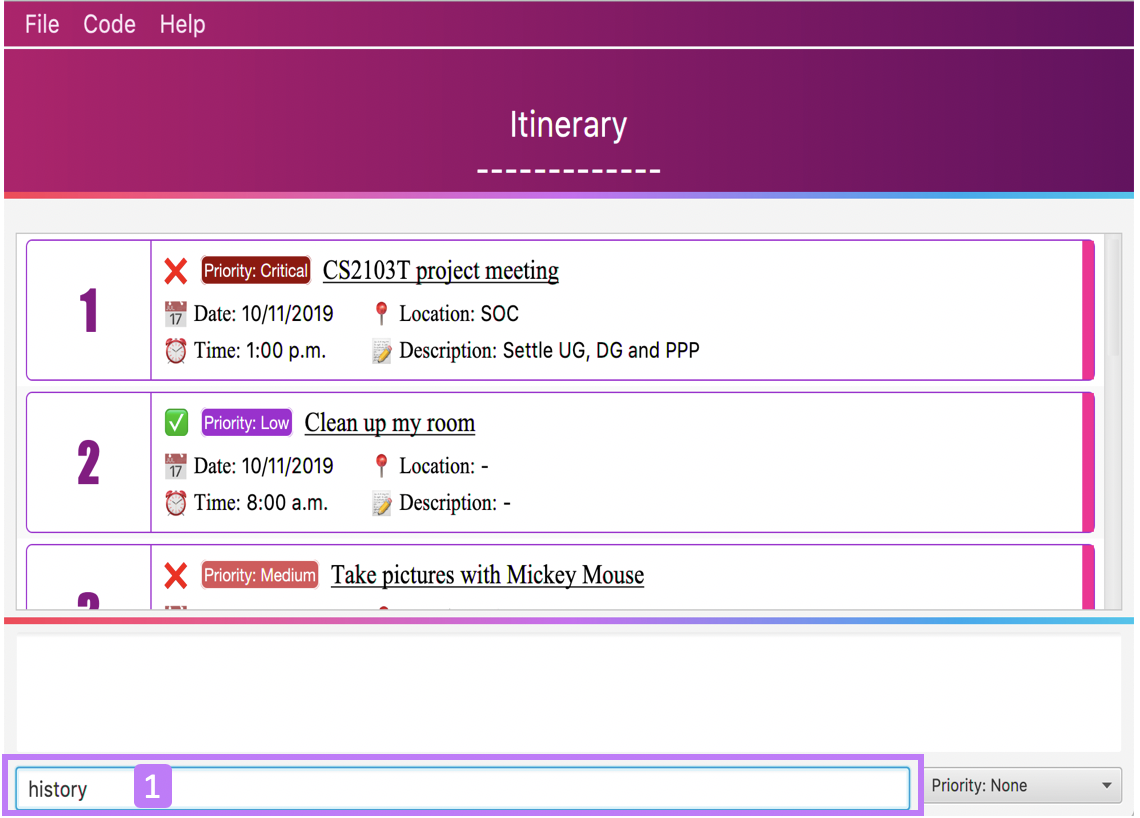
Step 2. The result box will display the message "Commands called for this session (Most recent → Earliest):" followed by the list of past commands that are being called in the Itinerary for that session.

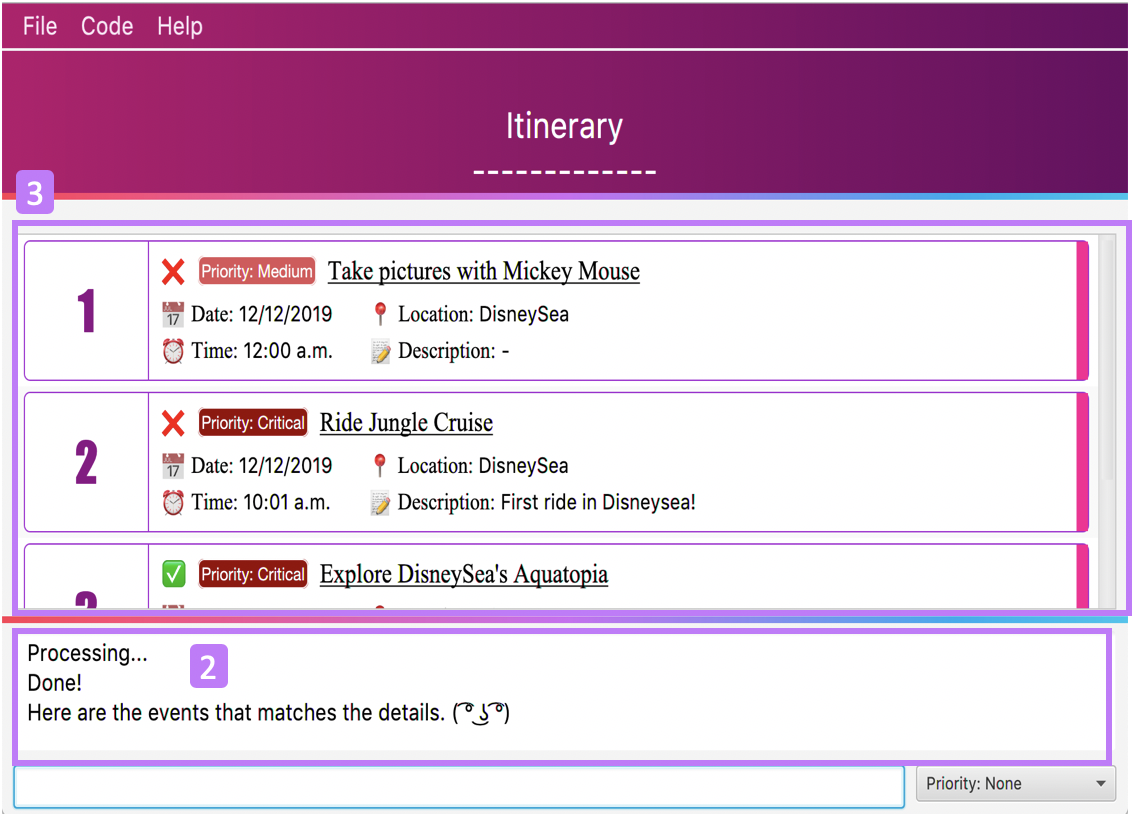
6.10. Searching for an event: search
Does your event list too many events to browse through? Let TravEzy Itinerary help you by searching for events that matches specific keywords. 😊
If your event list is too cluttered up, try using the clear command instead to reset the whole event list instead.
|
Format:
search SEARCH CONDITION
where SEARCH CONDITION can be any of the following: title/TITLE, date/DATE, time/TIME, l/LOCATION,
d/DESCRIPTION or tag/
Example:
search date/12122019 l/DisneySea
Step by step:
Step 1. Type search in the command box and press Enter.
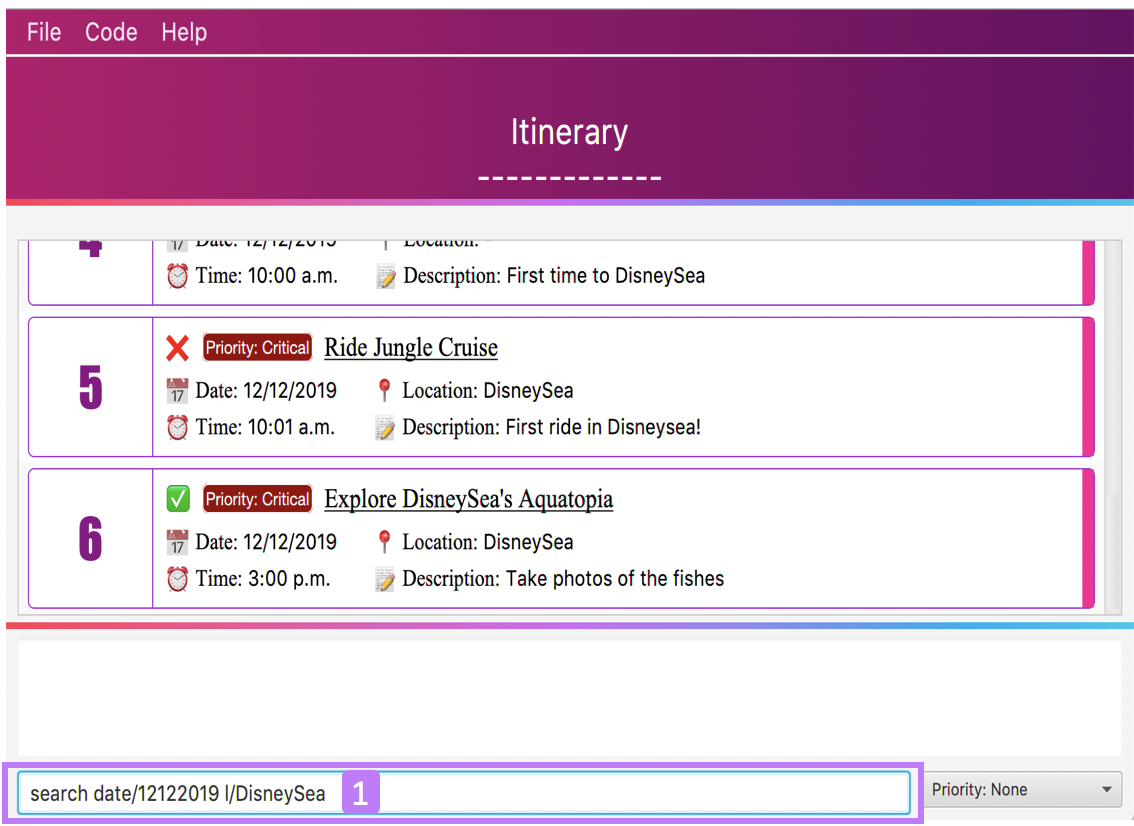
Step 2. The result box will display the message "Processing… Done! Here are the events that matches the details. ( ͡° ͜ʖ ͡°)"
Step 3. The filtered event list will be shown containing events that matches the keywords given.
6.11. Sorting the events: sort
Organizing your events in the event list has never been easier the Itinerary’s awesome sorting capabilities. 💯
Format:
sort by/SORT CONDITION
where SORT CONDITION can be any of the following: title, location, chronological, completion or
priority
Example:
sort by/priority
Step by step:
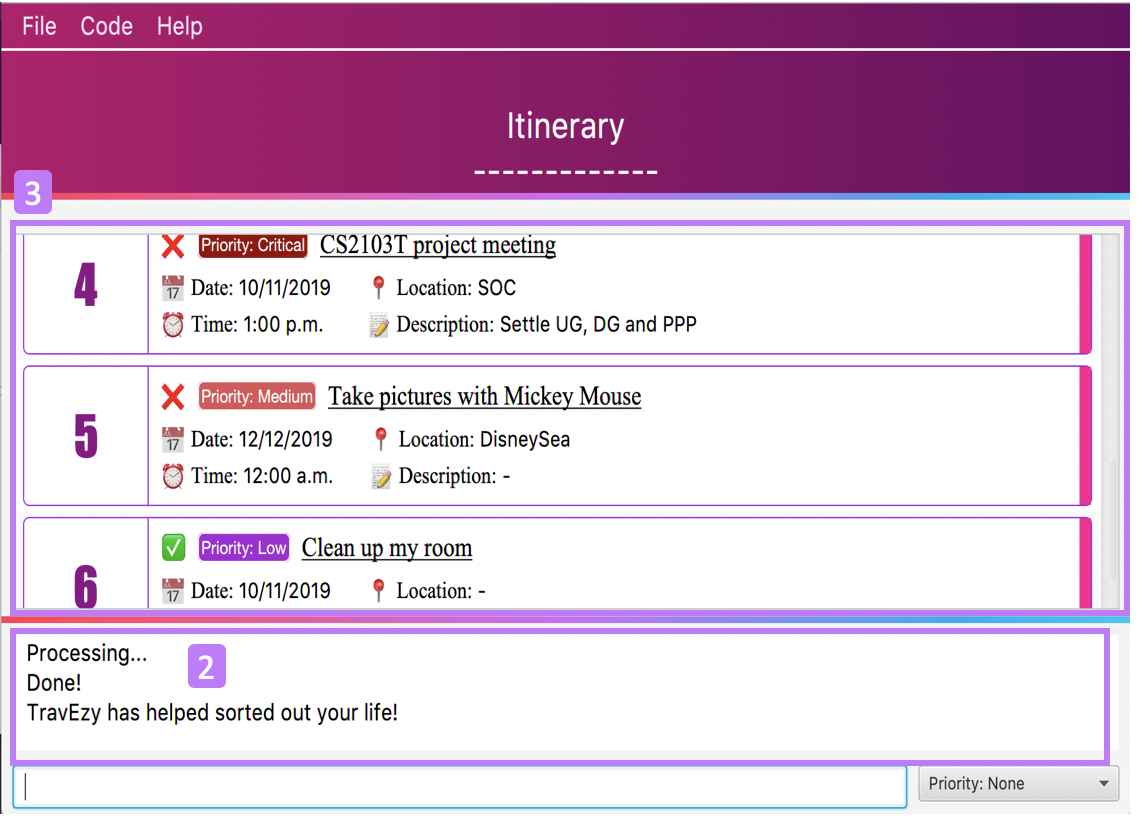
Step 1. Type sort by/priority in the command box and press Enter.
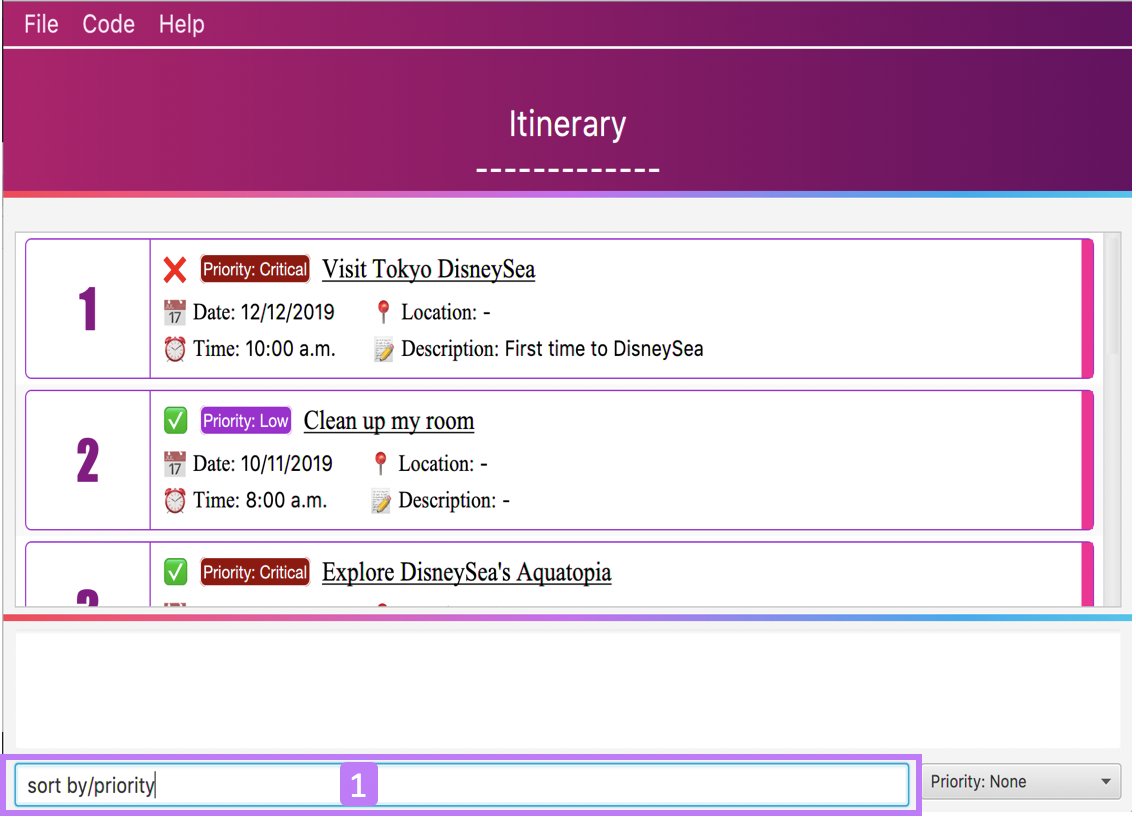
Step 2. The result box will display the message "Processing… Done! TravEzy has helped sorted out your life!"
Step 3. The Itinerary will present the sorted event list based on the sort condition given.
6.12. Auto-completion feature
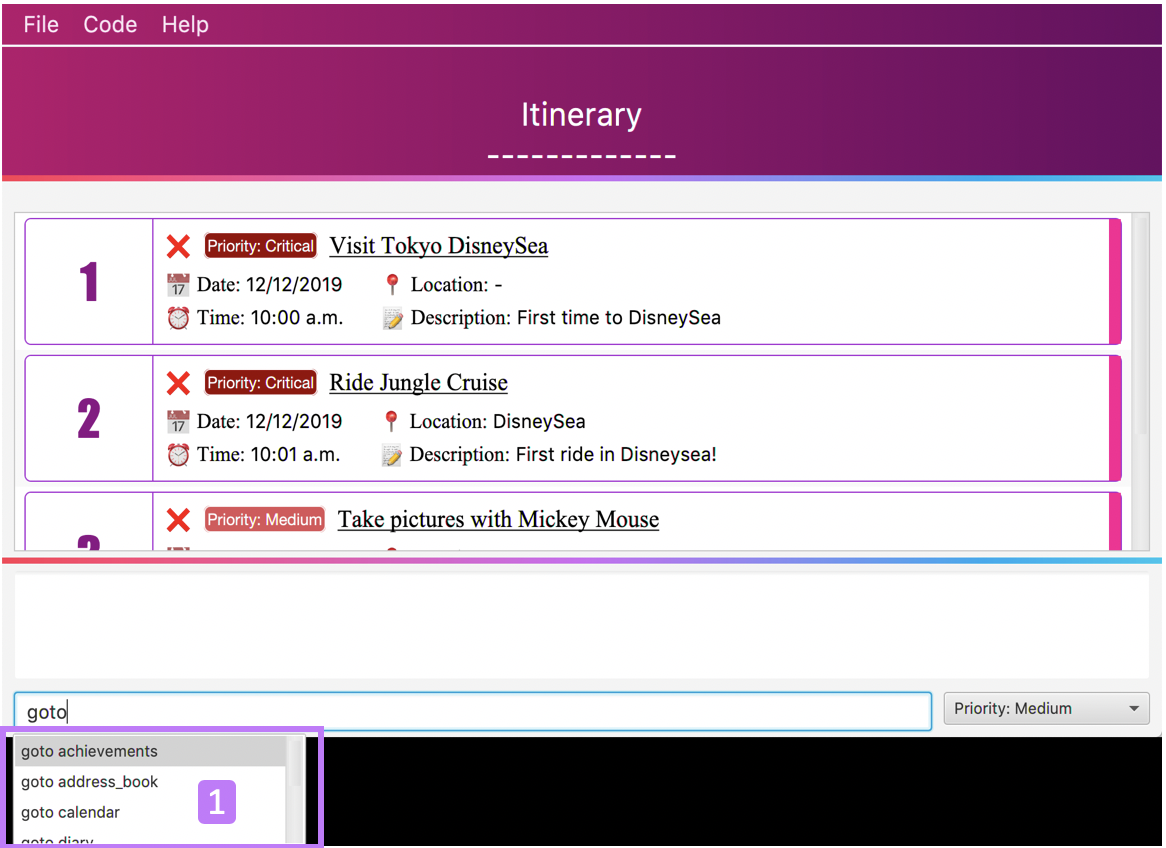
Don’t you wish there’s a way to quickly type all your commands. Well TravEzy’s Itinerary got you covered! TravEzy’s Itinerary command box has auto-completion function which offers suggestions based on your input.
This is how TravEzy’s Itinerary auto-complete looks like:
-
Auto-complete dropdown bar. Provides suggestions to complete your command base on your current input typed in the command box.
| The auto-complete dropdown bar requires some time to sync with the input typed in the command box. Hence, give some time for it to read the input before hitting Enter |
7. Address Book
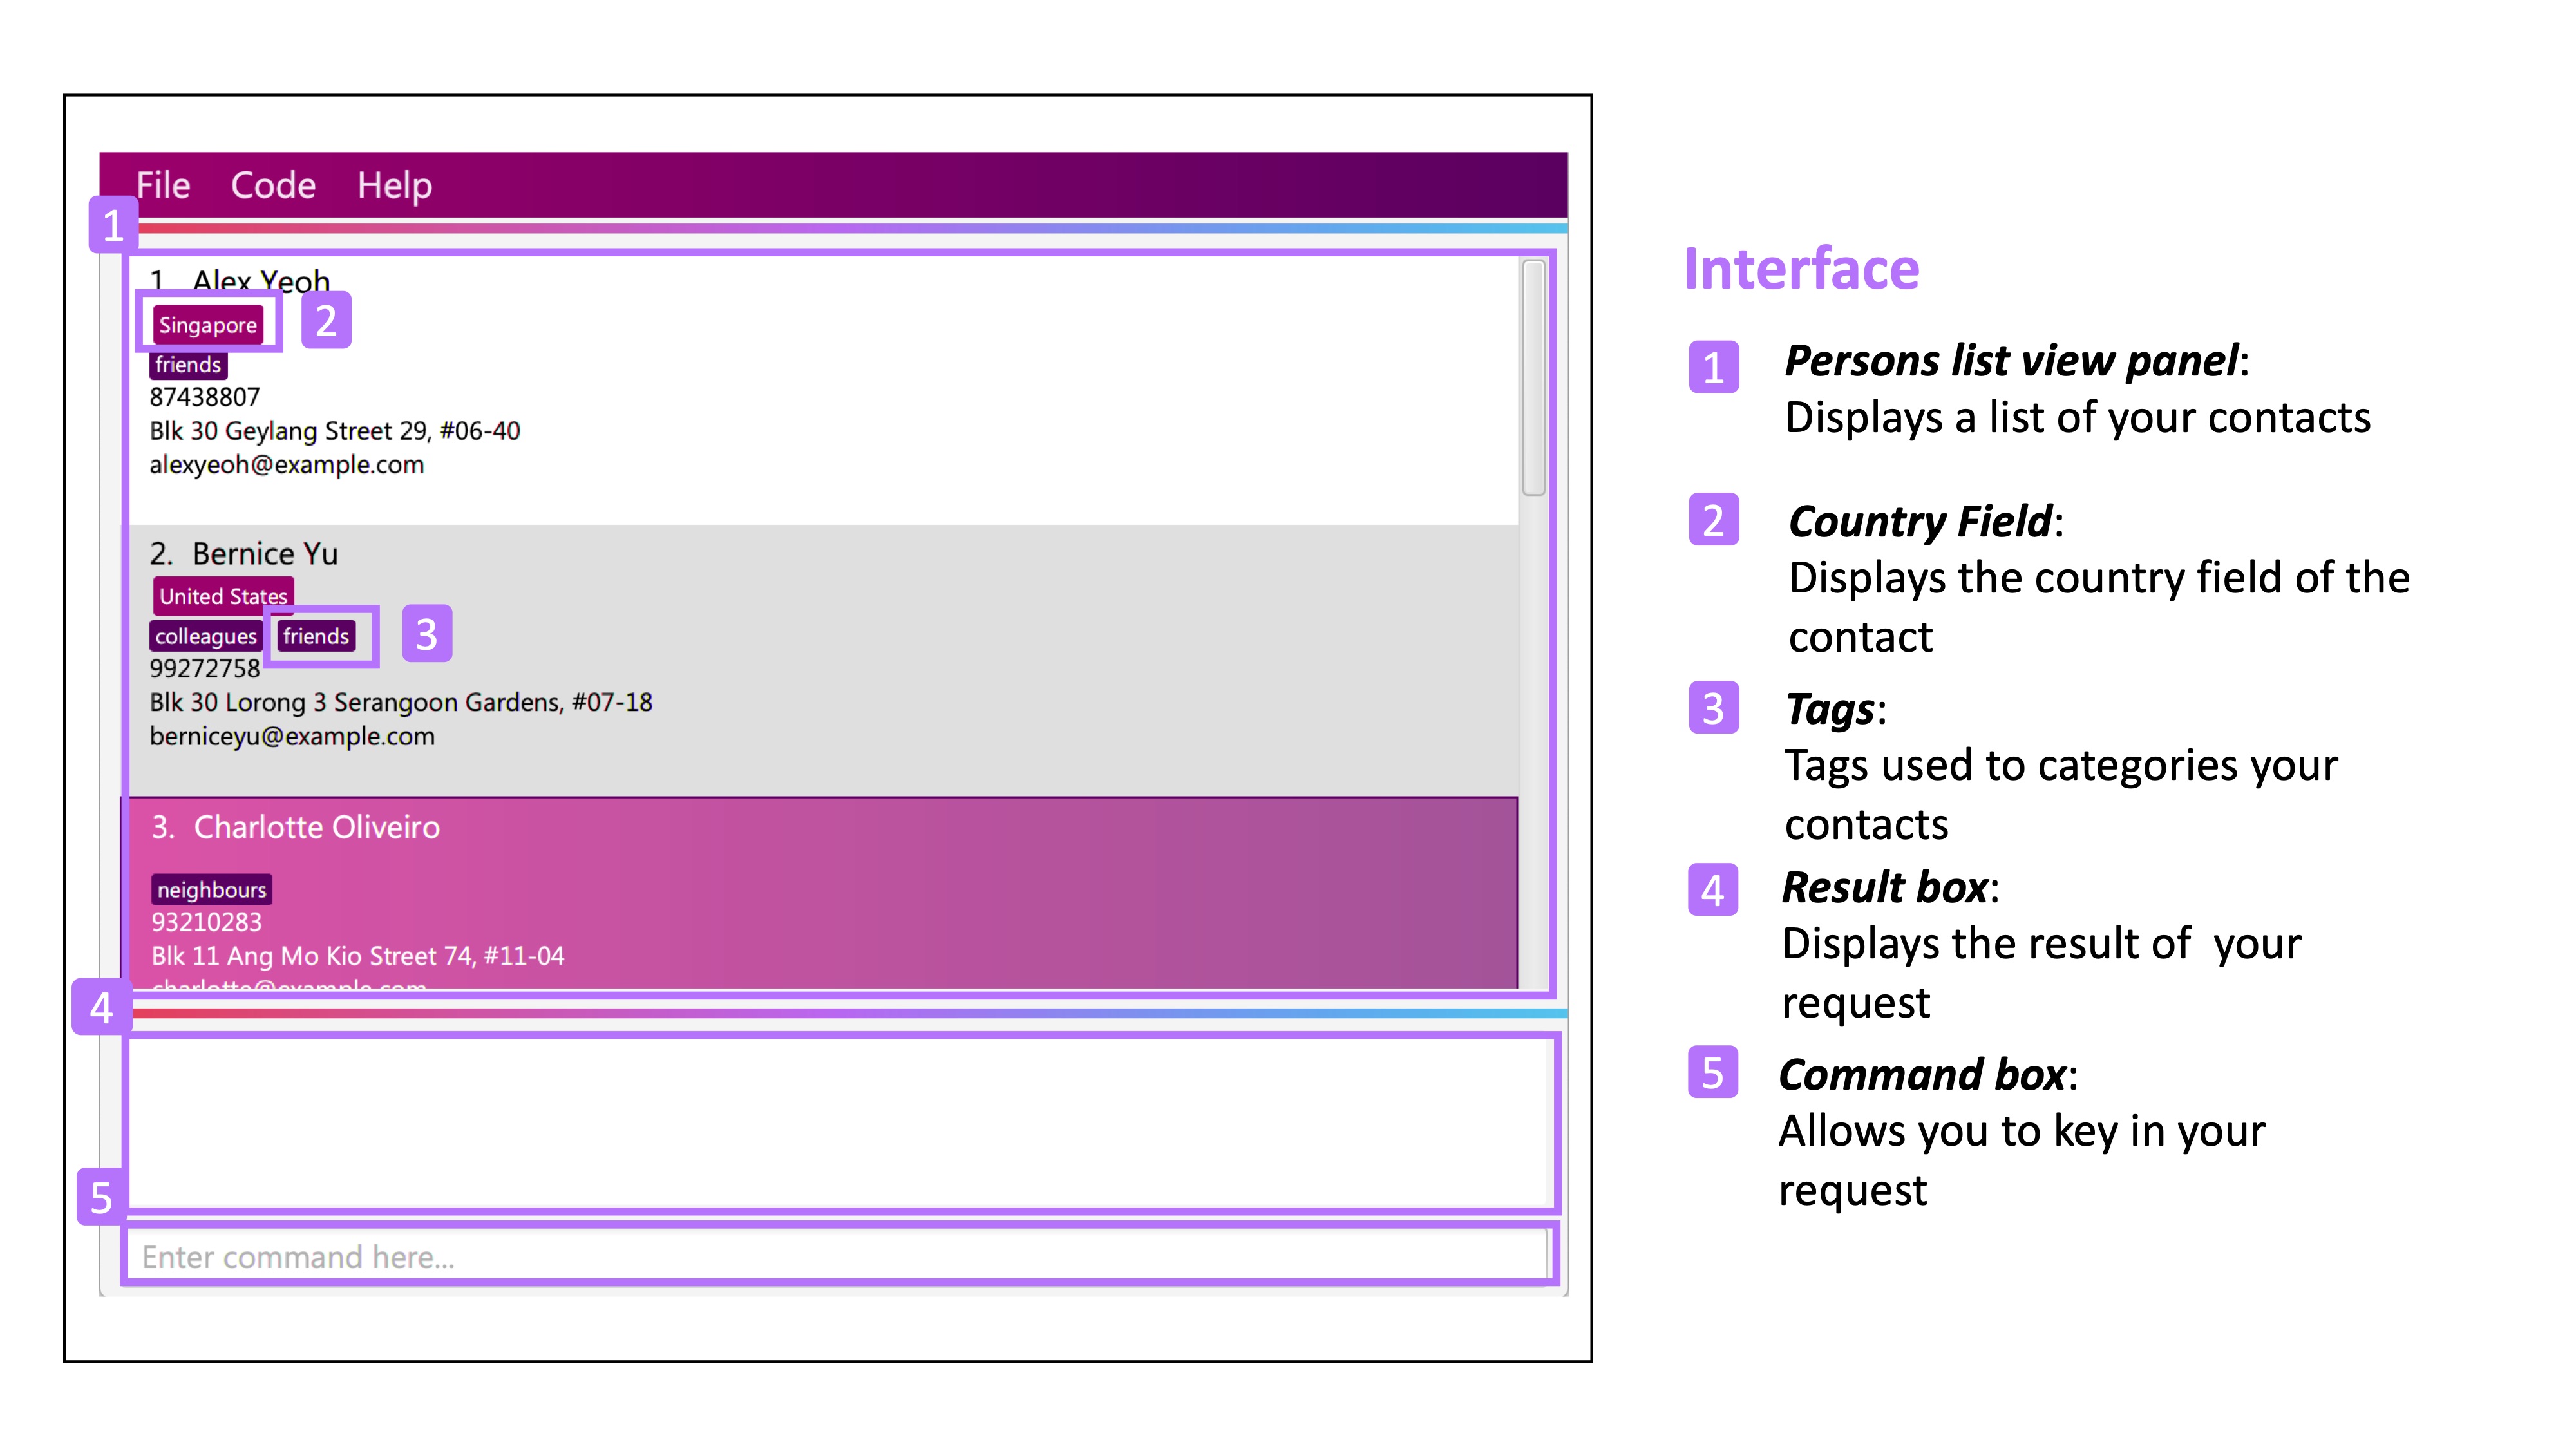
You are heading to a different country for a trip this holiday and you want to let your friends in other countries know that you are coming over. The trouble of managing contacts from many different countries can be overwhelming with a large number of contacts. Looking for a better contacts management application?
TravEzy is definitely the application you are looking for. TrazvEzy allows you to add your contact information specifying your contact’s country. How does TravEzy do that? Read on to find our more…
7.2. Adding a person: add
Met a new friend in a new foreign country during your holiday trip? Add him / her to your TravEzy address book. TravEzy address book is different from other address book by allowing you to add a country field beside your contact information.
Format:
add n/NAME p/PHONE_NUMBER e/EMAIL a/ADDRESS [t/TAG] [r/REMARK][c/COUNTRY]
Address Book does not allow duplicate contacts. A person should not have the same NAME, PHONE and EMAIL
|
Tags are useful ways to categorize your contacts. For example, tag a person with:add n/Alice p/918273645 e/alice@example.com t/friend,
the t/ prefix is used for tagging.A person can have any number of tags (including 0) |
Examples:
Step by Step:
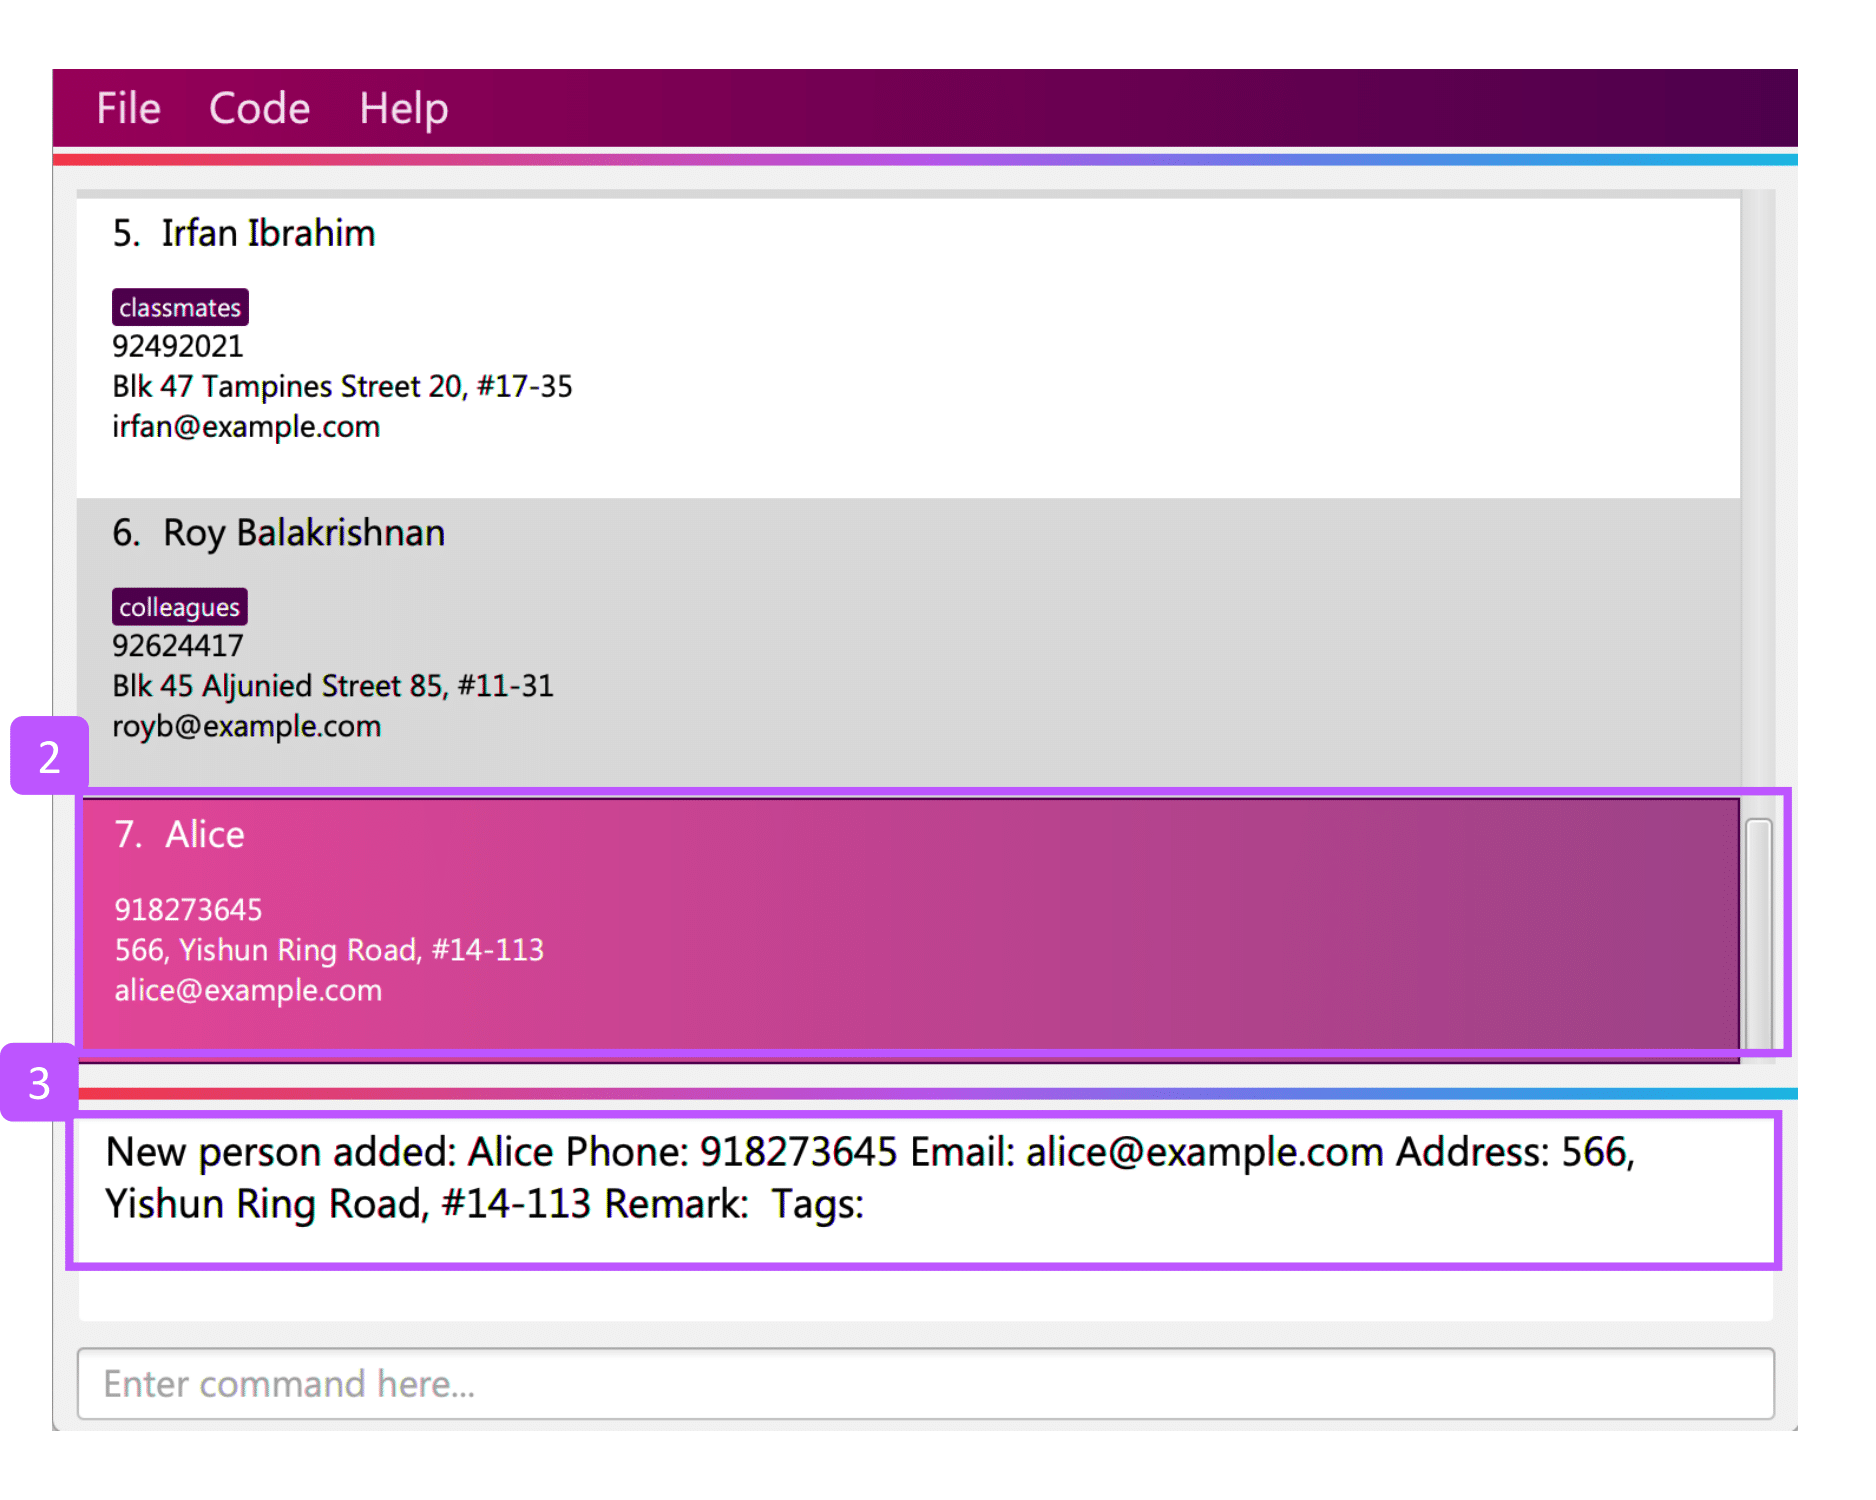
Step 1. Type add n/Alice p/918273645 e/alice@example.com a/566,Yishun Ring Road, #14-113 in the command box and
click Enter.
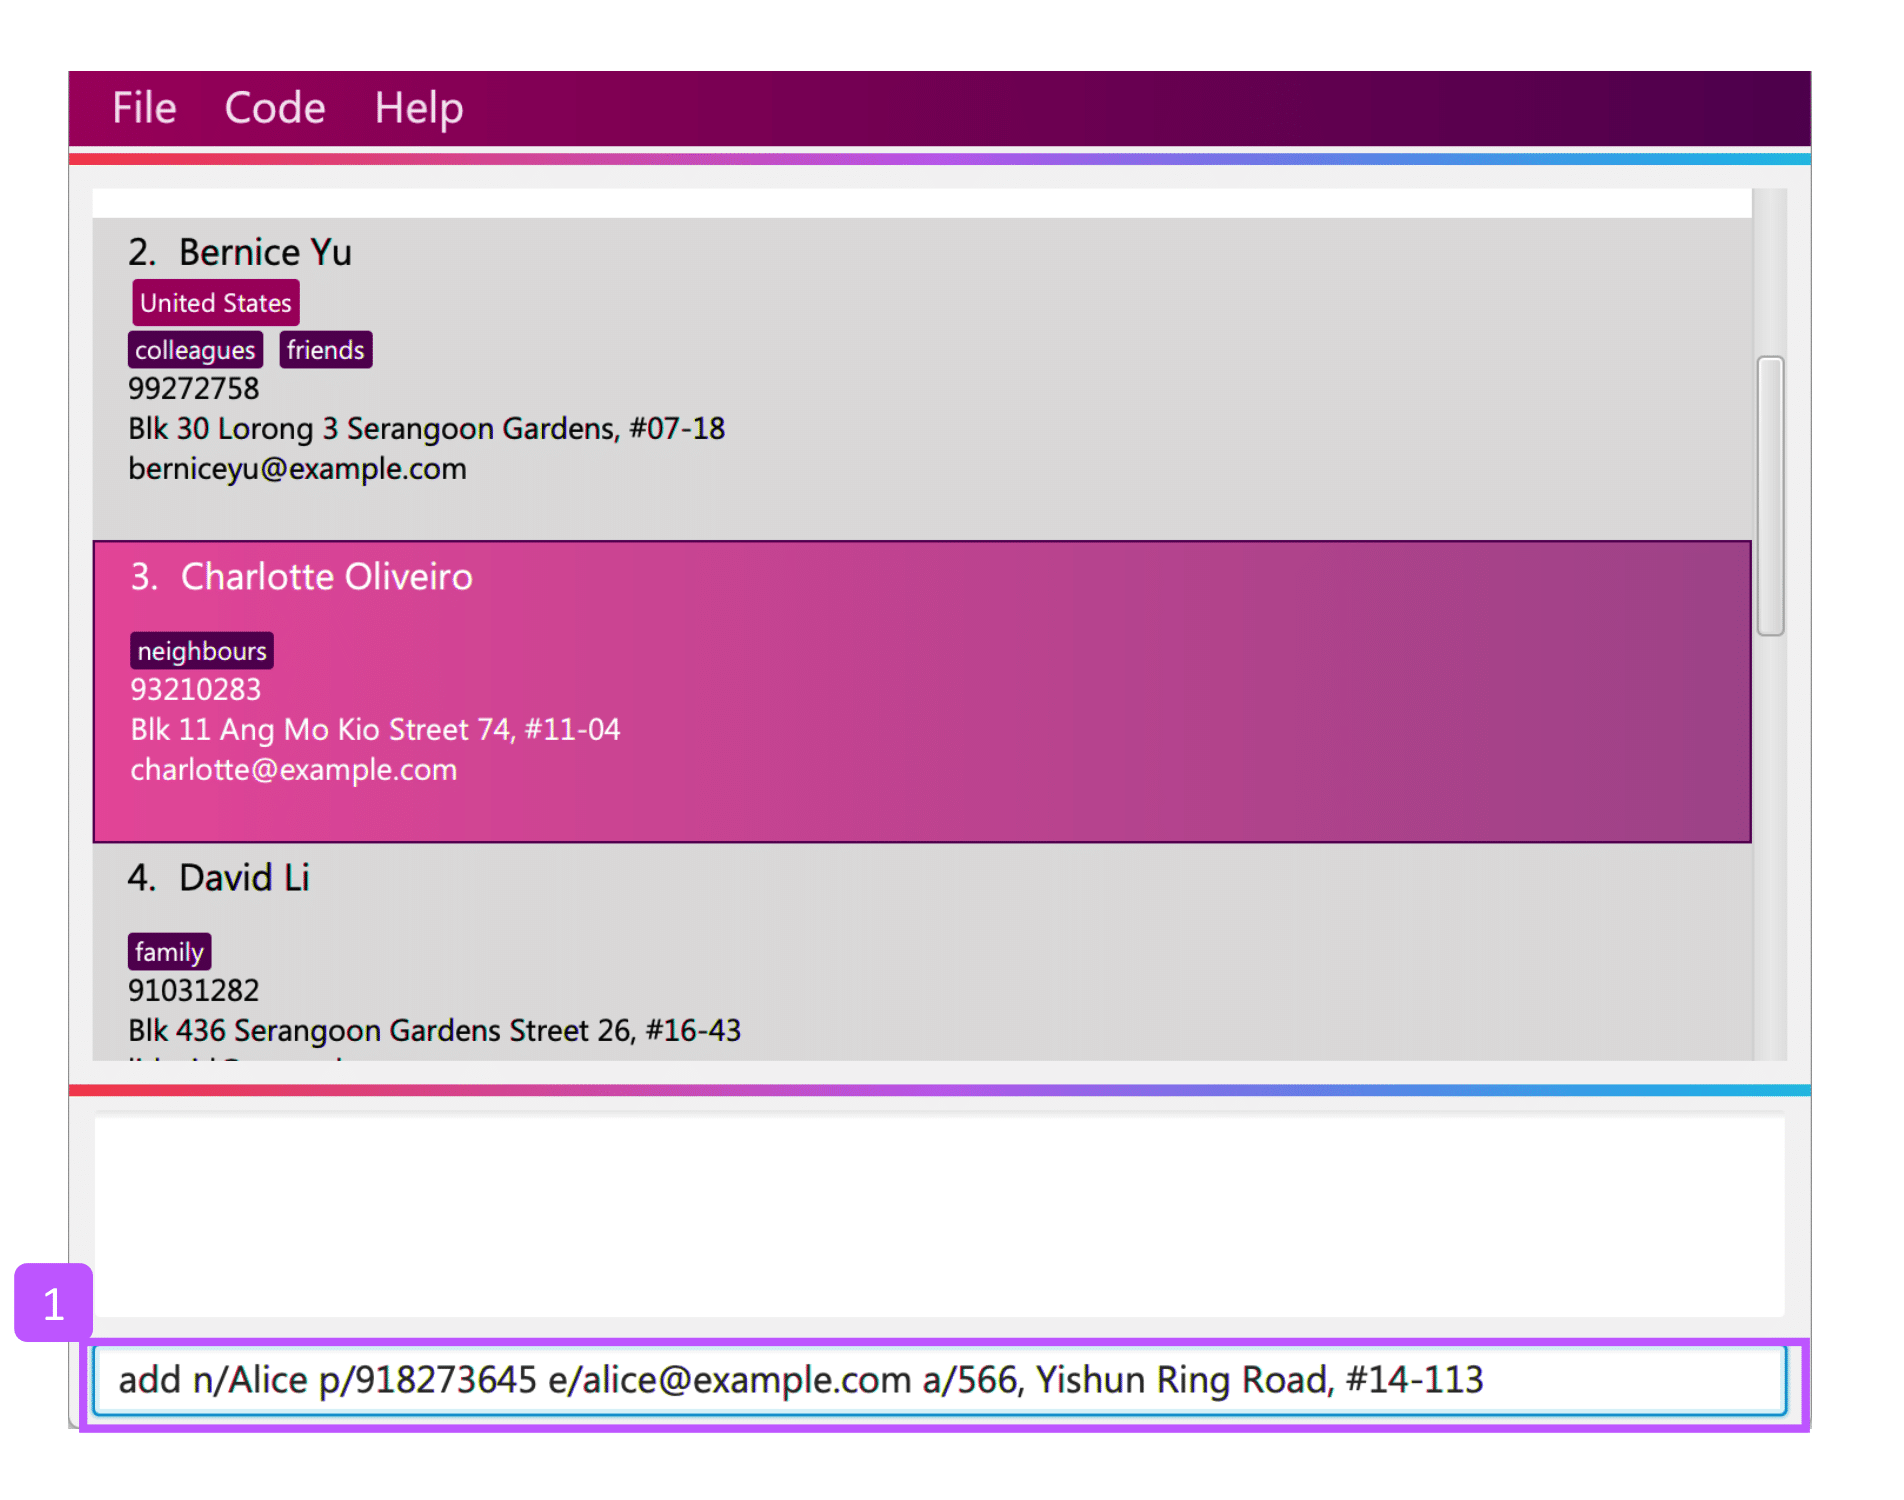
Step 2. In the persons list panel, you can now see that Alice has been added into the address book.
Step 3. The result box will also display a message that your contact has been added.
7.3. Listing all persons : list
After adding your contacts, you may want to see an overview of your contact information in the address book. See everyone in your address book with one command!
Format:
list
Step by Step:
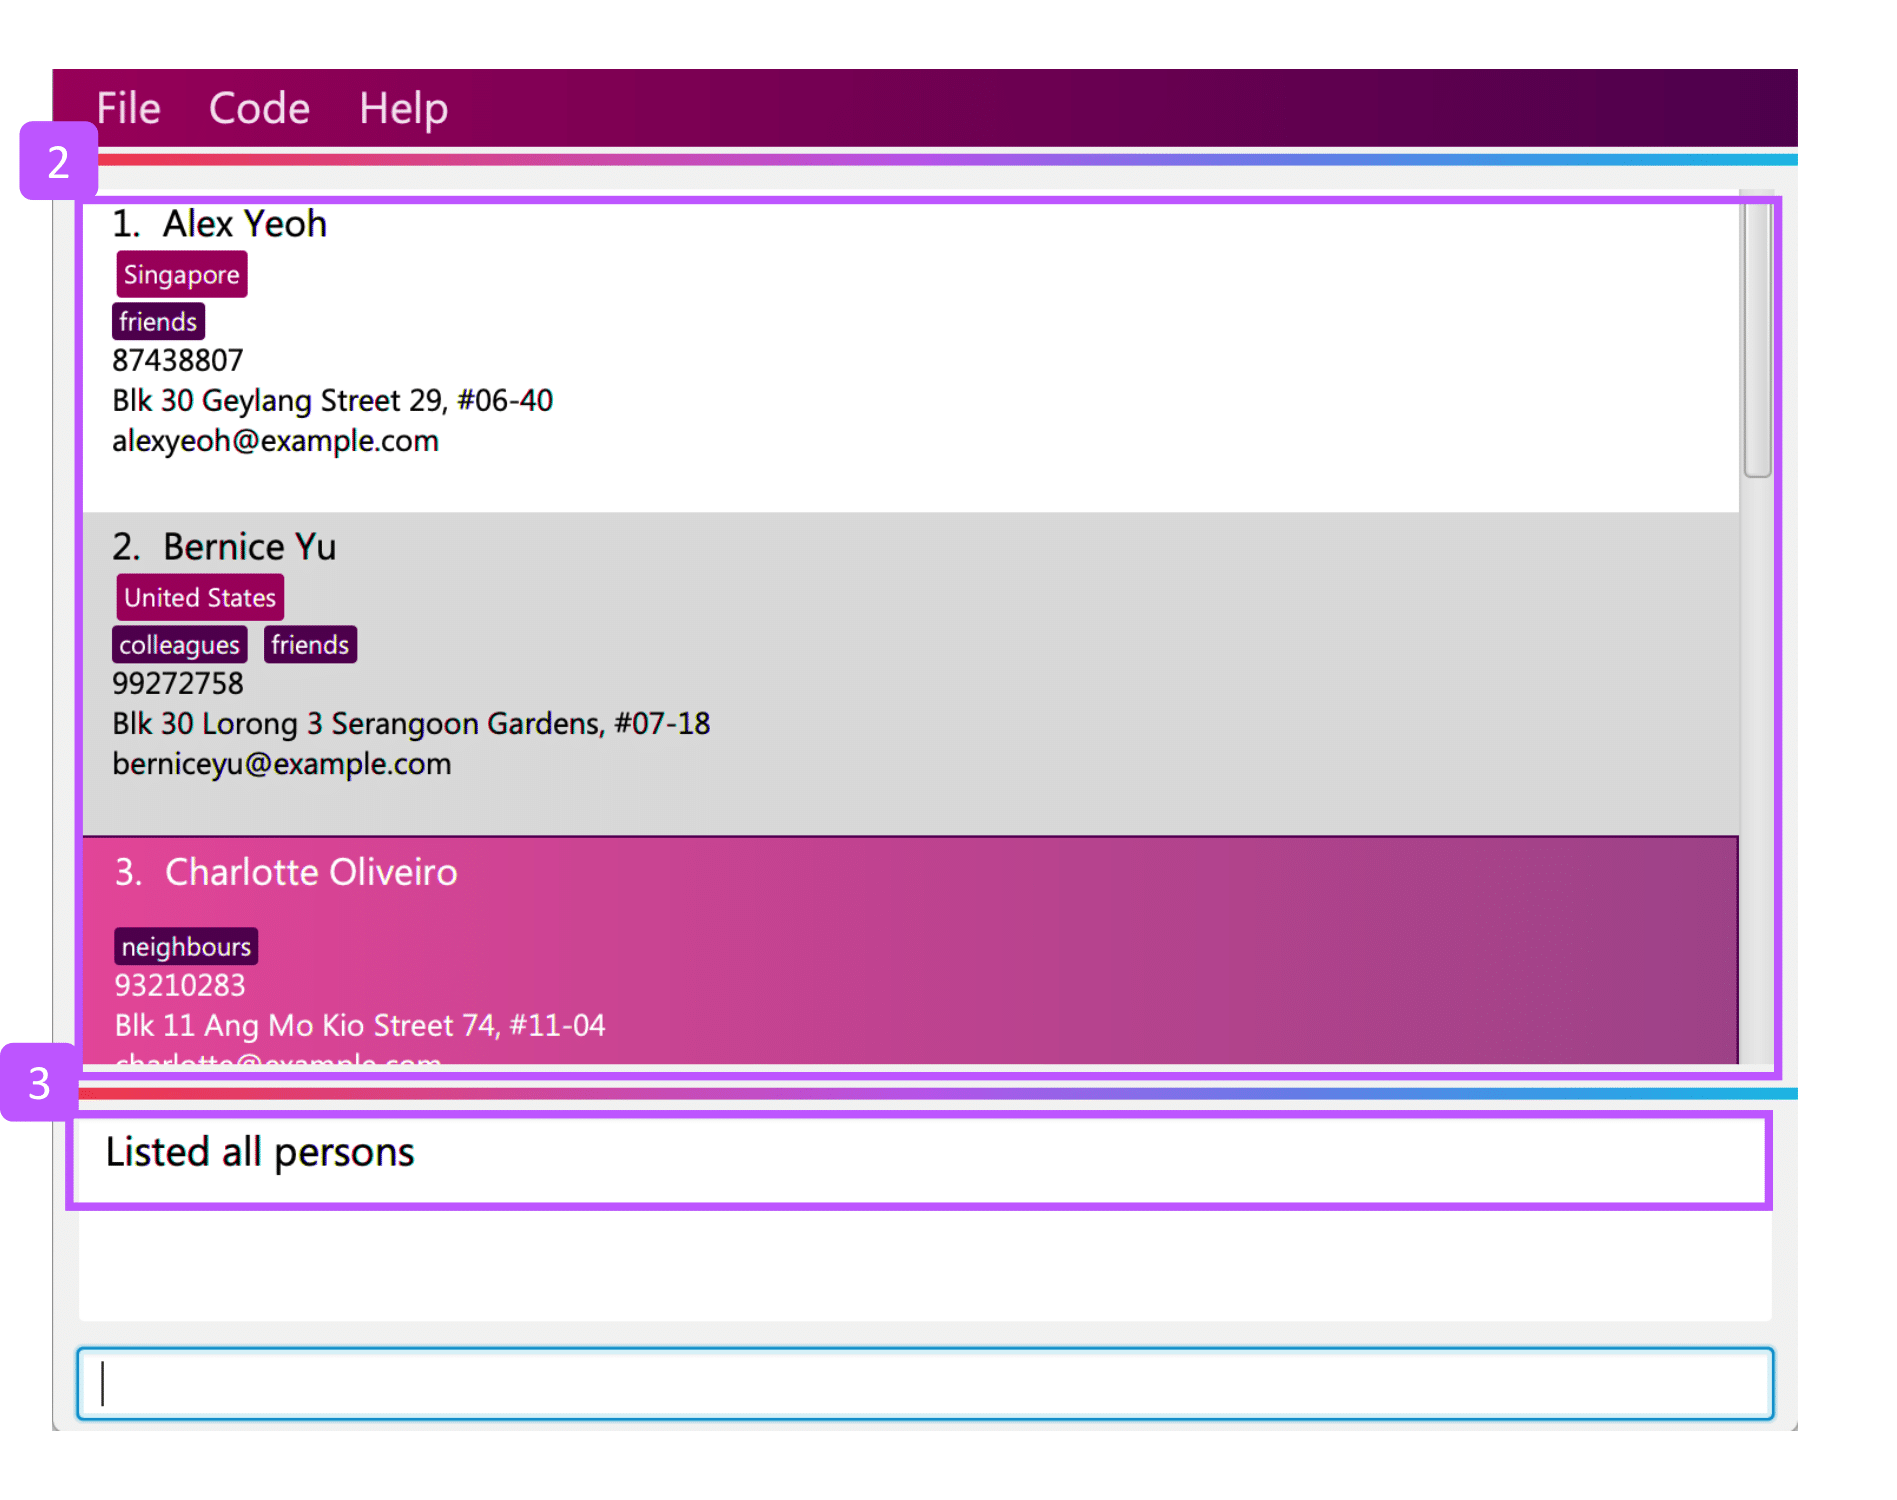
Step 1. Type list in the command box and click Enter.
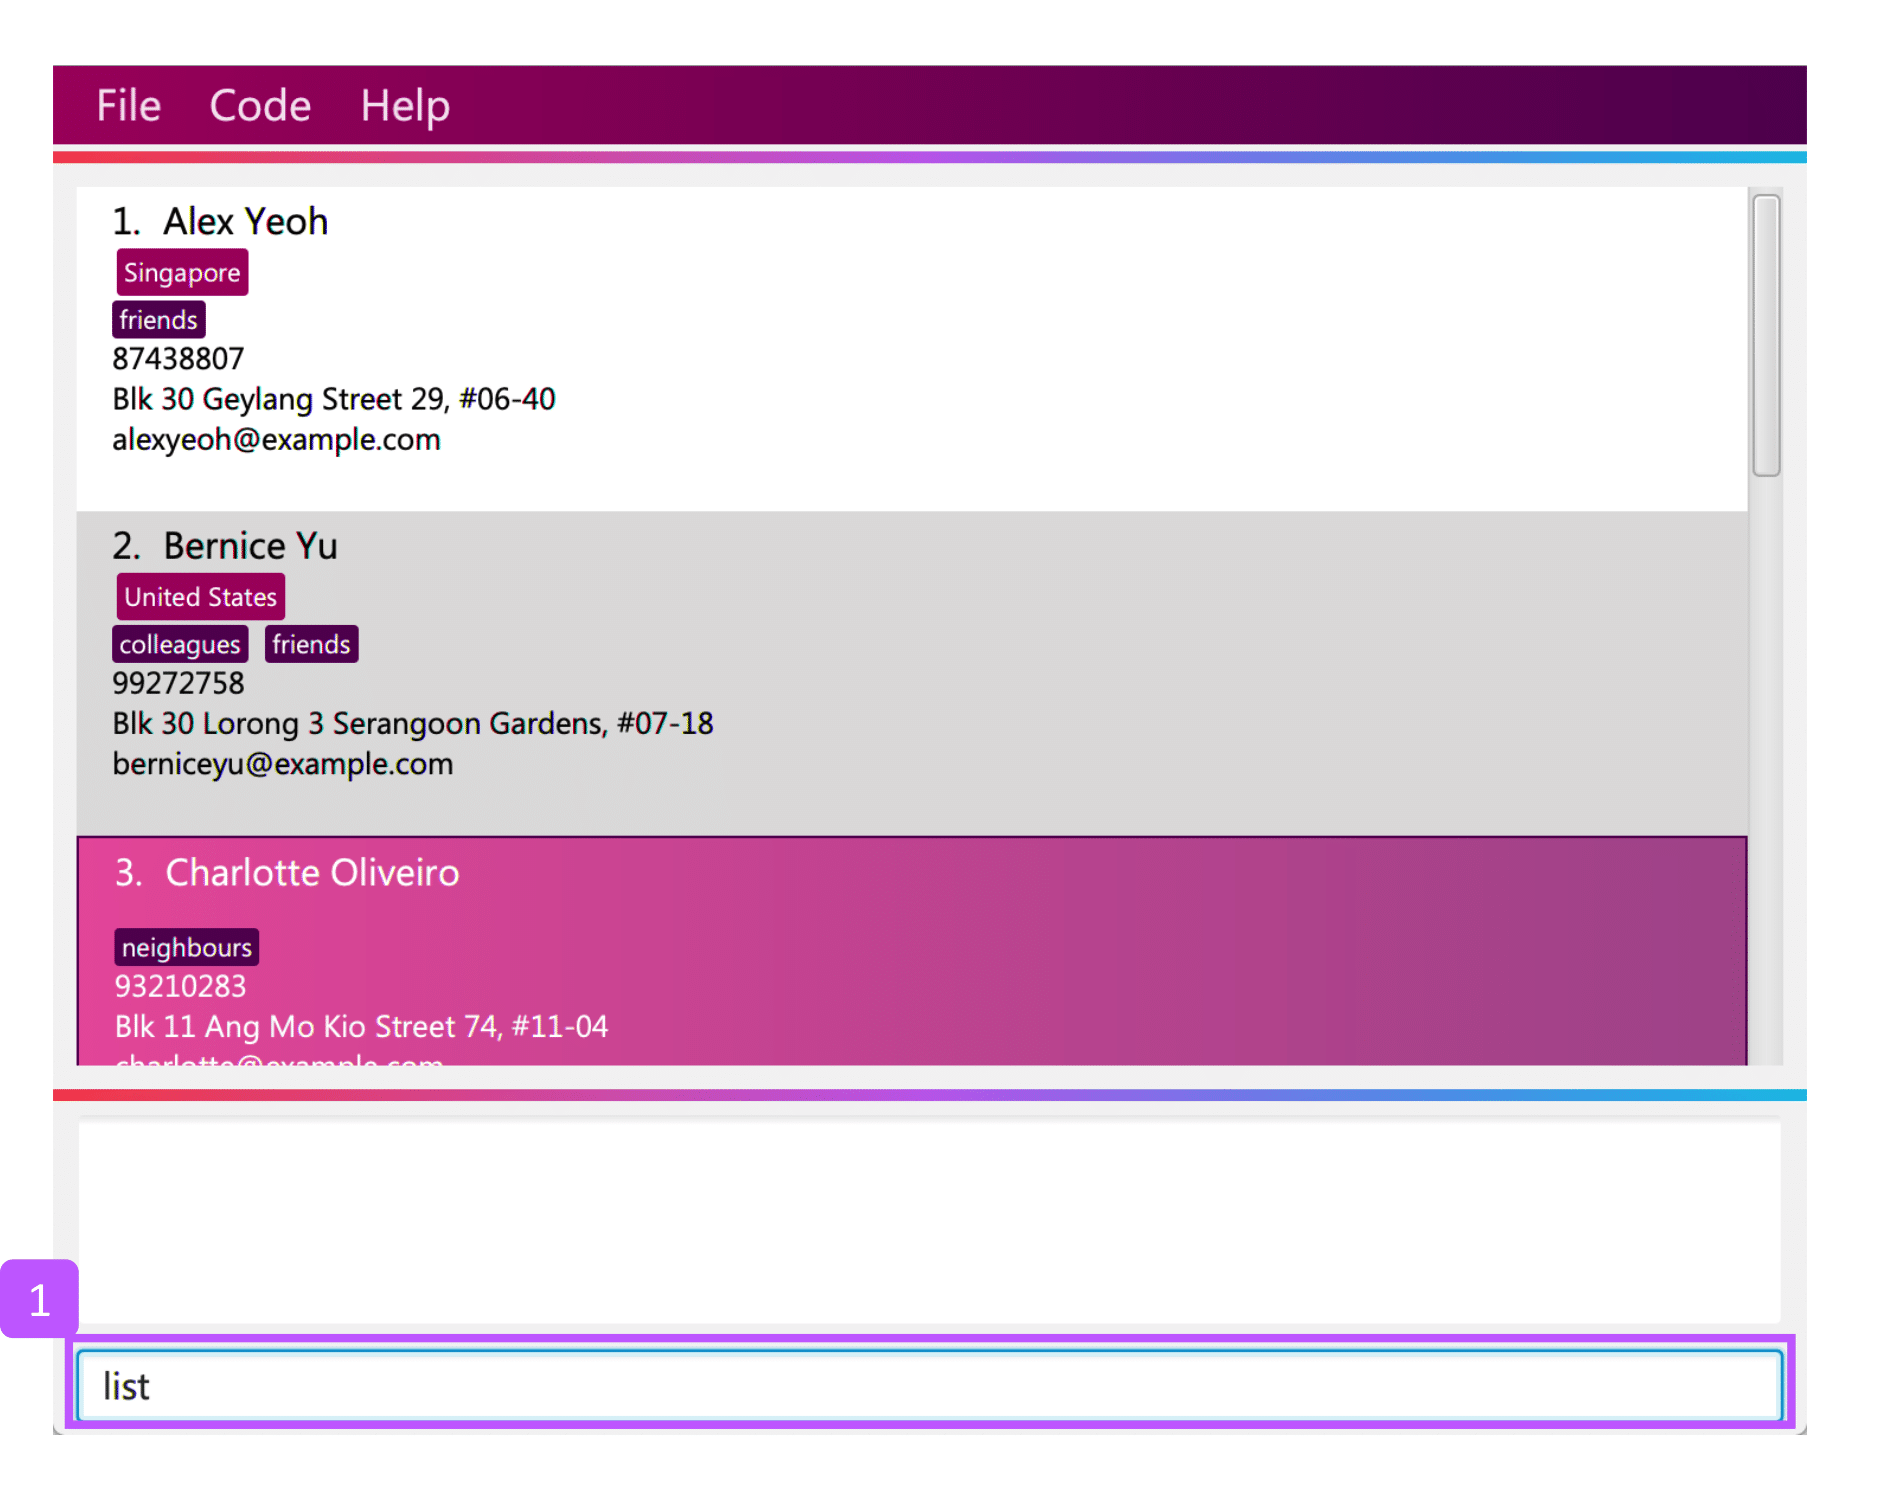
Step 2. See an overview of your contact information in the persons list panel
Step 3. The result box will also display a message that all your contact information has been listed.
7.4. Editing a person : edit
Oh no, you have added a wrong contact information into the address book! Edit all your contact information in the address book inside TravEzy is easy by specifying a field of the contact information you want to edit.
Format:
edit INDEX [n/NAME] [p/PHONE] [e/EMAIL] [a/ADDRESS] [t/TAG] [r/REMARK] [c/COUNTRY]
Edits the person at the specified INDEX. The index refers to the index number shown in the displayed person list. The index must be a positive integer 1, 2, 3, …At least one of the optional fields must be provided. Existing values will be updated to the input values. When editing tags, the existing tags of the person will be removed i.e adding of tags is not cumulative. |
You can remove all the person’s tags by typing t/ without specifying any tags after it.You can remove the person’s remark by typing r/ without specifying any remark after it.You can remove the person’s country by typing c/ without specifying any country after it.
|
Examples:
Step by Step:
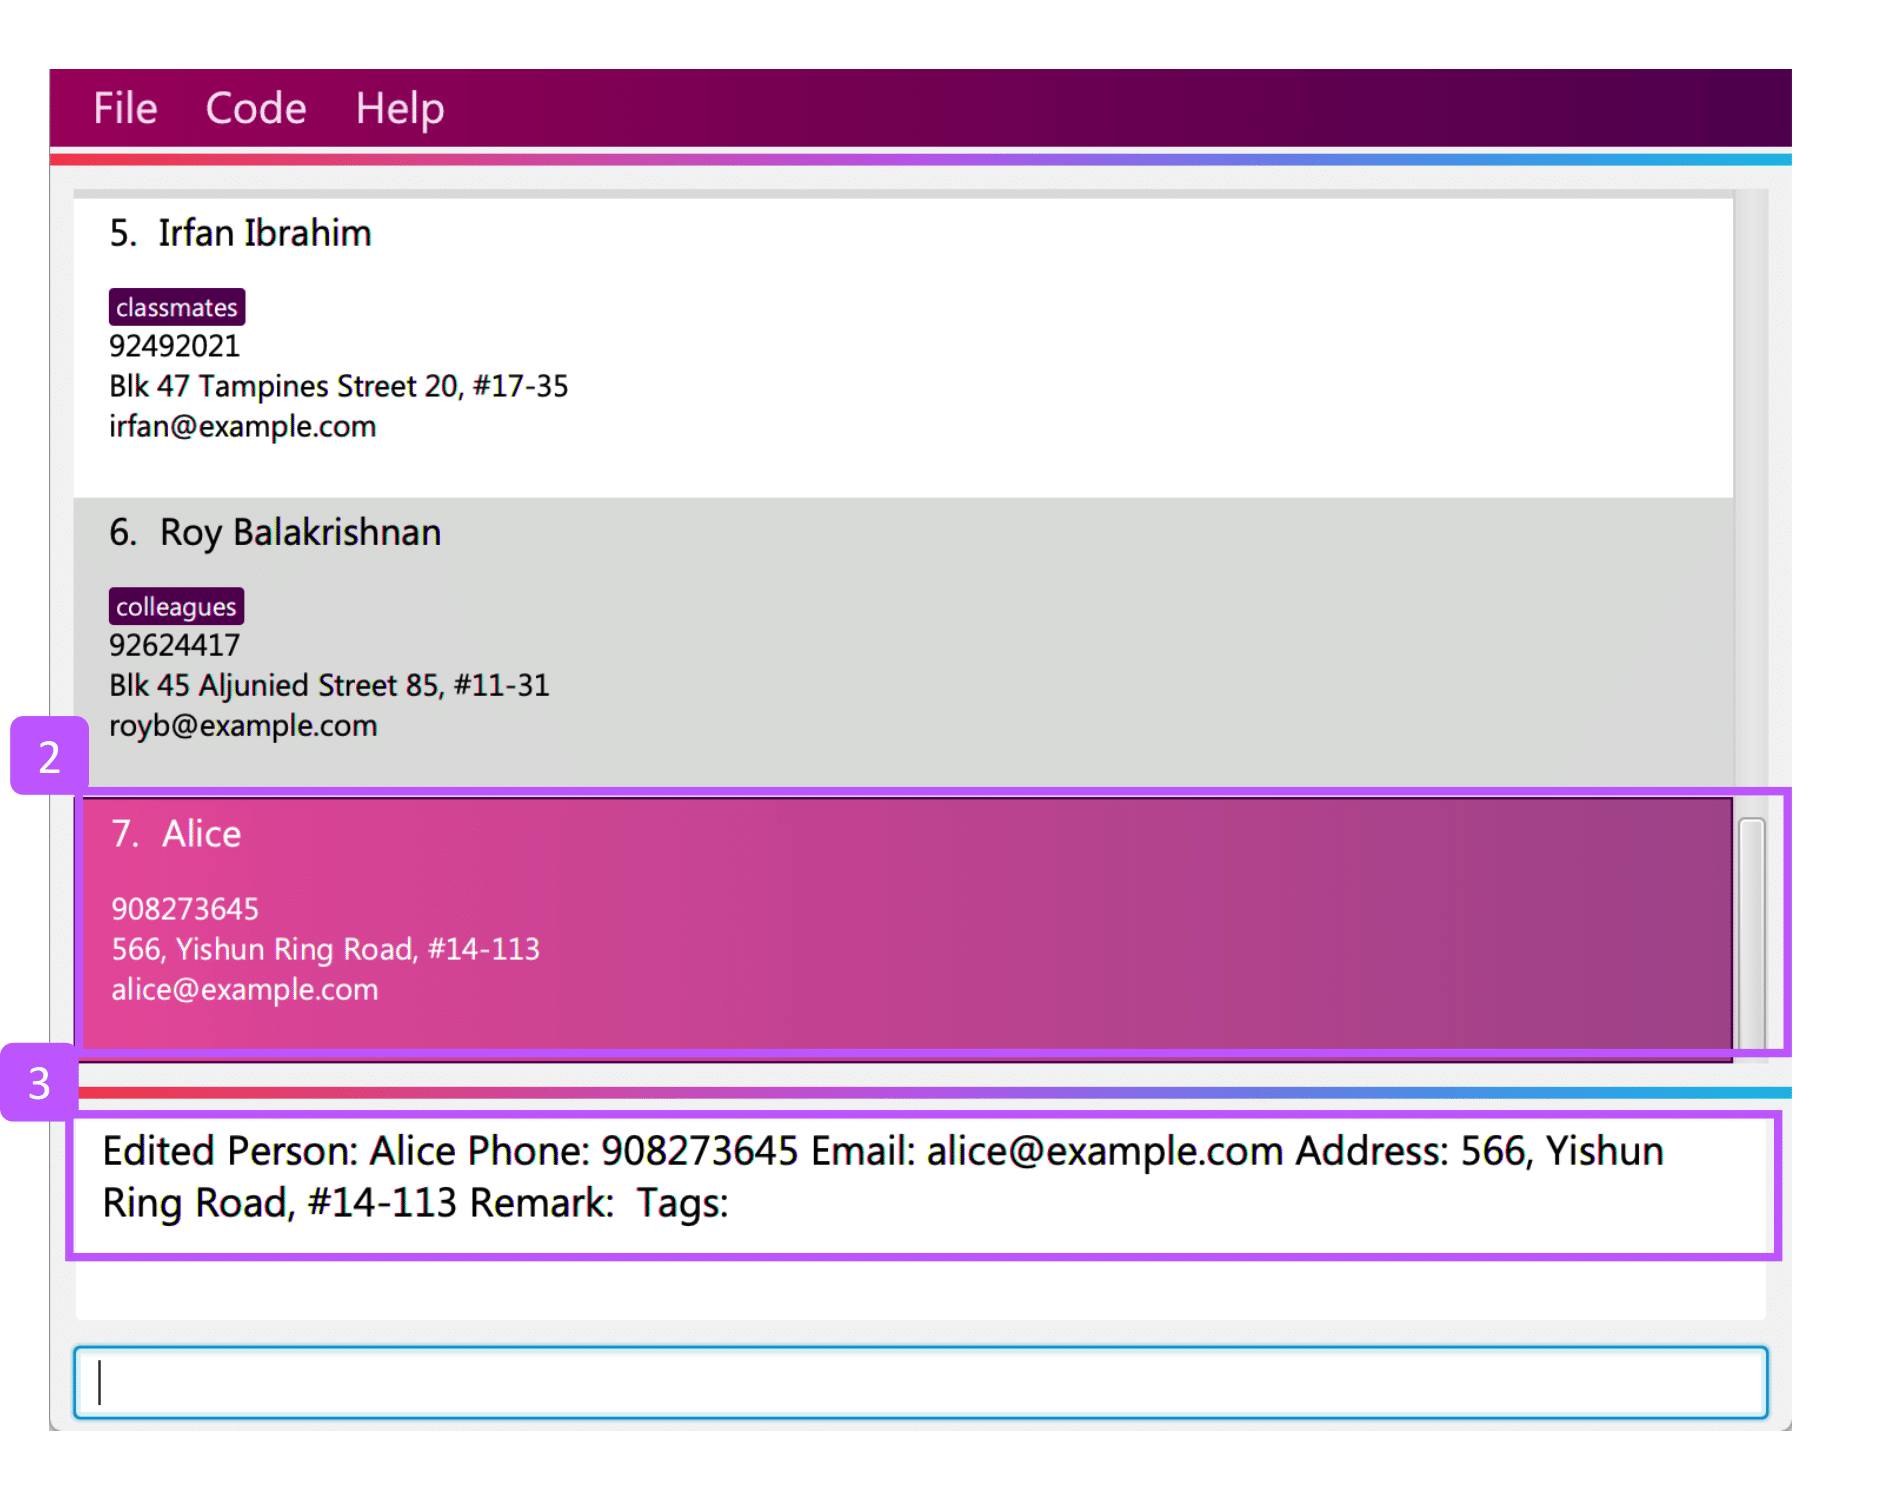
Step 1. Type edit7 p/9082373645 to edit Alice’s phone number to reflect the correct phone number 908237645
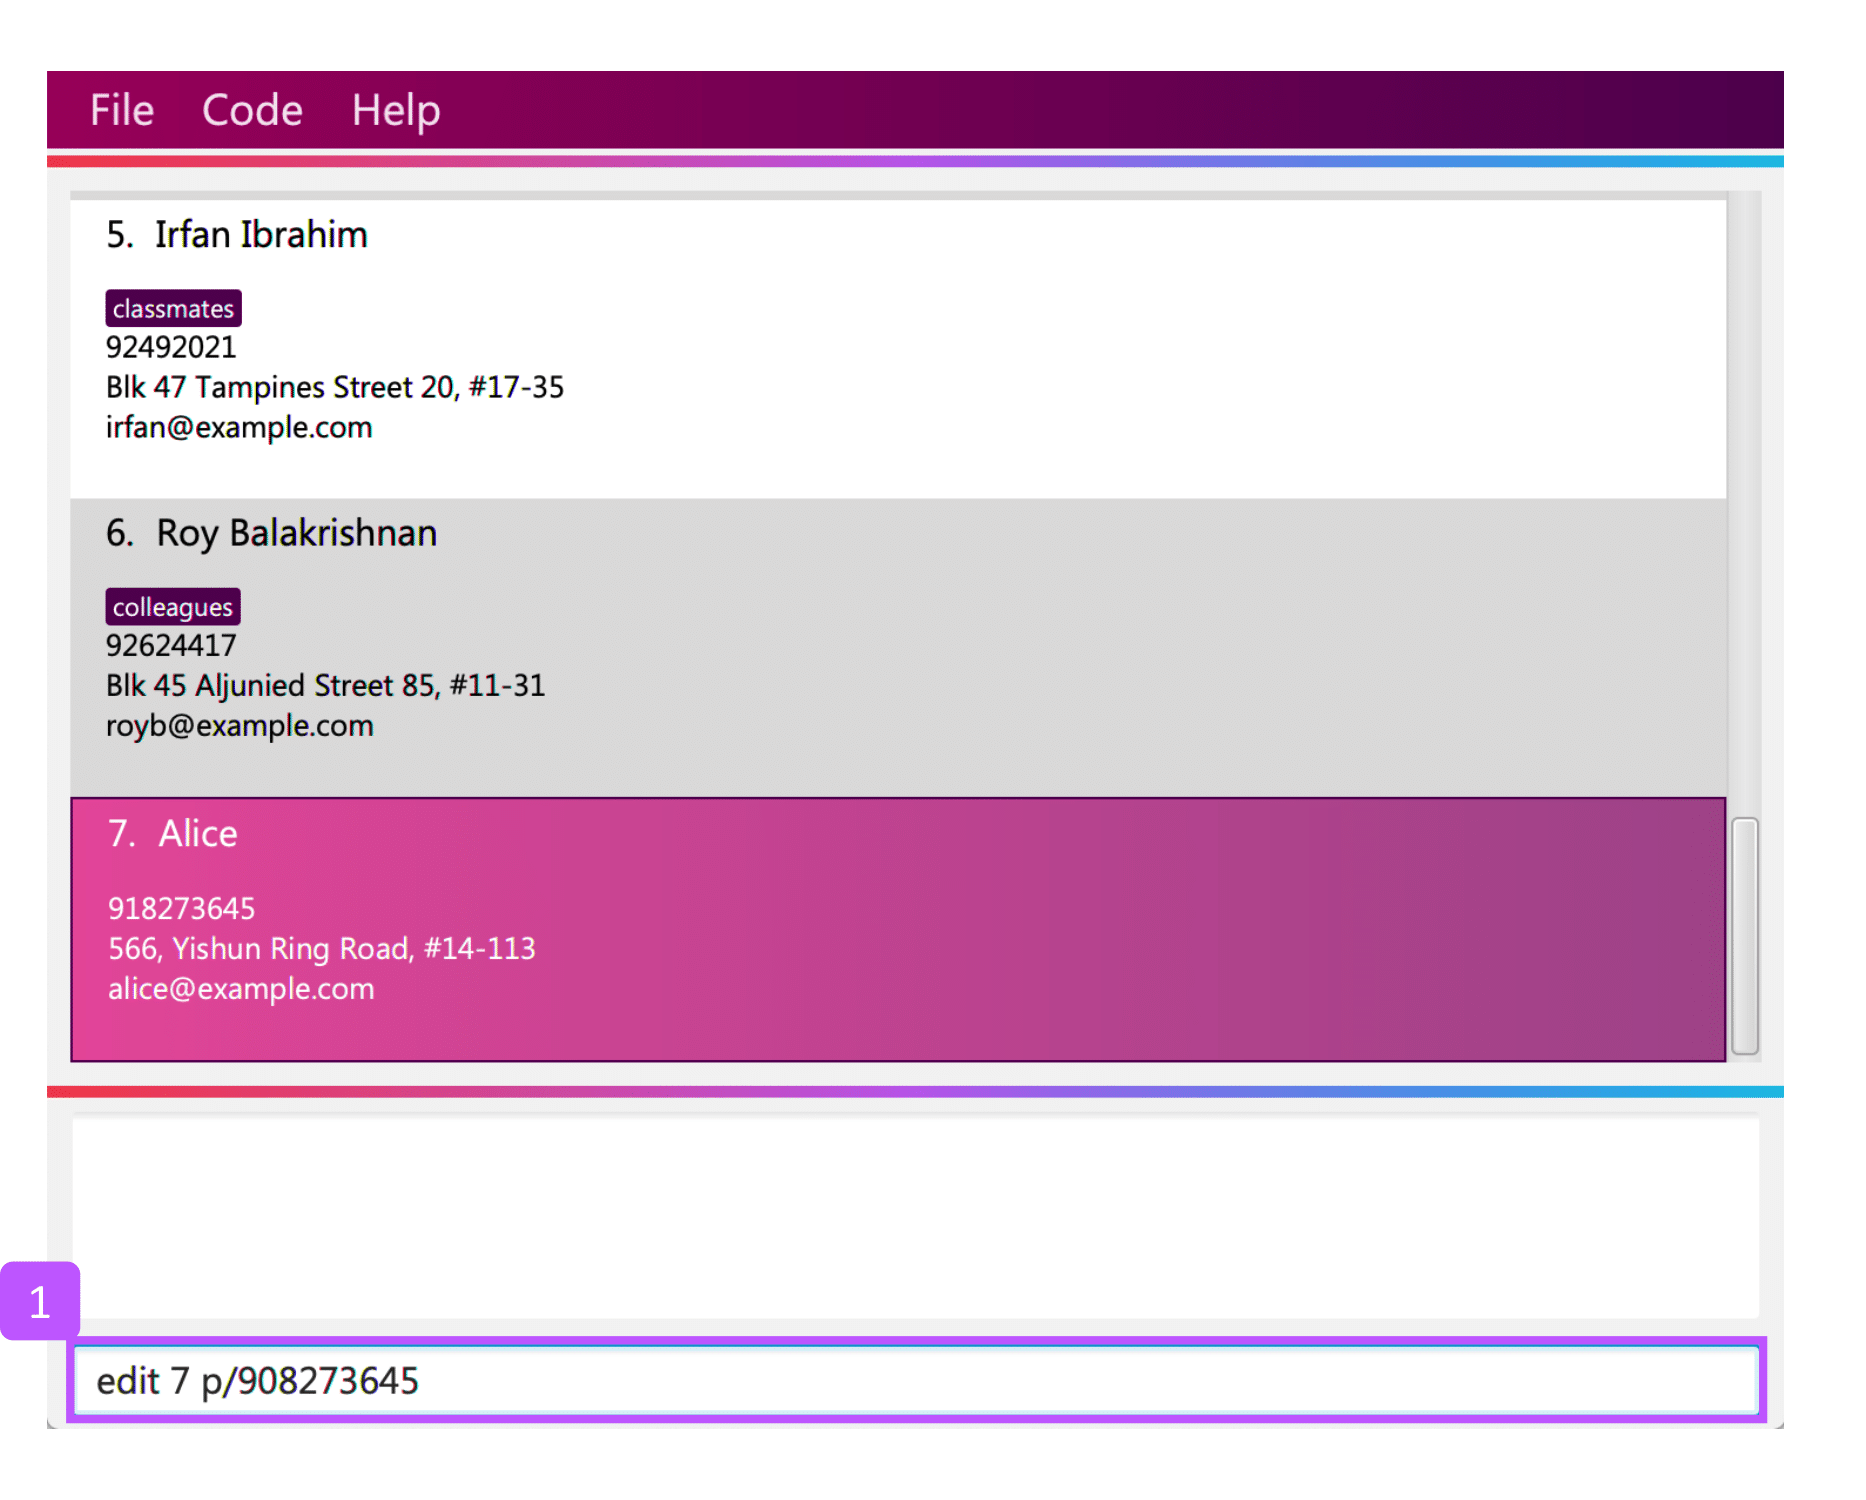
Step 2. The persons list panel will now display the updated information for Alice after the edit.
Step 3. The result box will display a message that the person has been edited if successful.
7.5. Locating persons by name: find
Too many contacts in your address book? TravEzy address book provides a simple way to find your contact information
with keywords. How about let TravEzy address book do the finding for you!
Format: find KEYWORD [MORE_KEYWORDS]
The search is case insensitive. e.g hans will match HansThe order of the keywords does not matter. e.g. Hans Bo will match Bo HansOnly the name is searched. Only full words will be matched e.g. Han will not match Hans |
Persons matching at least one keyword will be returned (i.e. OR search). e.g. Hans Bo will return Hans Gruber,
Bo Yang
|
Examples:
Step by Step:
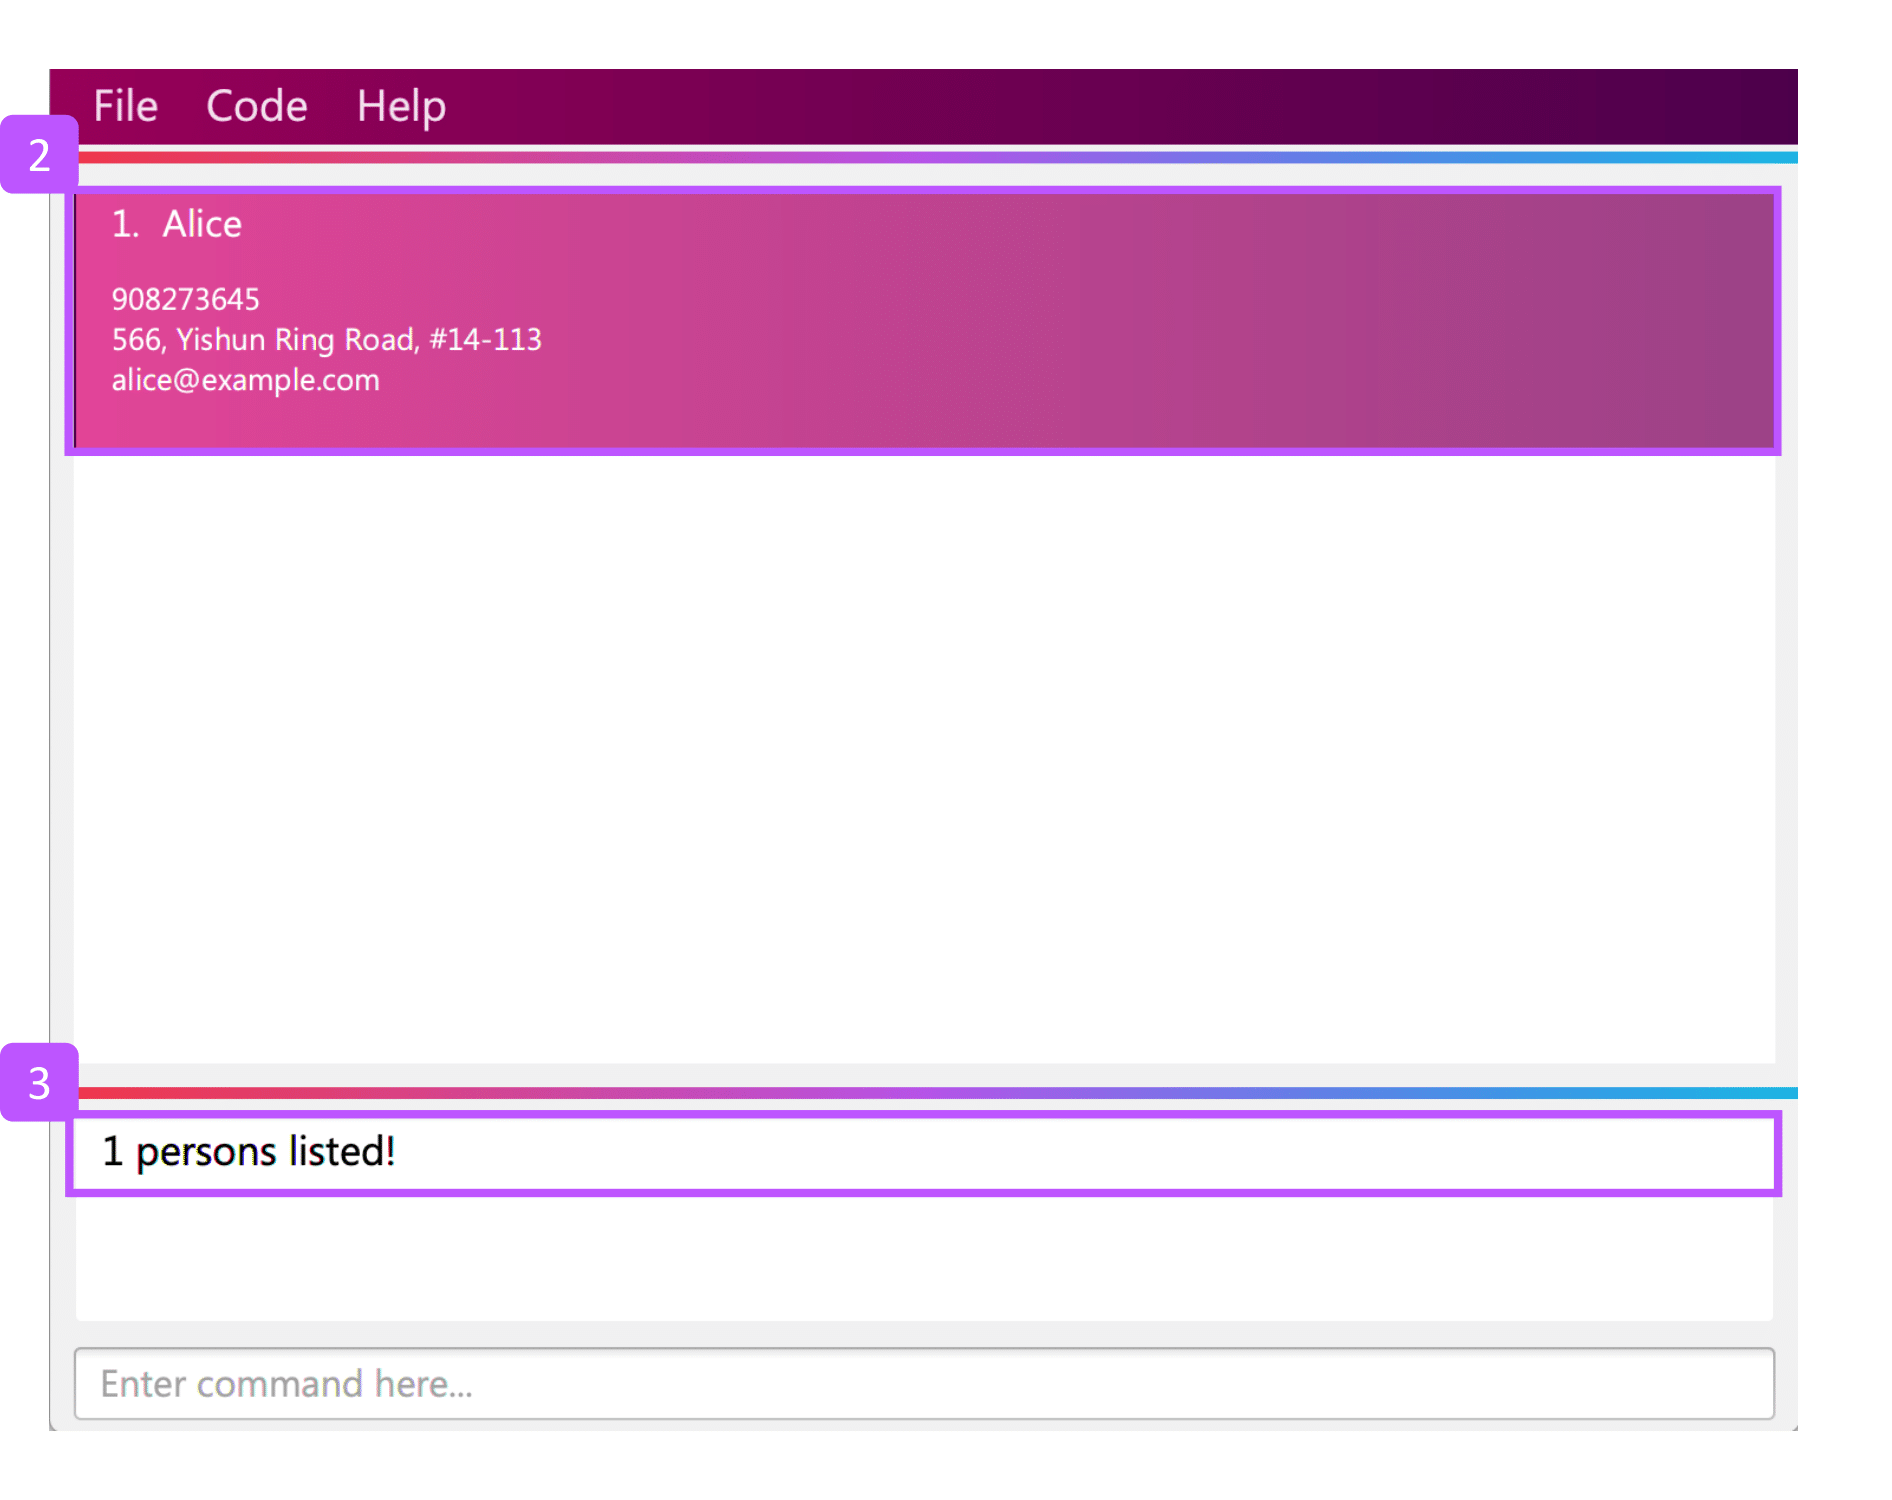
Step 1. Type find Alice in the command box and click Enter
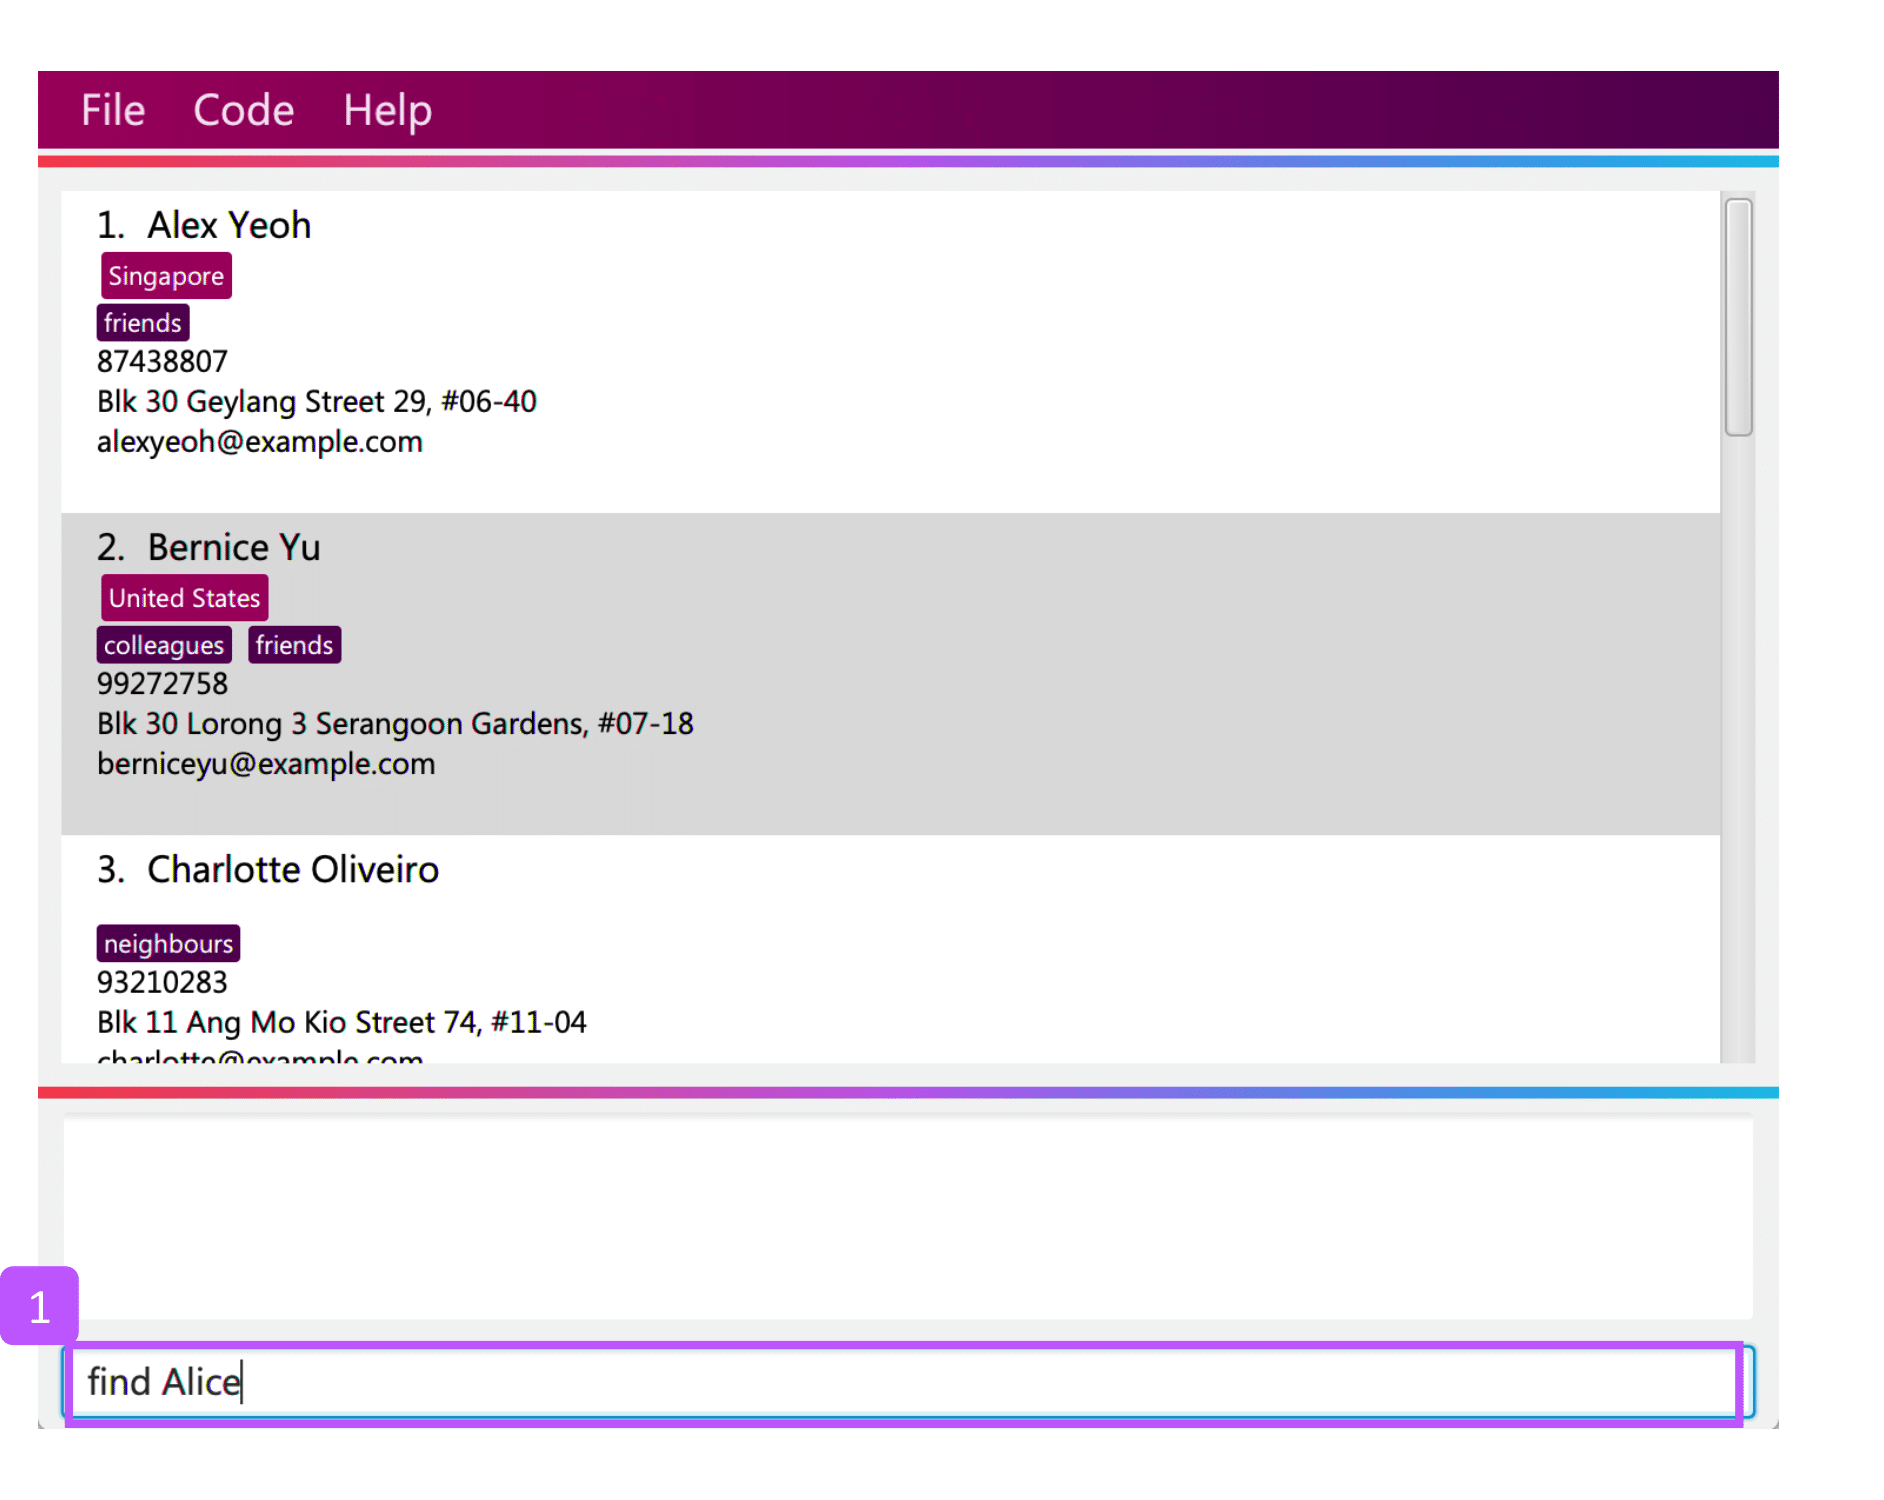
Step 2. The results found will be displayed at the persons list panel.
Step 3. The result box will also display a message to indicate the number of matching results found.
7.6. Deleting a person : delete
Make your address book neat and organized! Clear off any old and unused contact information. Travezy address book application allows you to delete your old contact information. Time to make your address book look pretty and neat!
Format:
delete INDEX
|
The index refers to the index number shown in the displayed person list. The index must be a positive integer 1, 2, 3, … |
Examples:
Step By Step:
Step 1. Type delete 7 in the command box and click Enter
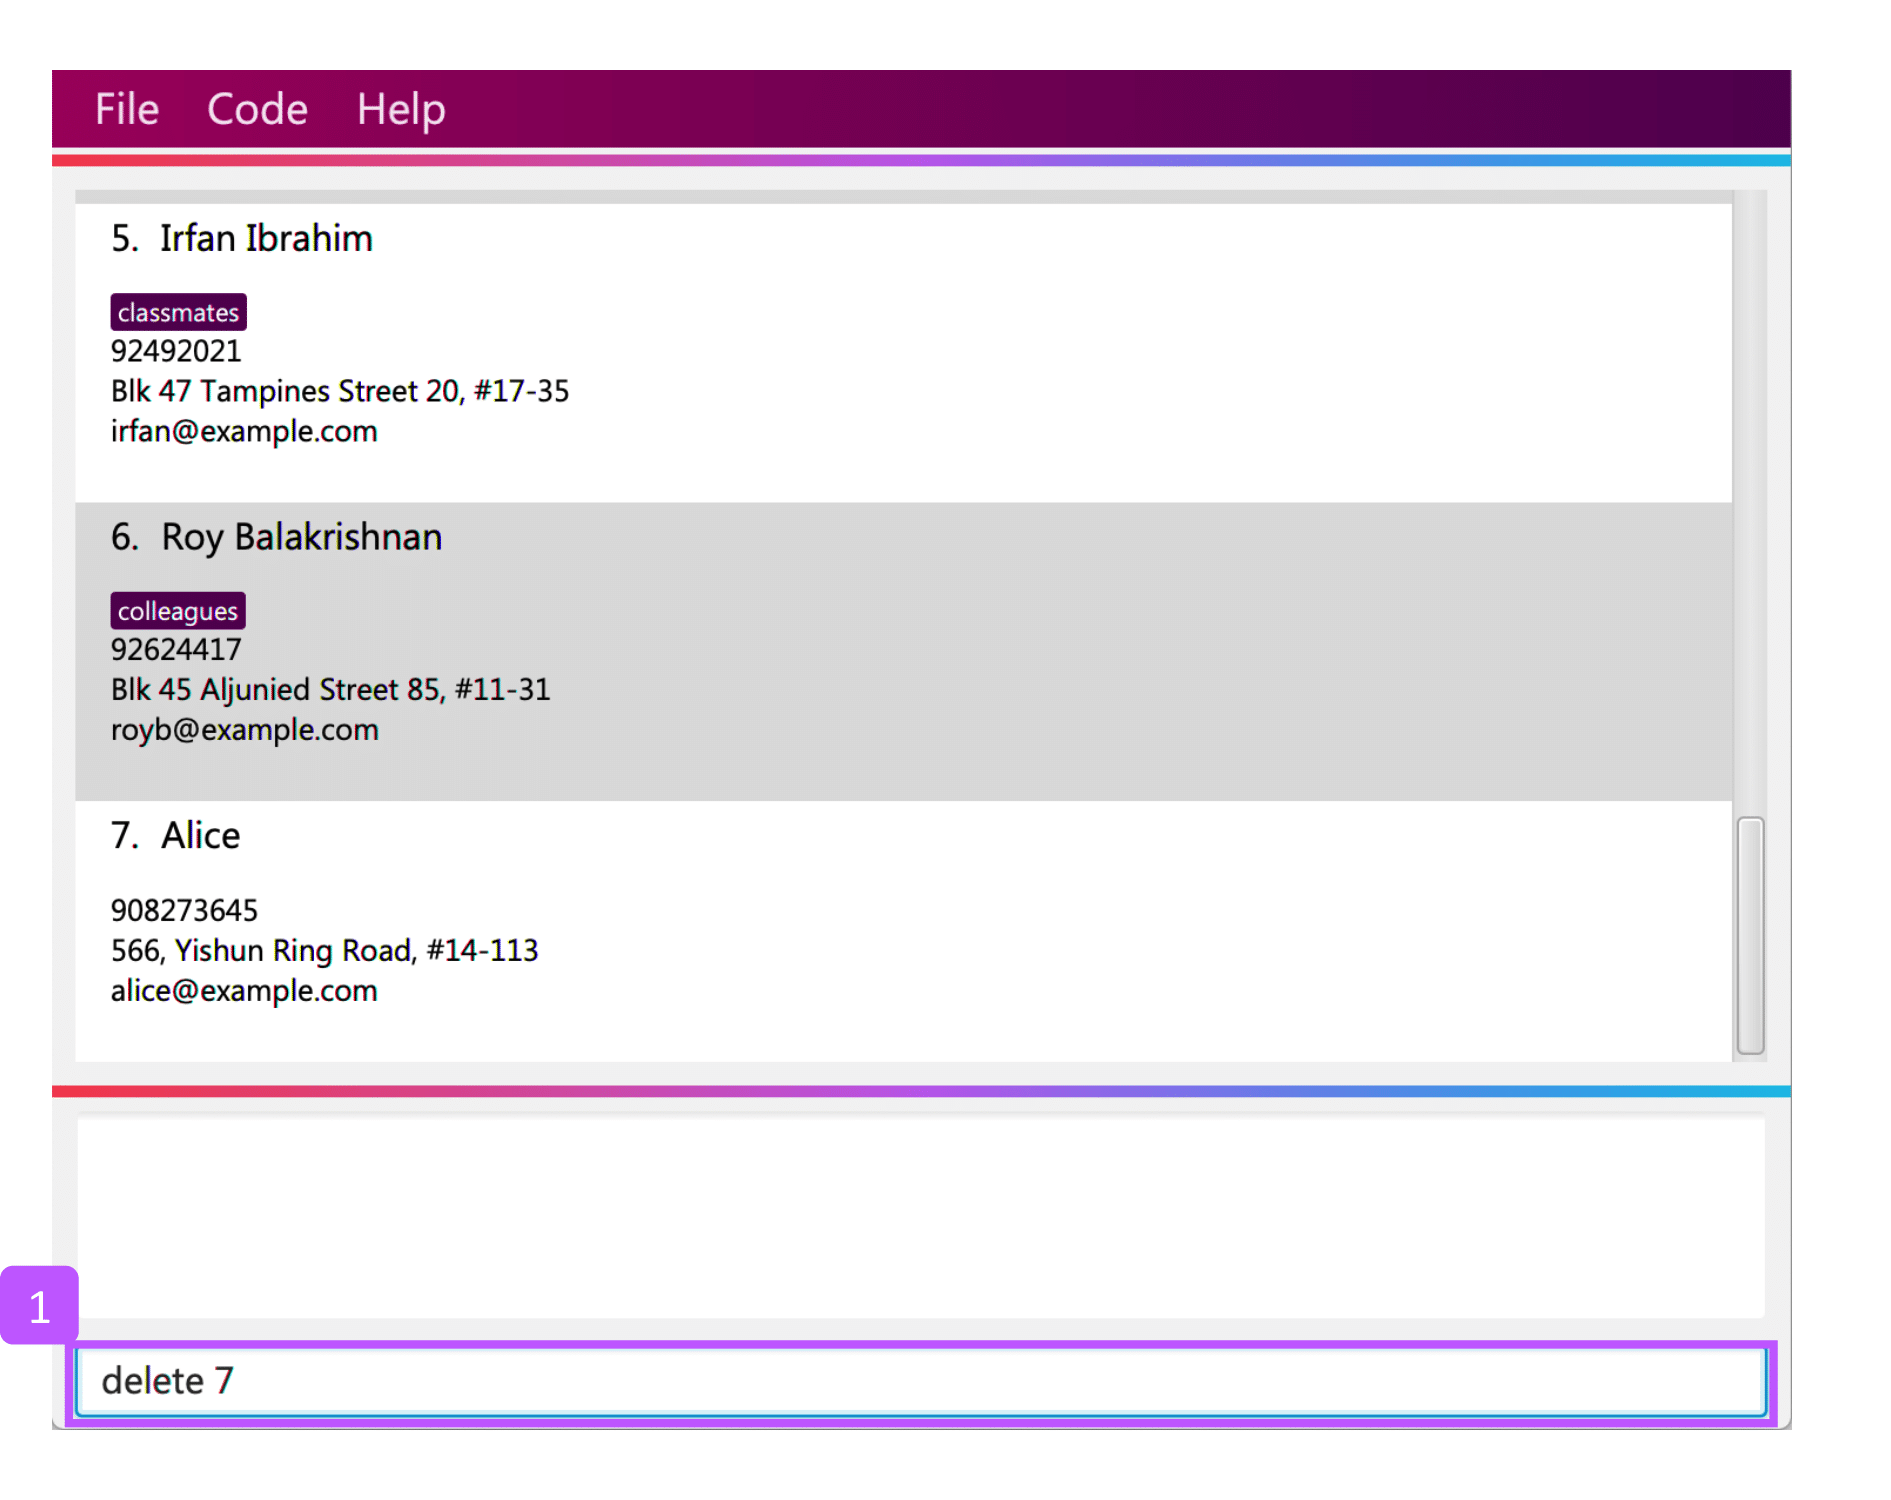
Step 2. The persons list panel will display the updated address book after deleting the specified contact
Step 3. The result box will also display a message to notify that the person has been deleted from the contact book.
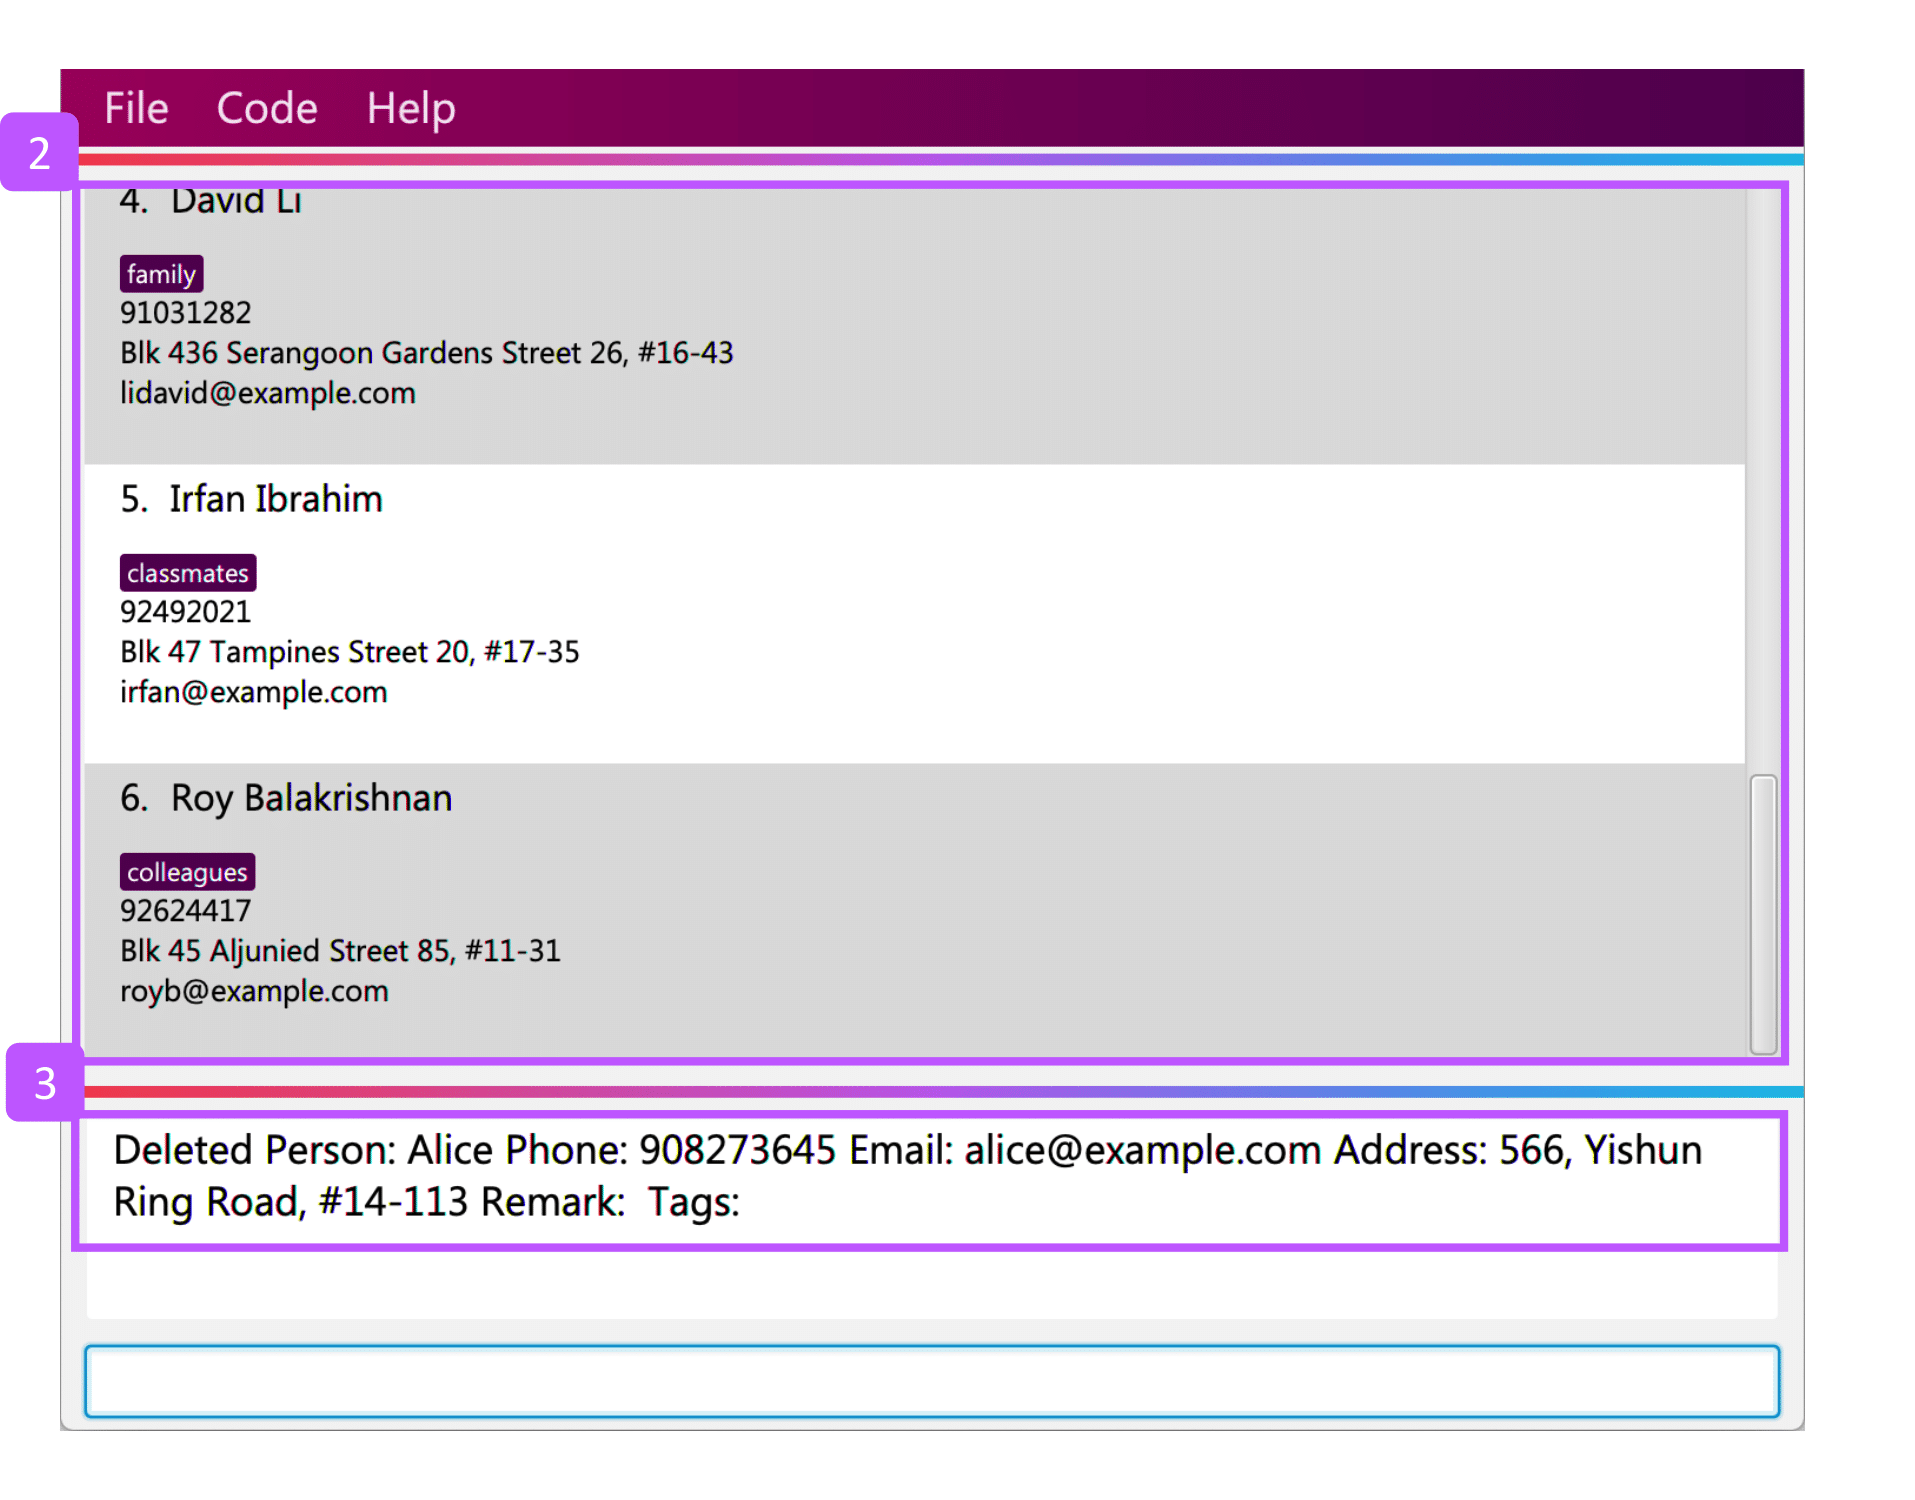
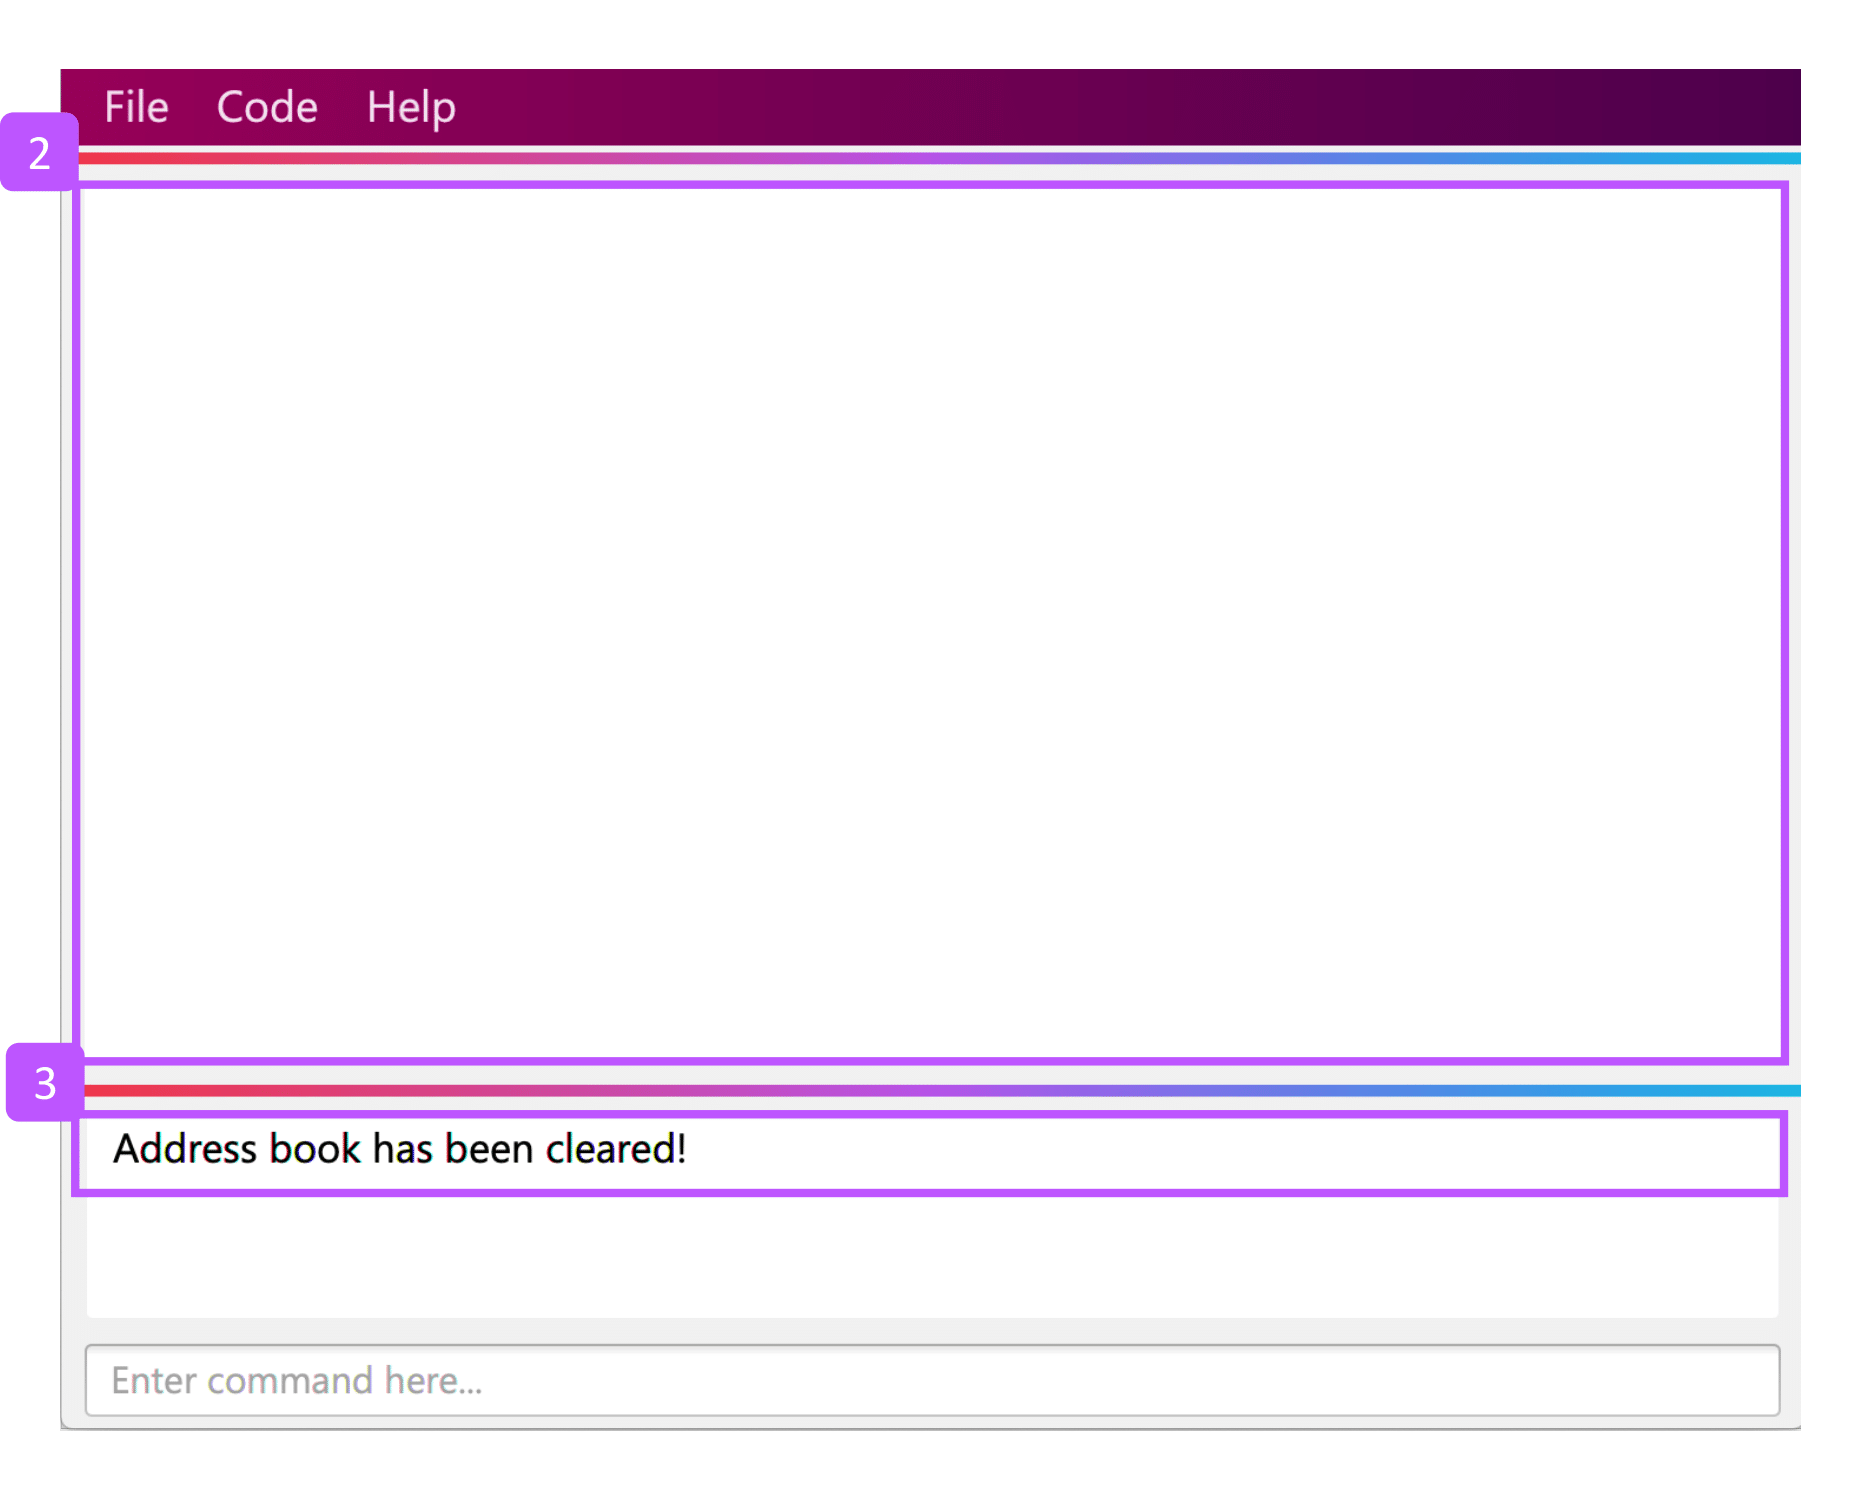
7.7. Clearing all entries : clear
Restarting your address book from scratch? Rather than deleting your contacts one by one, start with a fresh new address
book by clearing all existing contact entries.
Format:
clear
| You will not be able to undo this operation. Think twice before entering this command! |
Step by step:
Step 1. Type clear into the command box and click Enter
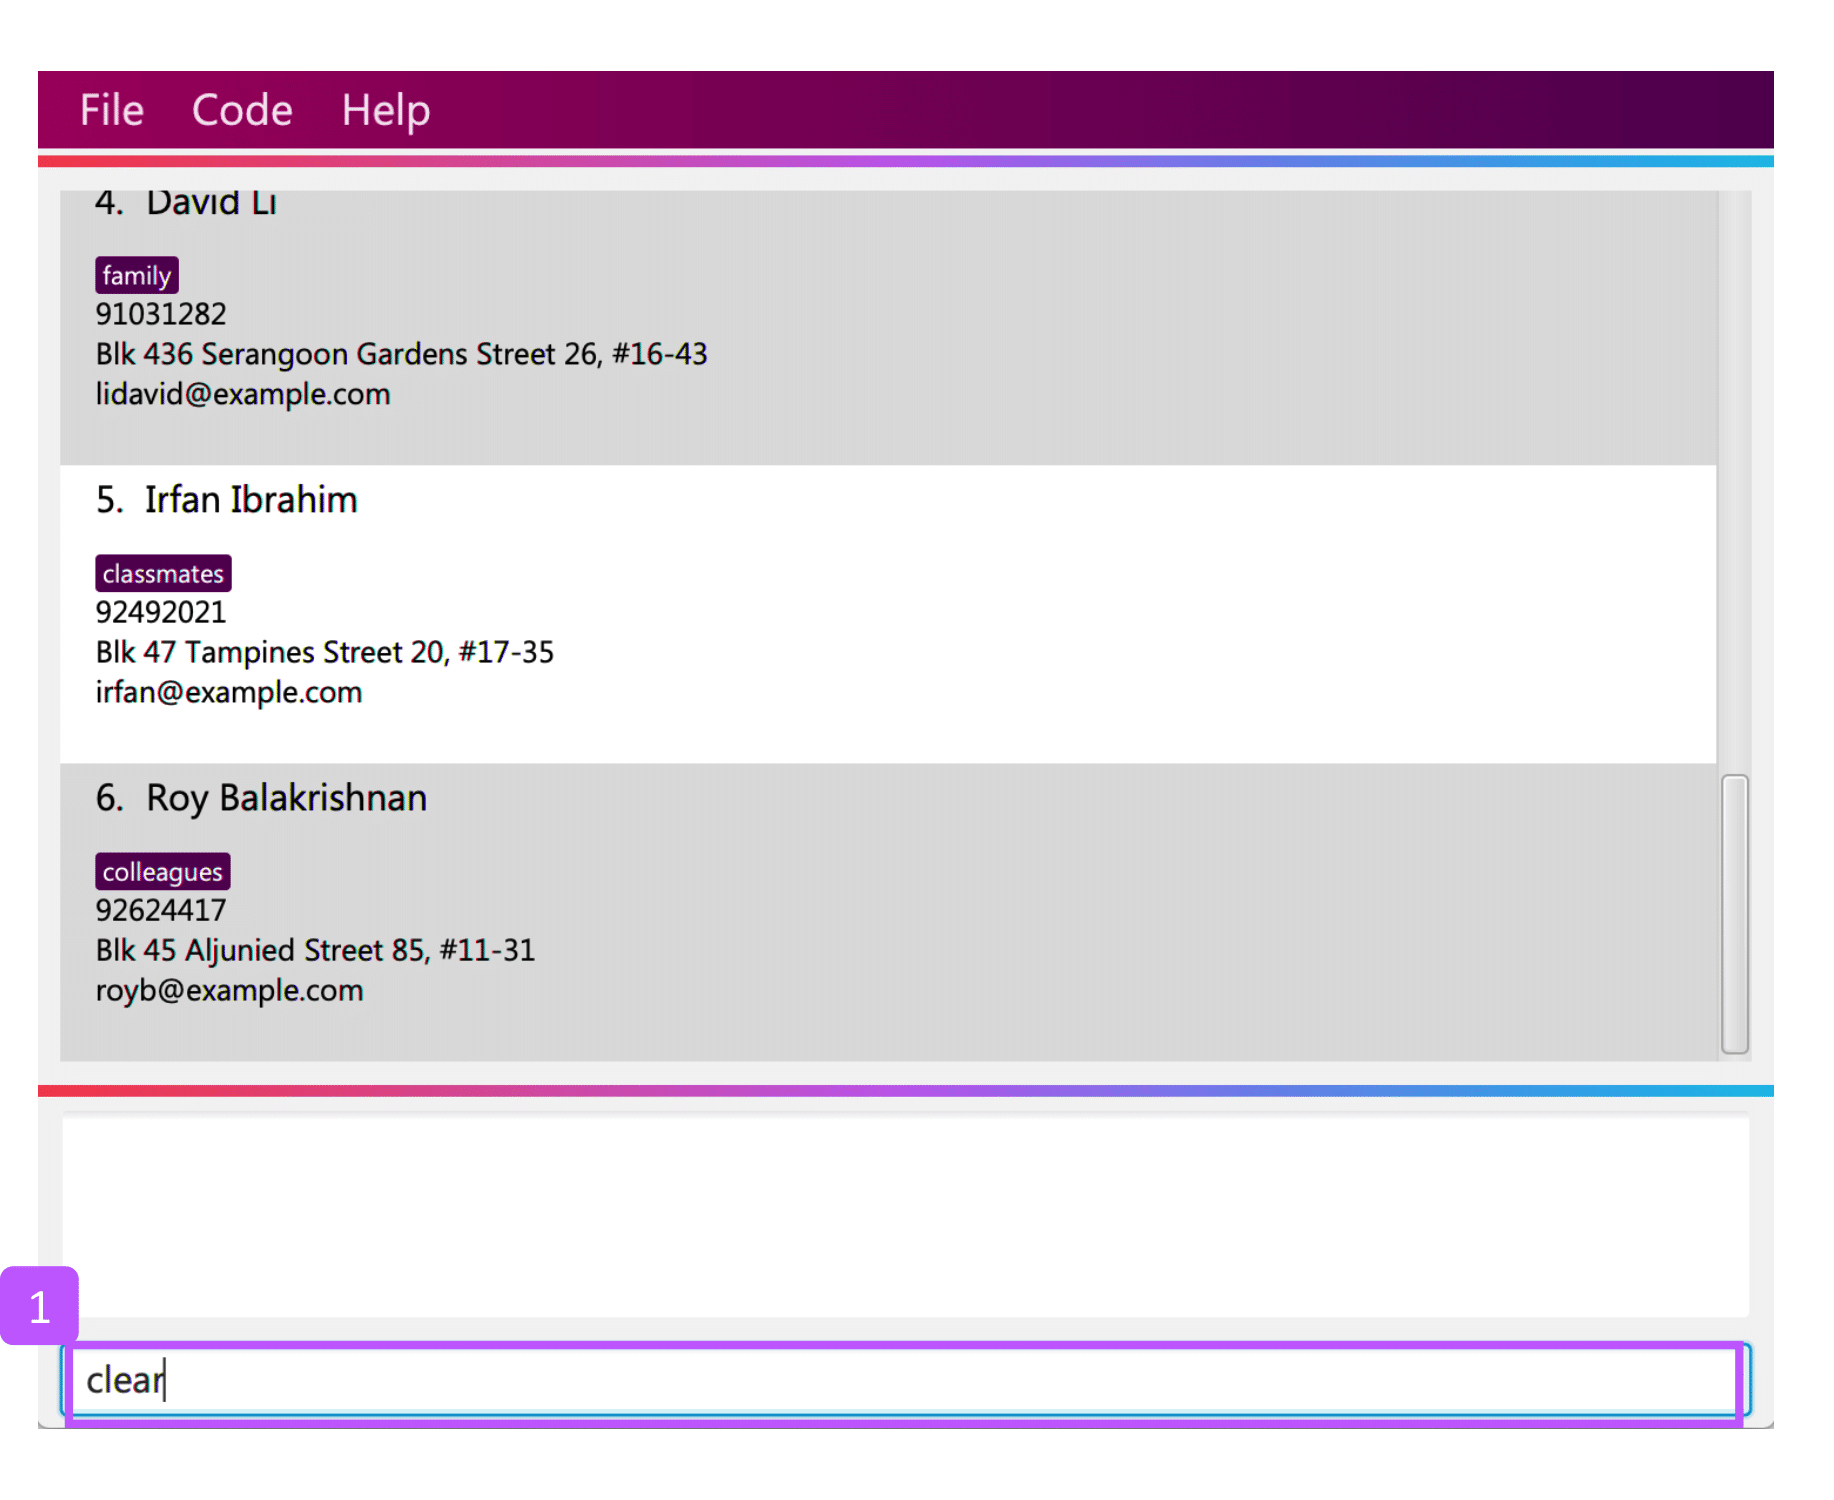
Step 2. The persons list panel is now cleared. You will see an empty persons list panel.
Step 3. The result box will display a message that tells you that the address book has been cleared.
7.8. Saving the data
Address book data are saved in the hard disk automatically after any command that changes the data.
There is no need to save manually.
8. Financial Tracker
Scare that you’re gonna overspend whenever you’re on a trip? Afraid no more! TravEzy’s Financial Tracker allow you to track your expenses seamlessly!
Each of your expense has 6 key fields:
-
Date
-
Time
-
Amount
-
Description
-
Type of expenditure
-
Country
The Date and Time specify when you spend your expenses, followed by the amount, description, types of expenditure and country where you’re current travelling at. Example of the types of expenditure are food, entertainment, health care, etc. You name it, TravEzy tracks it! In Financial Tracker, you will be able to manage your expenses easily.
| Valid year range is from 1000 to 3999. |
8.2. Adding an expense: add
Adding the expense of milk you’ve bought at the grocery shop you stopped by?
| You can only add a total maximum amount of one trillion! |
Format:
add a/AMOUNT d/DESCRIPTION t/TYPE OF EXPENDITURE [date/DATE] [time/TIME]
Example:
add a/2.89 d/Meiji Milk t/grocery
Step by step:
Step 1. Select which country you’re currently at from the Countries dropdown box.
Step 2. Type add a/2.89 d/Meiji Milk t/grocery in the Command box and press Enter.
Step 3. The Result box will display the message "Expense added".
Step 4. Now you can find your added expense in the Expense list panel.
8.3. Deleting an expense: delete
Added a wrong expense? Of course you can delete it if you want to :)
Format:
delete INDEX
Example: Delete the first expense you saw on your expense list.
delete 1
Step by step:
Step 1. Type delete 1 in the Command box and press Enter.
Step 2. The Result box will display the message "Your expense has been deleted".
8.4. Editing an expense: edit
Add a wrong expense? Why not edit it instead!
Format:
edit INDEX [a/AMOUNT] [d/DESCRIPTION] [t/TYPE OF EXPENDITURE] [date/DATE] [time/TIME]
Example: Edit the 1st expense you saw on your expense list.
edit 1 a/29.80 d/Nike bottle
Step by step:
Step 1. Notice the first expense’s fields in the Expense list panel.
Step 2. Now, type edit 1 a/29.80 d/Nike bottle in the Command box and press Enter.
Step 3. The Result box will display the message "The expense updated successfully!".
Step 4. Now the first expense’s amount and description fields have been changed to 29.80 and Nike bottle respectively.
8.5. Clears an expense list: clear
Messed up your expense list? Don’t worry, just clear it!
Format:
clear
Step by step:
Step 1. Type clear in the Command box and press Enter.
Step 2. The Result box will display the message "Expense list cleared!".
Step 3. Now in your Expense list panel, your expense list has been cleared!
8.6. Undo your previous action: undo
Did something wrong? We heard you! Simply undo your previous action :)
You can only undo your previous add, edit, delete and clear command.
|
Format:
undo
Step by step: (A continue from above clear command)
Step 1. Type undo in the Command box and press Enter.
Step 2. The Result box will display the message "Done!".
Step 3. Notice that your expense list has been recovered. Nice save!
8.7. Switching between countries: switch
Currently in somewhere else? Switch to that expense list instead!
Format:
switch COUNTRY
| You can always use the Countries dropdown box directly instead! |
| You can only type in countries which are only listed from the Countries dropdown box |
Example:
switch Japan
Step by step:
Step 1. Type switch Japan in the Command box and press Enter.
Step 2. The Result box will display the message "Expense list switched".
Step 3. Now your expense list inside the Expense list panel has been switched to that which is in Japan!
8.8. Sort out your expense list: sort
The default sorting way of the expense list is not your thing? Just sort your expense list according your needs!
| All of the sorting is done in reversed order :) |
Format:
sort CRITERIA
Where CRITERIA can be amount, date, time, type and default
Example: to sort by amount
sort amount
Step by step:
Step 1. Notice the amount field in each expenses are currently not in order.
Step 2. Now, type sort amount in the Command box and press Enter.
Step 3. The Result box will display the message "Expense List sorted!".
Step 4. Now all your expenses are sorted in descending order of your amount!
8.9. Generate an overview of your spending: summary
Do you ever have difficulty summarising your spending? Afraid not! You can view you expenses statistics easily!
Format:
summary
Step by step:
Step 1. Type summary in the Command box and press Enter.
Step 2. The result box will display the message "Currently viewing the Summary Window".
Step 3. As you should have noticed, the Summary Window has been popped out showing you statistics of your expenses in a nice-looking pie chart and bar chart form!
9. Diary
The sweetest part of any holiday is looking back at your fond memories. TravEzy’s Diary allows you to do just that! Here is our Diary right below!

In TravEzy, we have broken down your memories into 4 key parts, namely Title, Date and Time, Place and Memory.
For example, here is a Diary Entry about our trip to Tioman
-
Title → First time Snorkeling
-
Date and Time → 30/12/2019 0900
-
Place → Tioman Island
-
Memory → Saw so many beautiful fish!
In the Diary, you will be able to add and delete your Diary Entries. There are also a few more special tasks that you can do with your Diary. Enjoy!
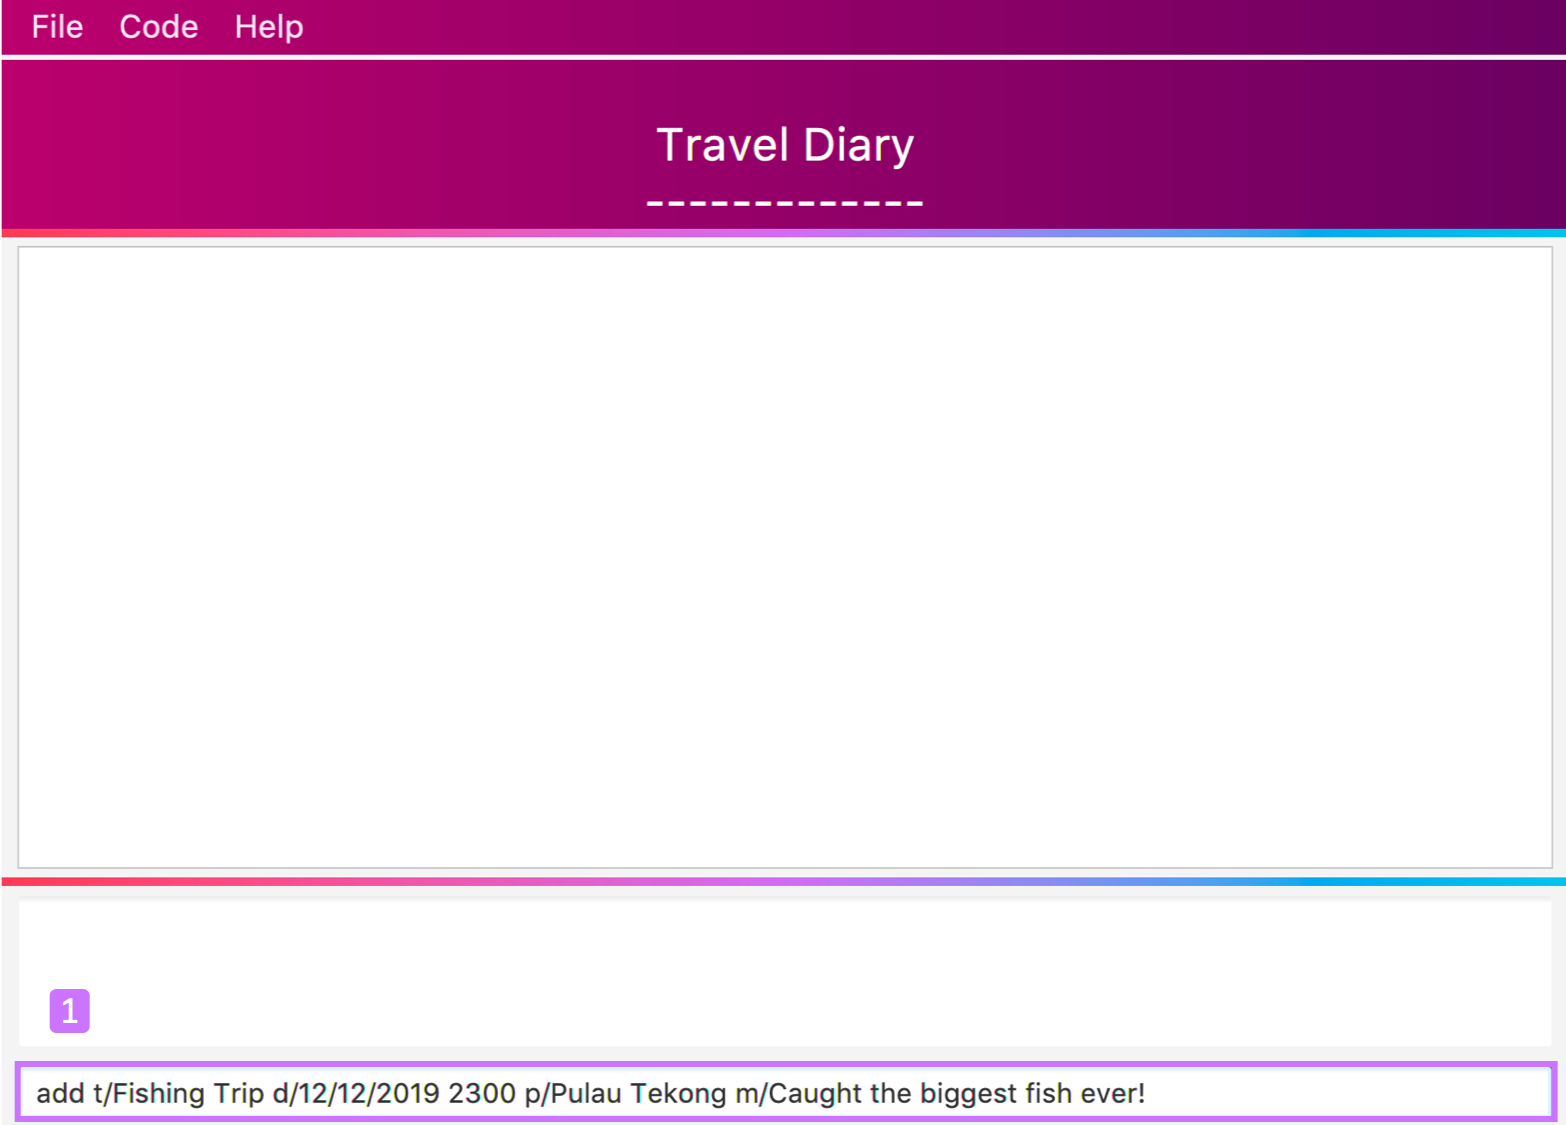
9.1. Adding diary entries to your diary add
Trying to journal about your fishing trip? The Diary allows you to add Diary Entries and keep them alive in your desktop forever.
Format:
add t/TITLE d/DATE TIME [p/PLACE] [m/MEMORY]
| Keep your input for Title, Place and Memory short! No more than 50 characters for title and 100 for place and memory! This will help you keep your Diary Entries short and sweet! |
Example:
add t/Fishing Trip d/12/12/2019 2300 p/Pulau Tekong m/Caught the biggest fish ever!
| Note that Date is input in this format: dd/mm/yyyy HHMM: | d = day | m = month | y = year | H = Hour (24HR) | M = Minute | |
| We know you’re a young student, so we’ve kept the range for the year in Date limited to 1980 - 2030 |
Step by step:
Lets take the example of a midnight fishing trip!
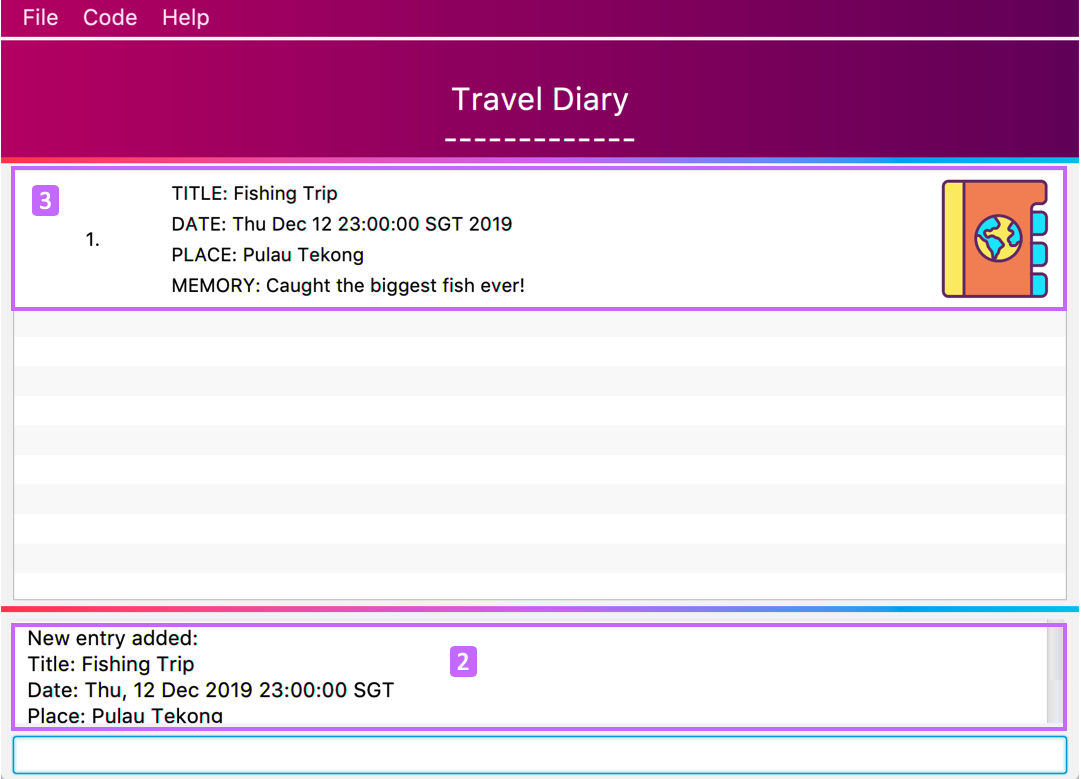
Step 1: Type add t/Fishing Trip d/12/12/2019 2300 p/Pulau Tekong m/Caught the biggest fish ever! into the User Input Box and
press Enter on your keyboard. You can refer to the picture below, where the number 1 is.
Step 2: TravEzy will tell you if your add command was successful in the Result Display, as can be seen where the number 2 is, in the picture below.
Step 3: You can see your added entry in the Diary List Panel, similar to number 3 in the picture below.
9.2. Deleting diary entries from your diary delete
It’s best to forget some memories ☹. The Diary can help you to get rid of unpleasant Diary Entries.
Format:
delete INDEX
Example:
delete 2
Can’t delete what’s not there! Try to keep the INDEX larger than 0 and smaller than the number of Diary Entries in your list!
|
Step by step:
Let’s say you lose your wallet while on holiday in Genting, That’s definitely a trip that no one would want to remember :(.
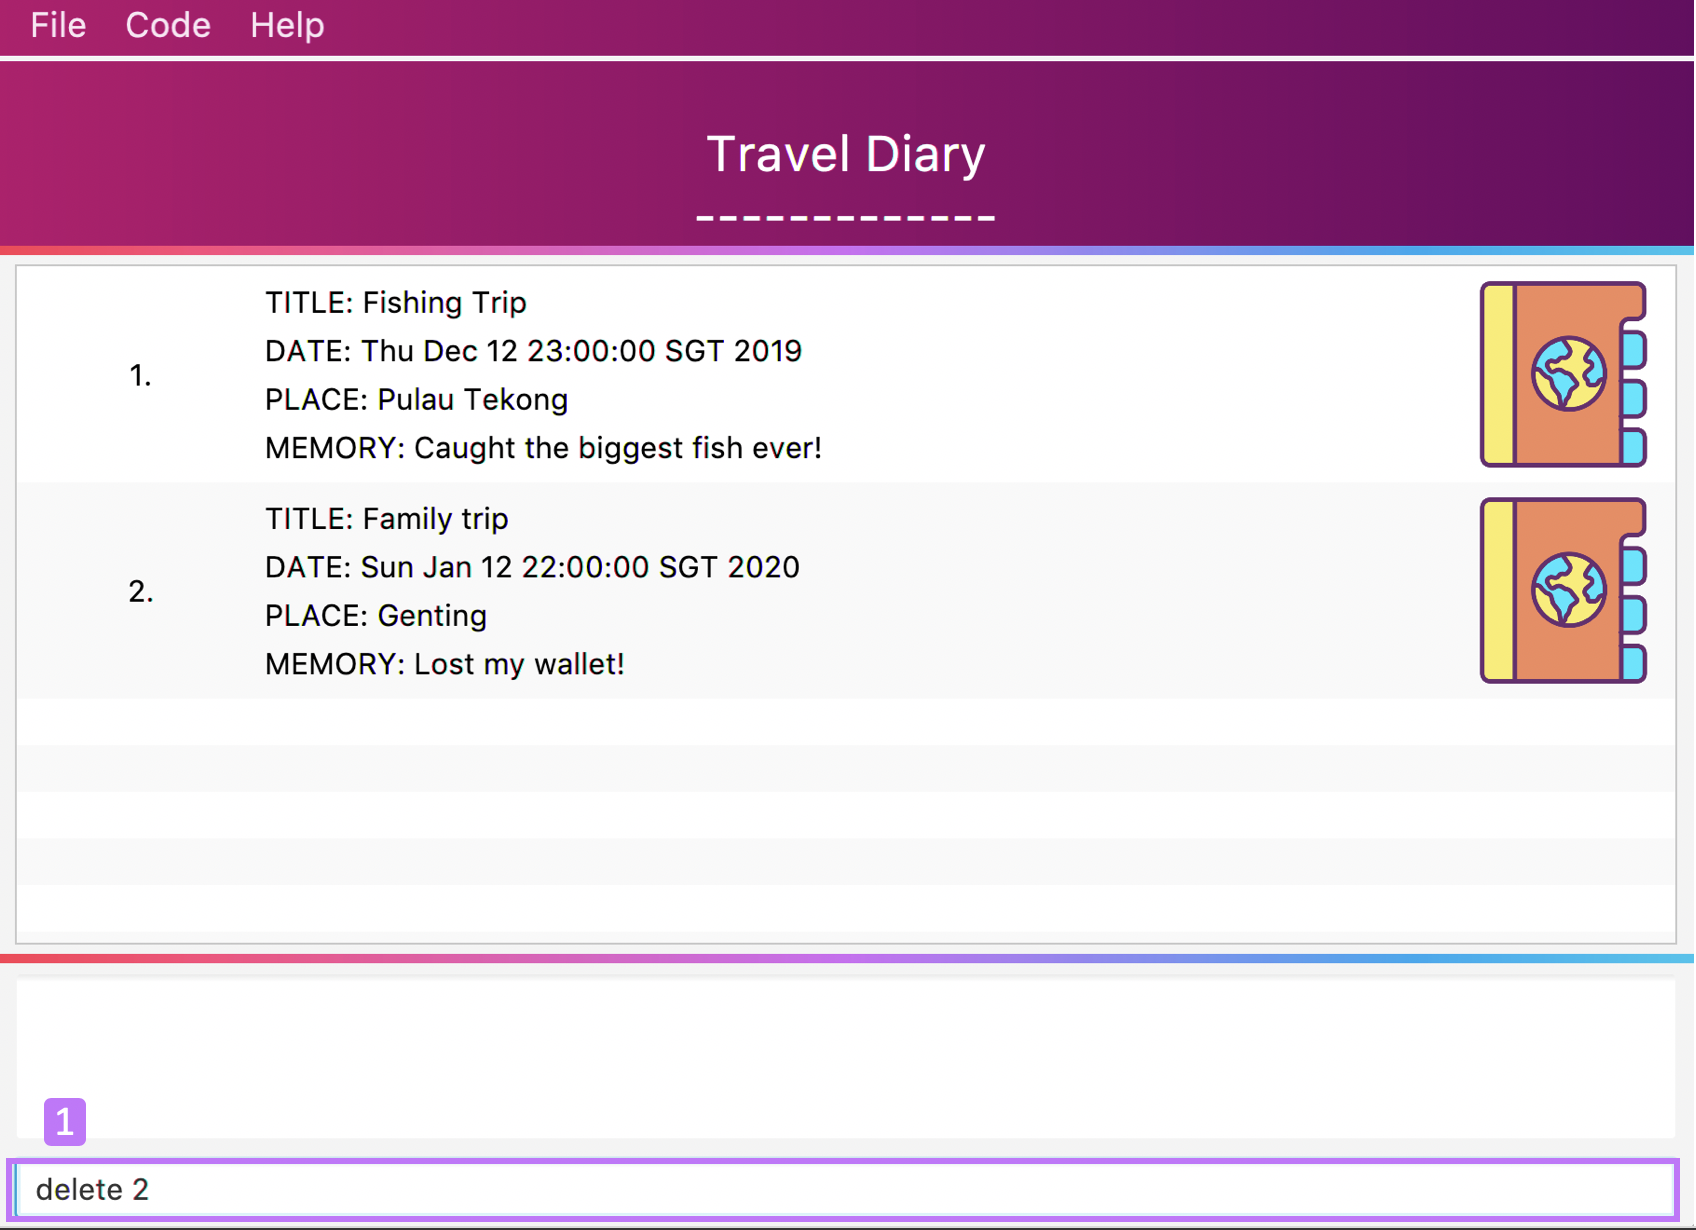
Step 1: Type delete 2 into the User Input Box and press Enter on the keyboard.You can refer to the picture below, where the number 1 is.
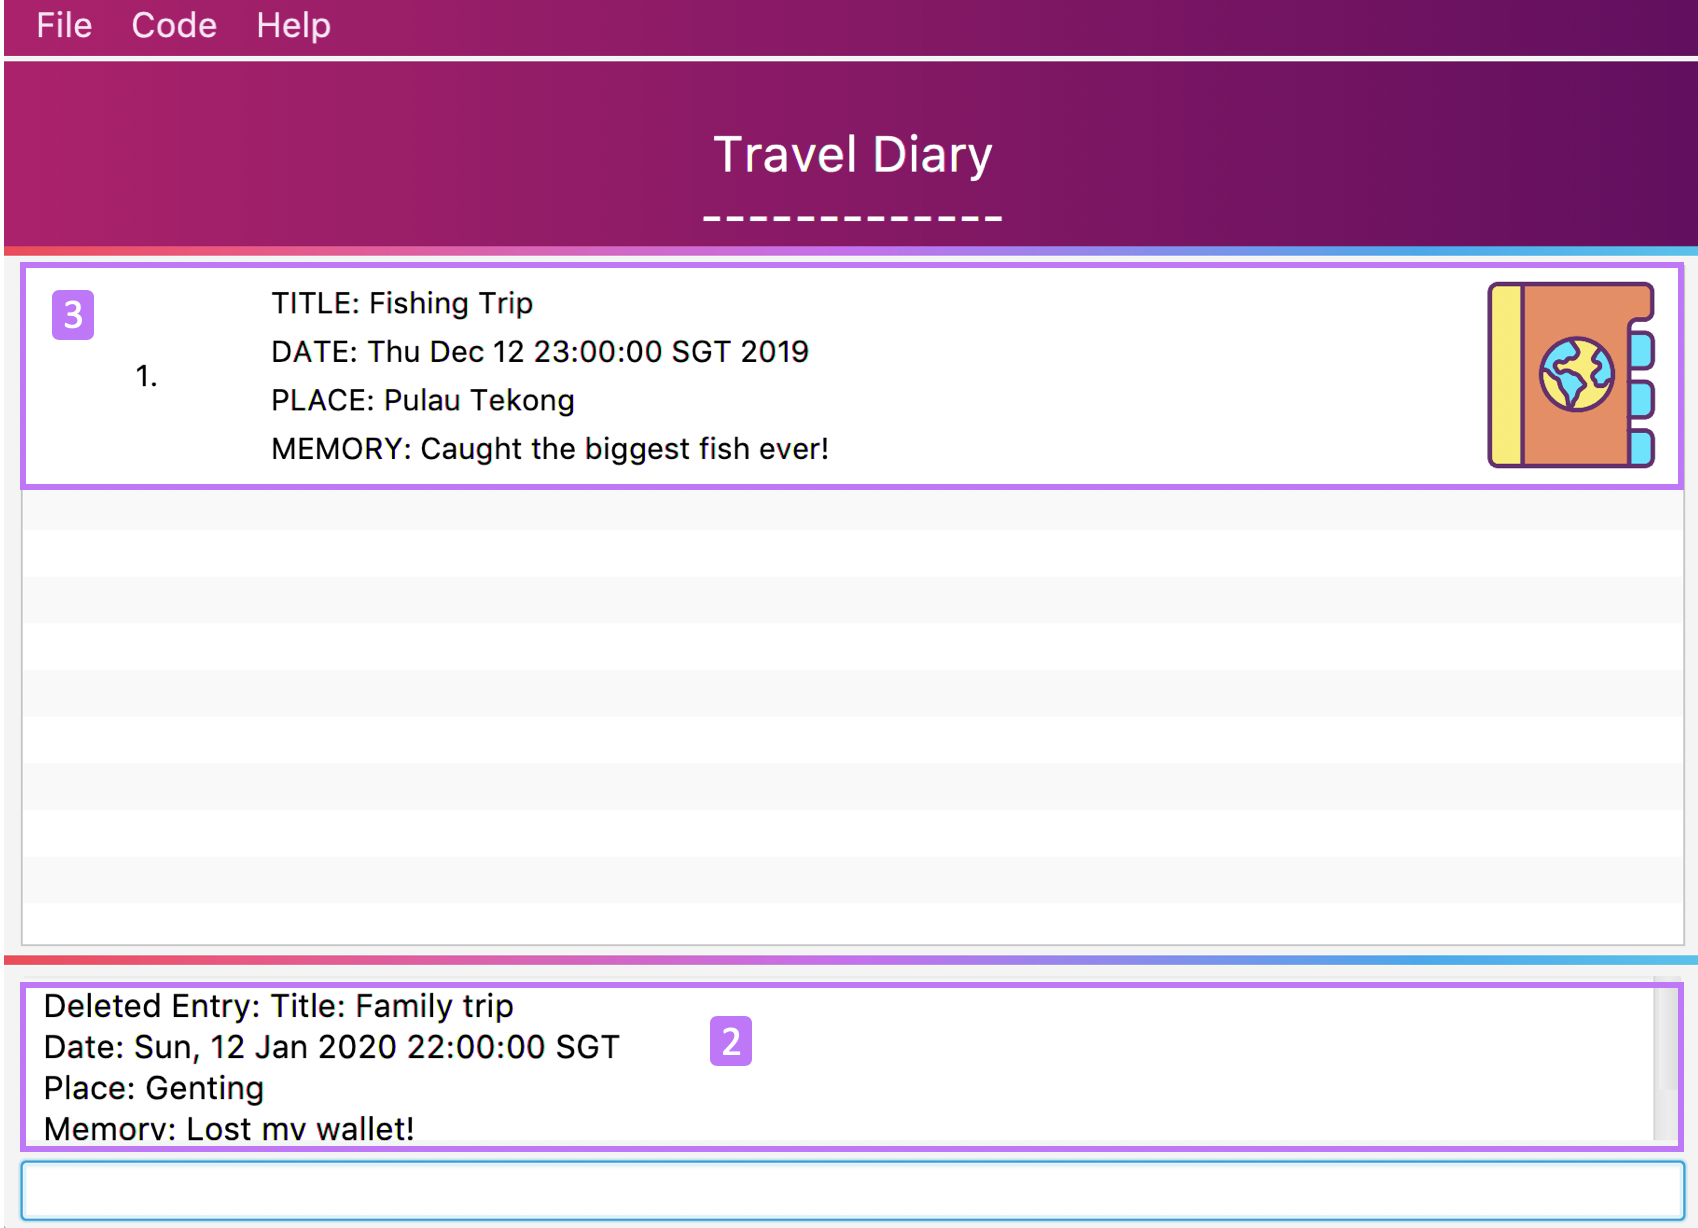
Step 2: TravEzy will tell you if your delete command was successful in the Result Display, as can be seen where the number 2 is, in the picture below.
Step 3: You can see your updated Diary List Panel without the horrible memory, similar to number 3 in the picture below.
9.3. List all your diary entries list
What if you want to see all your memories in ONE, CONTINUOUS list? The Diary can do that as well! It allows you to see everything in one, convenient list!
Format:
list
Example:
list
Step by step:
Lets relive EVERYTHING!
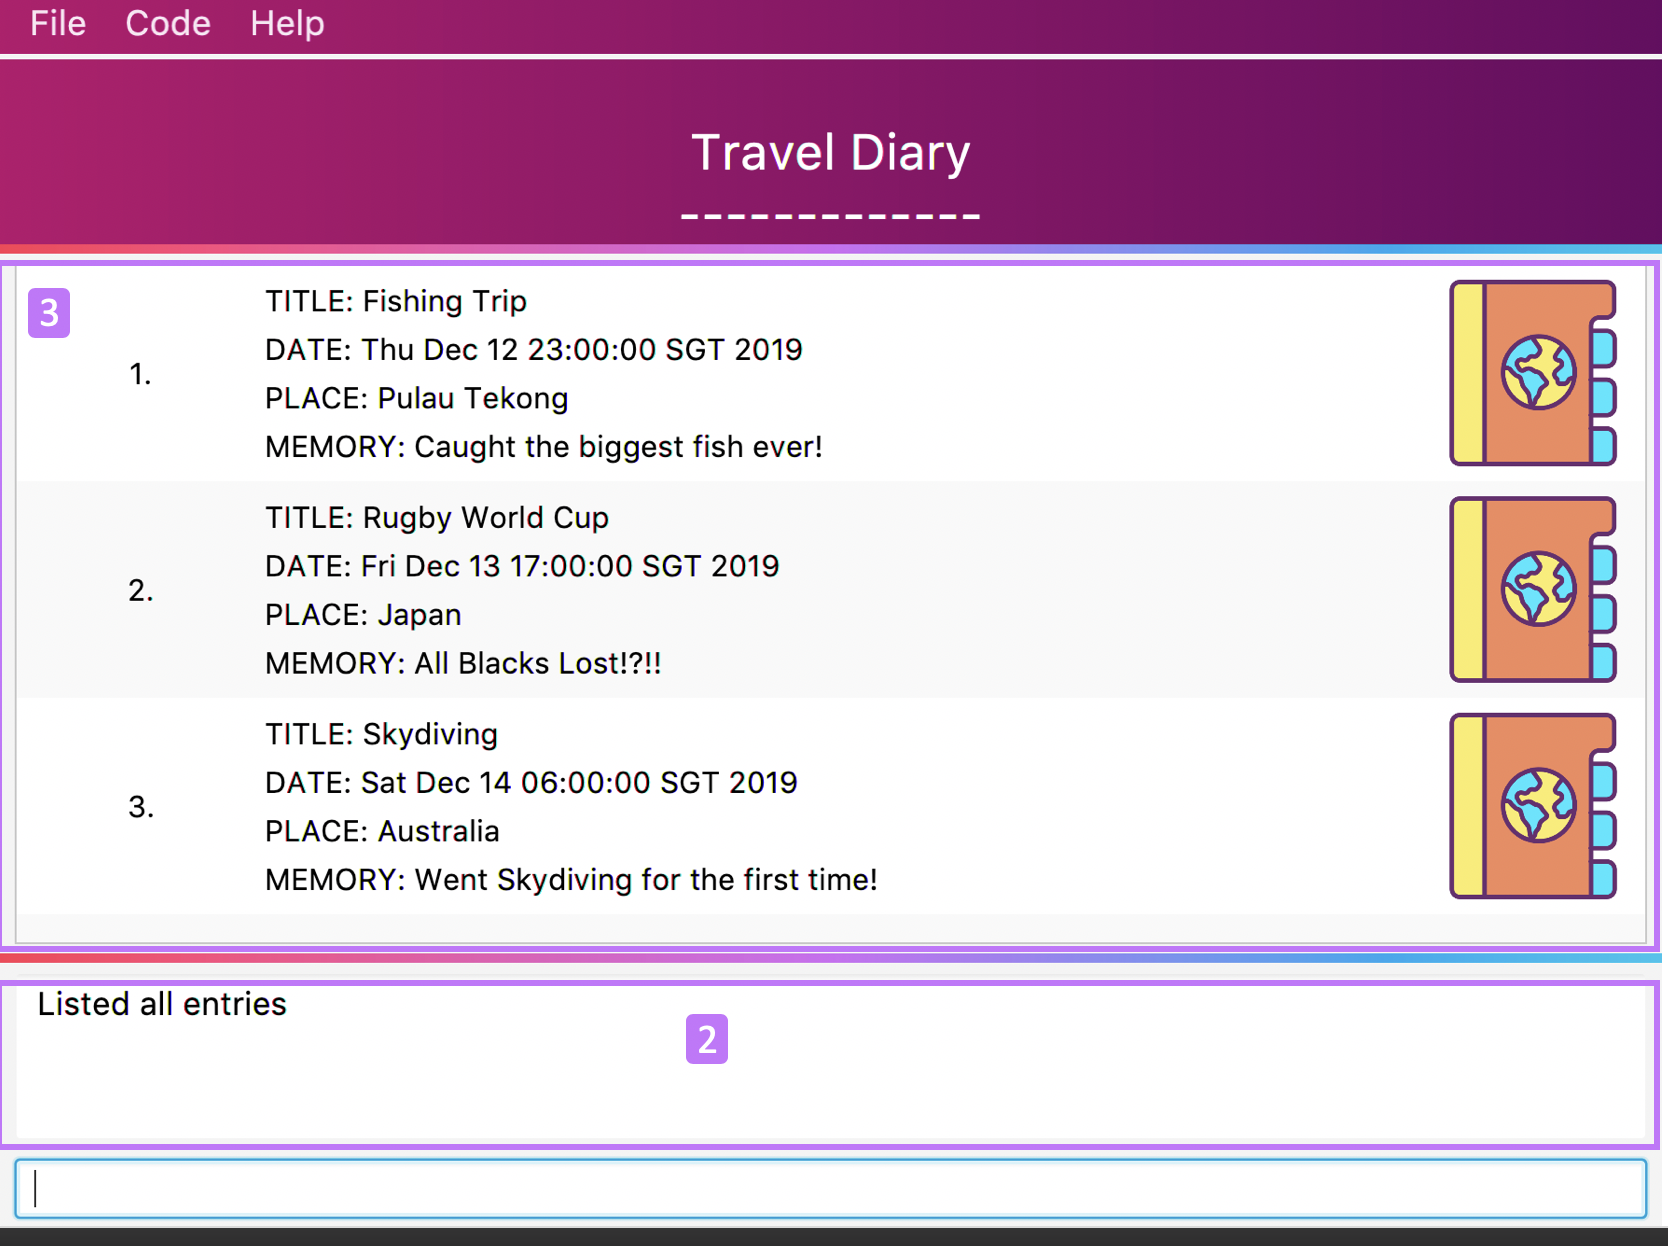
Step 1: Type list into the User Input Box and press Enter on the keyboard. You can refer to the picture below, where the number 1 is.
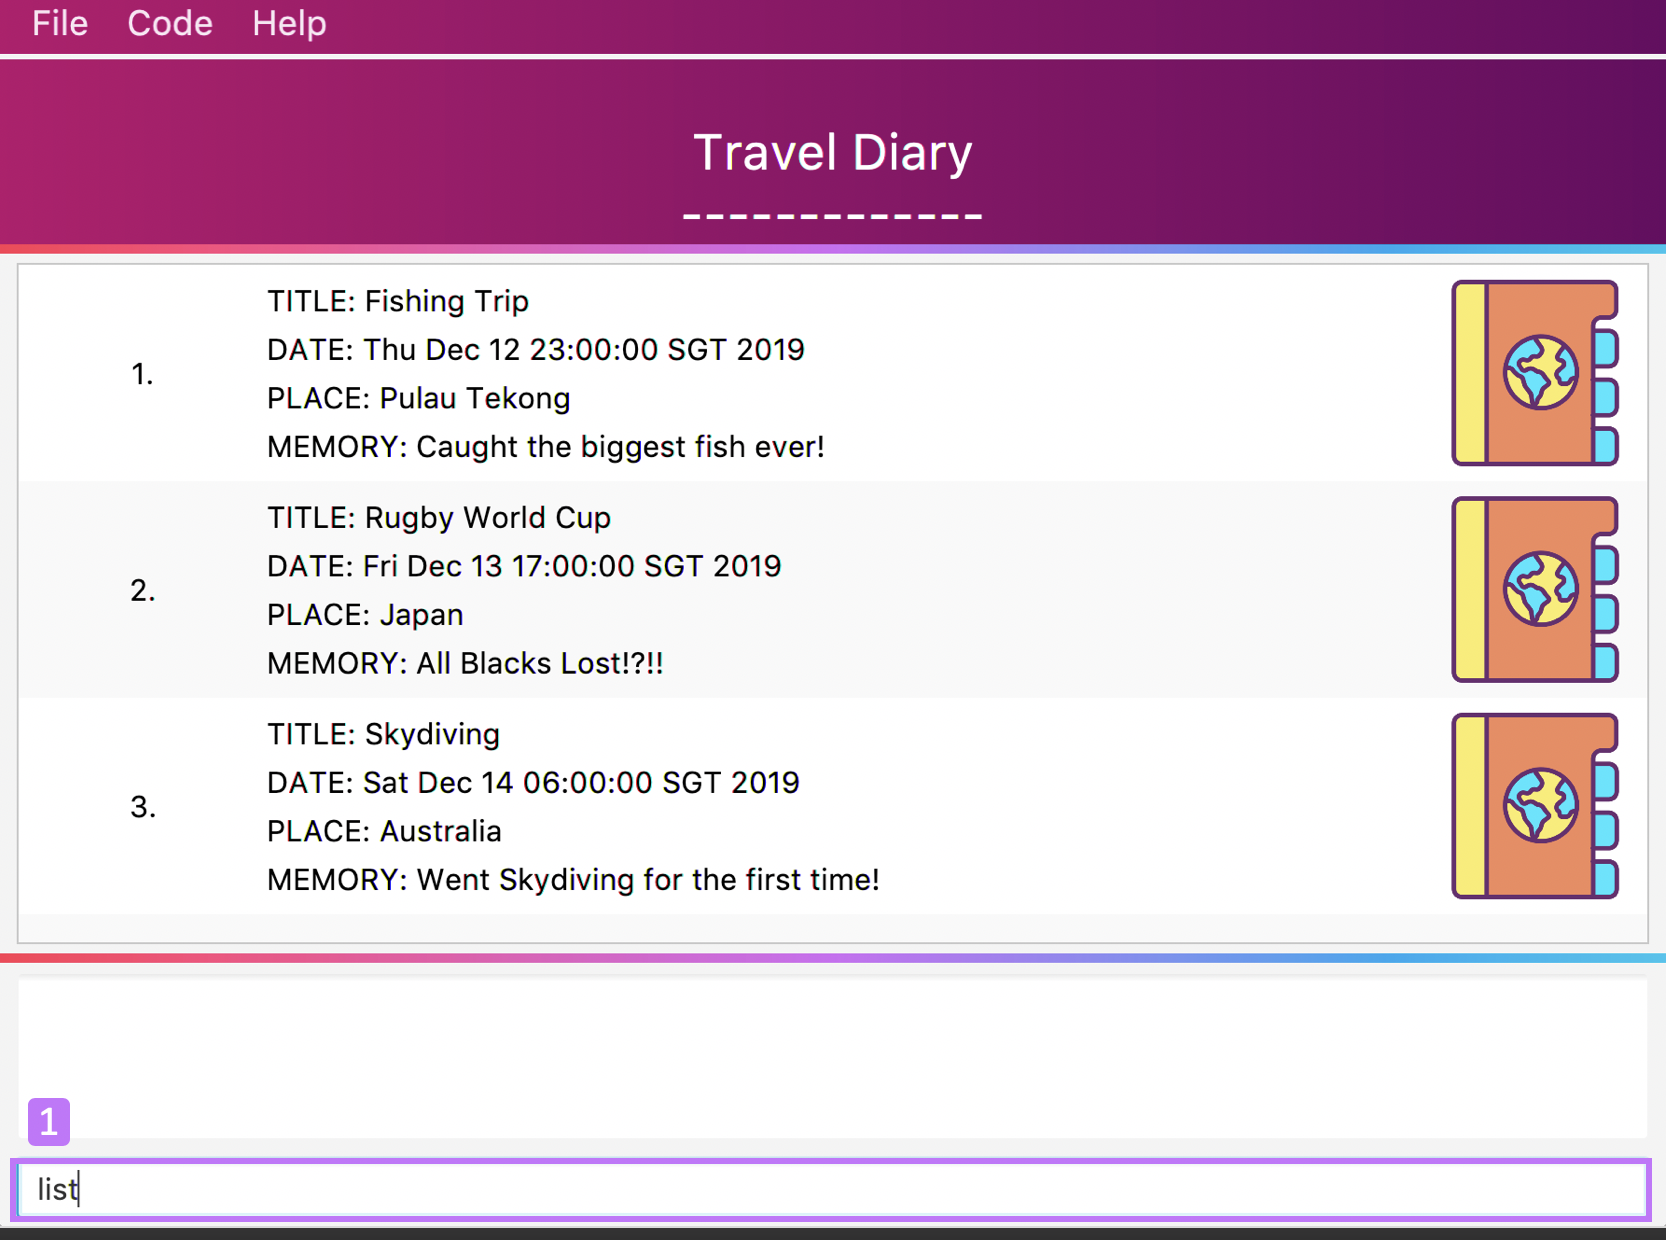
Step 2: TravEzy will tell you if your list command was successful in the Result Display, as can be seen where the number 2 is, in the picture below.
Step 3: You can see all your Diary Entries in the Diary List Panel, similar to number 3 in the picture below.
9.4. Find diary entries find
"Hey, when did I go to Spain?" It can be hard to remember all the details of your trips. That’s why, this Diary lets you look through all your entries quickly, to give you the entry that you want!
Format:
find TARGET
Example:
find rugby
| To search for Dates, enter them in the same format as before, when you added the Diary Entry (dd/mm/yyyy HHMM) |
Step by step:
That was the craziest Rugby World Cup ever! Who lost?
Step 1: Type find rugby into the User Input Box and press Enter on the keyboard. You can refer to the picture below, where the number 1 is.
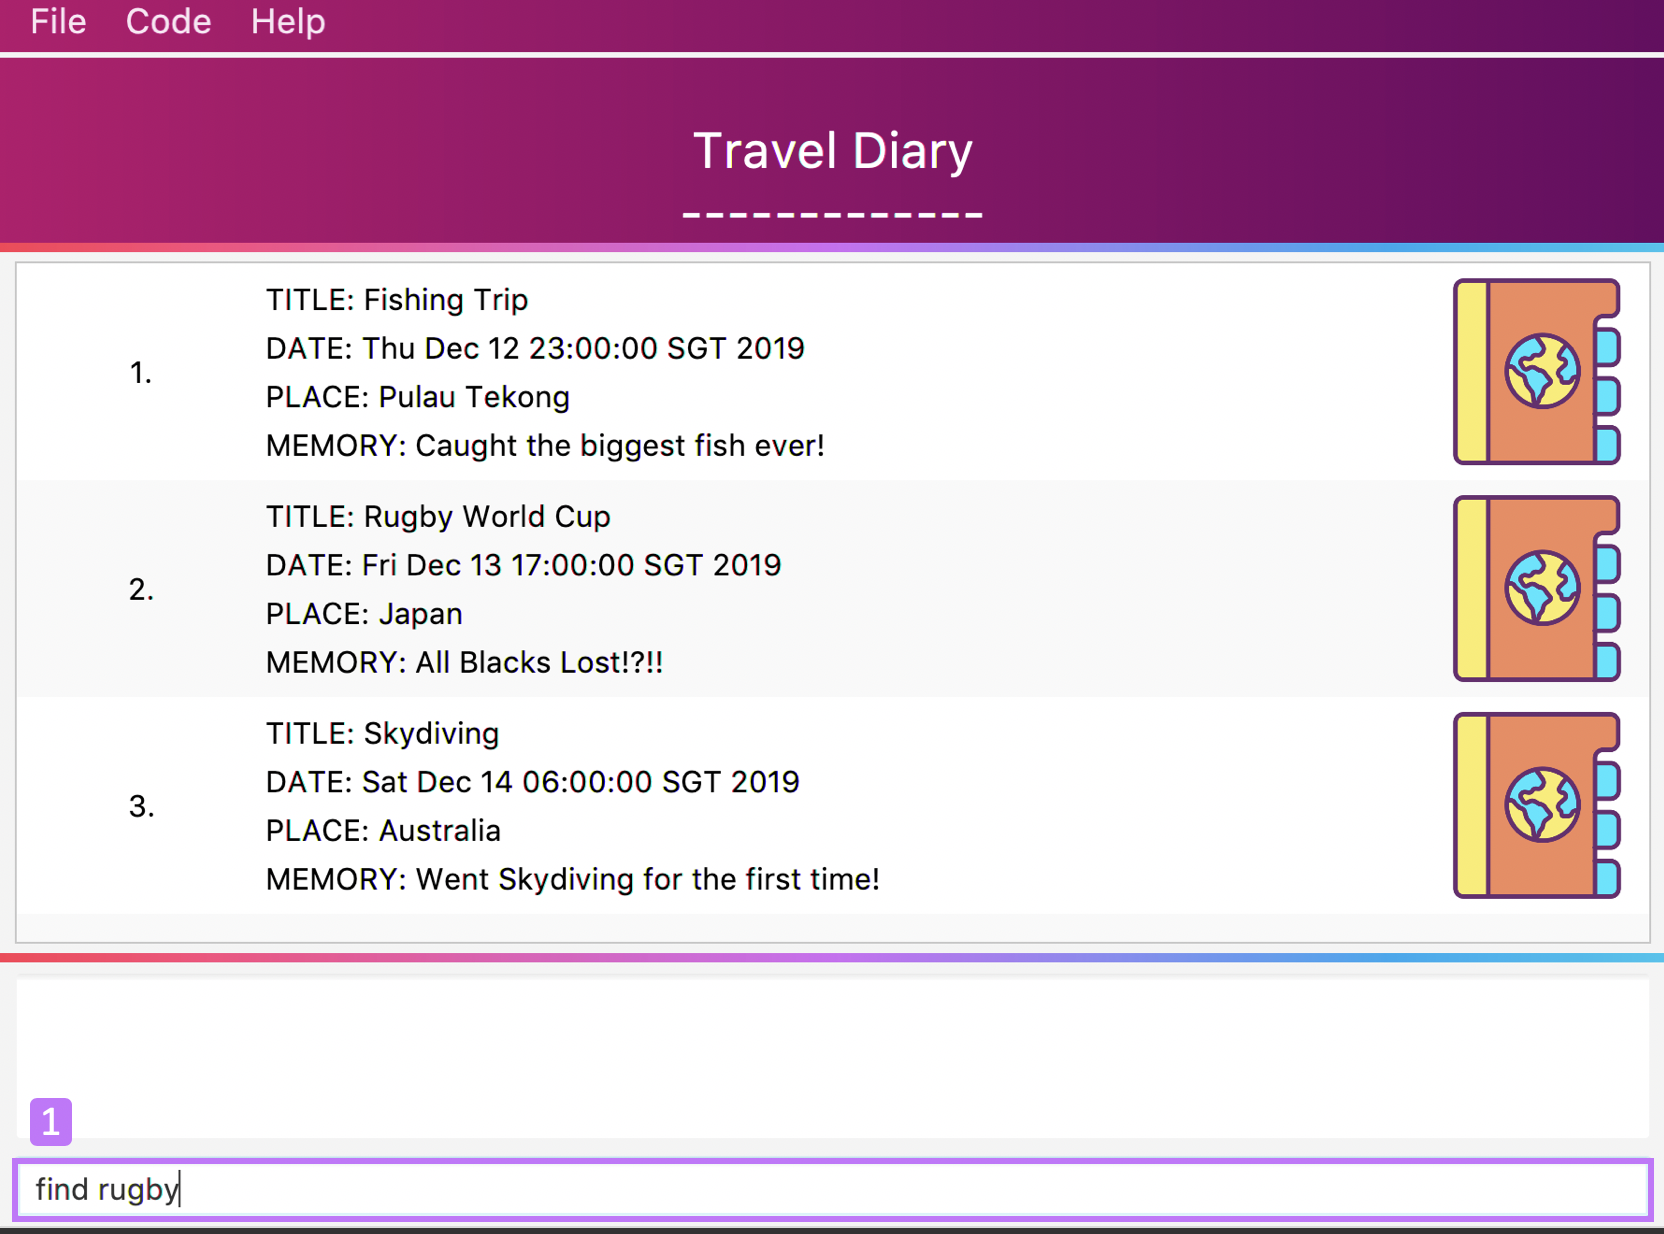
Step 2: TravEzy will tell you if your find command was successful in the Result Display, as can be seen where the number 2 is, in the picture below.
Step 3: You can see the matching Diary Entries in your Diary List Panel, similar to number 3 in the picture below.

9.5. Find specific diary entries findSpecific
Let’s narrow down your search! The Diary allows you to look through specific sections of each Diary Entry to find the exact entry that you want!
Format:
findSpecific [t/TITLE] [d/DATE TIME] [p/PLACE] [m/MEMORY]
Example:
findSpecific d/12/12/2019
Step by step:
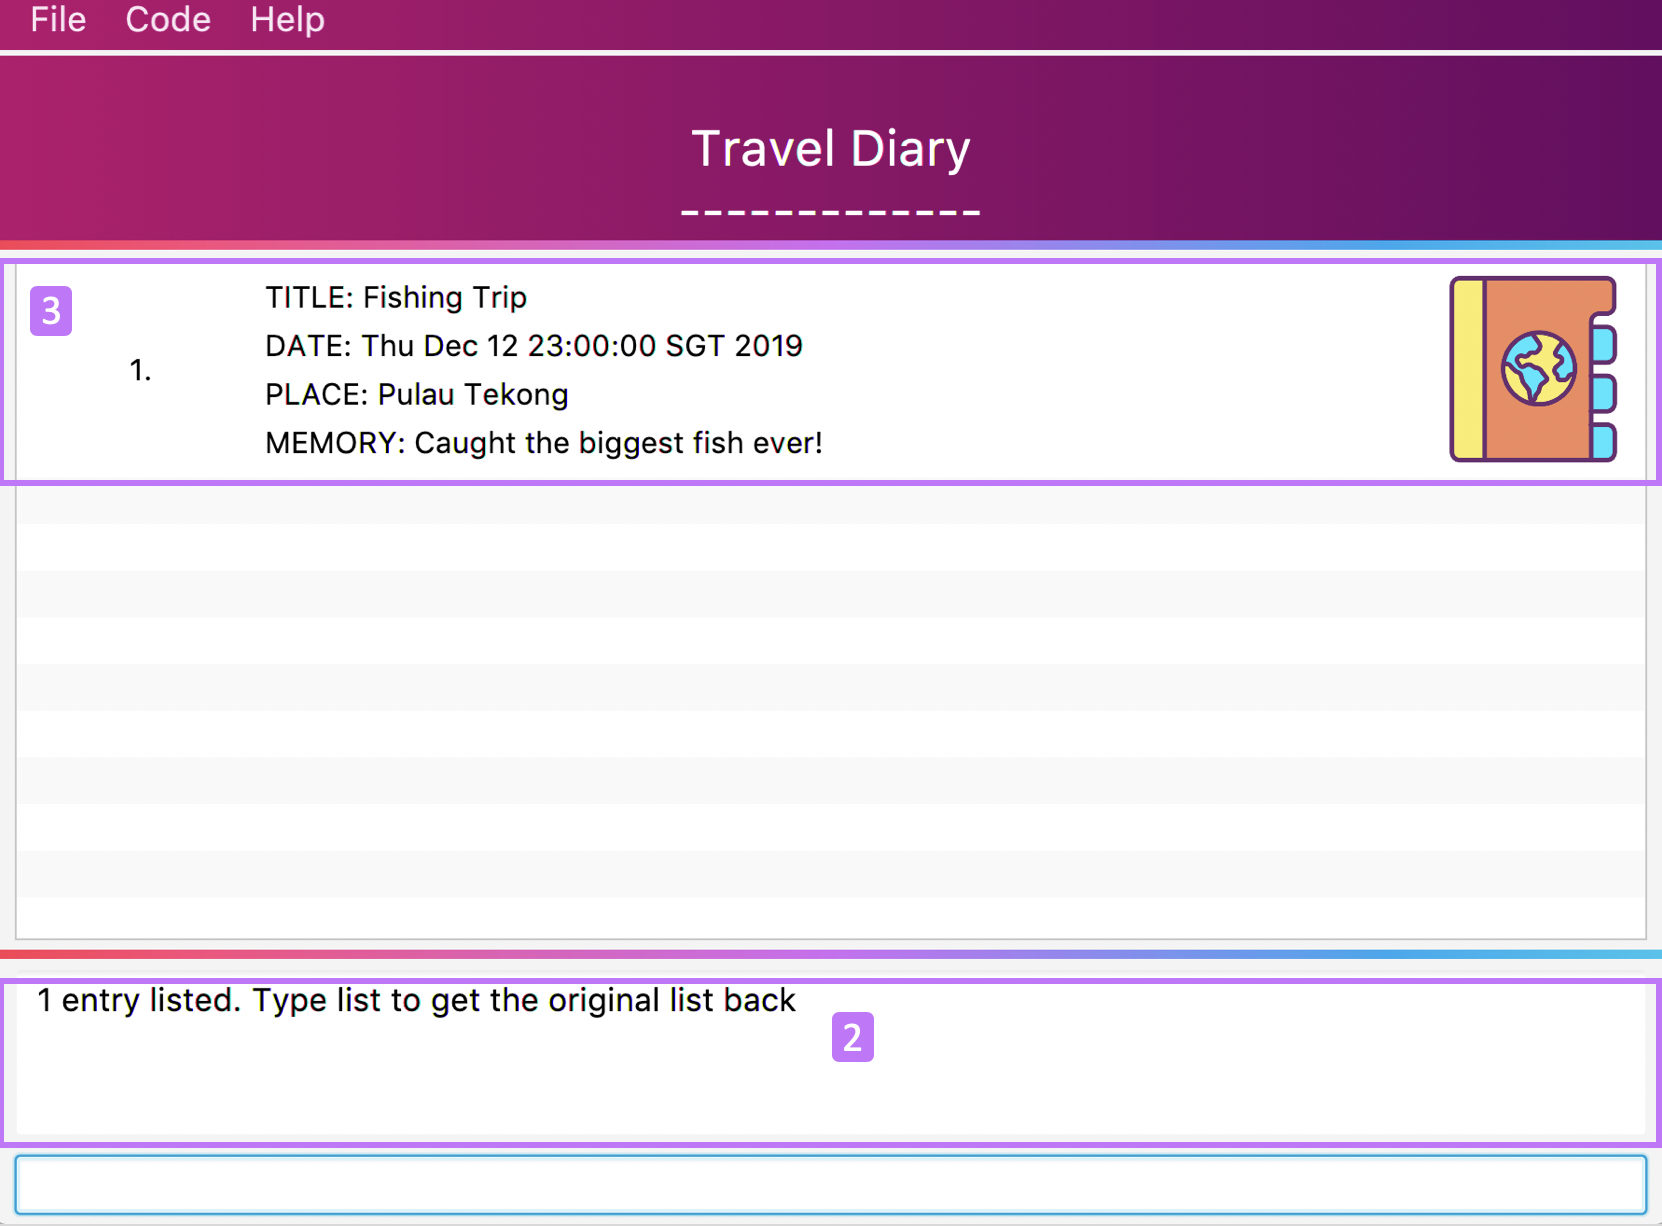
You know that you had a trip on the 12th of December 2019, but you can’t remember what you did…
Step 1: Type findSpecific d/12/12/2019 into the User Input Box and press Enter on the keyboard. You can refer to the picture below, where the number 1 is.
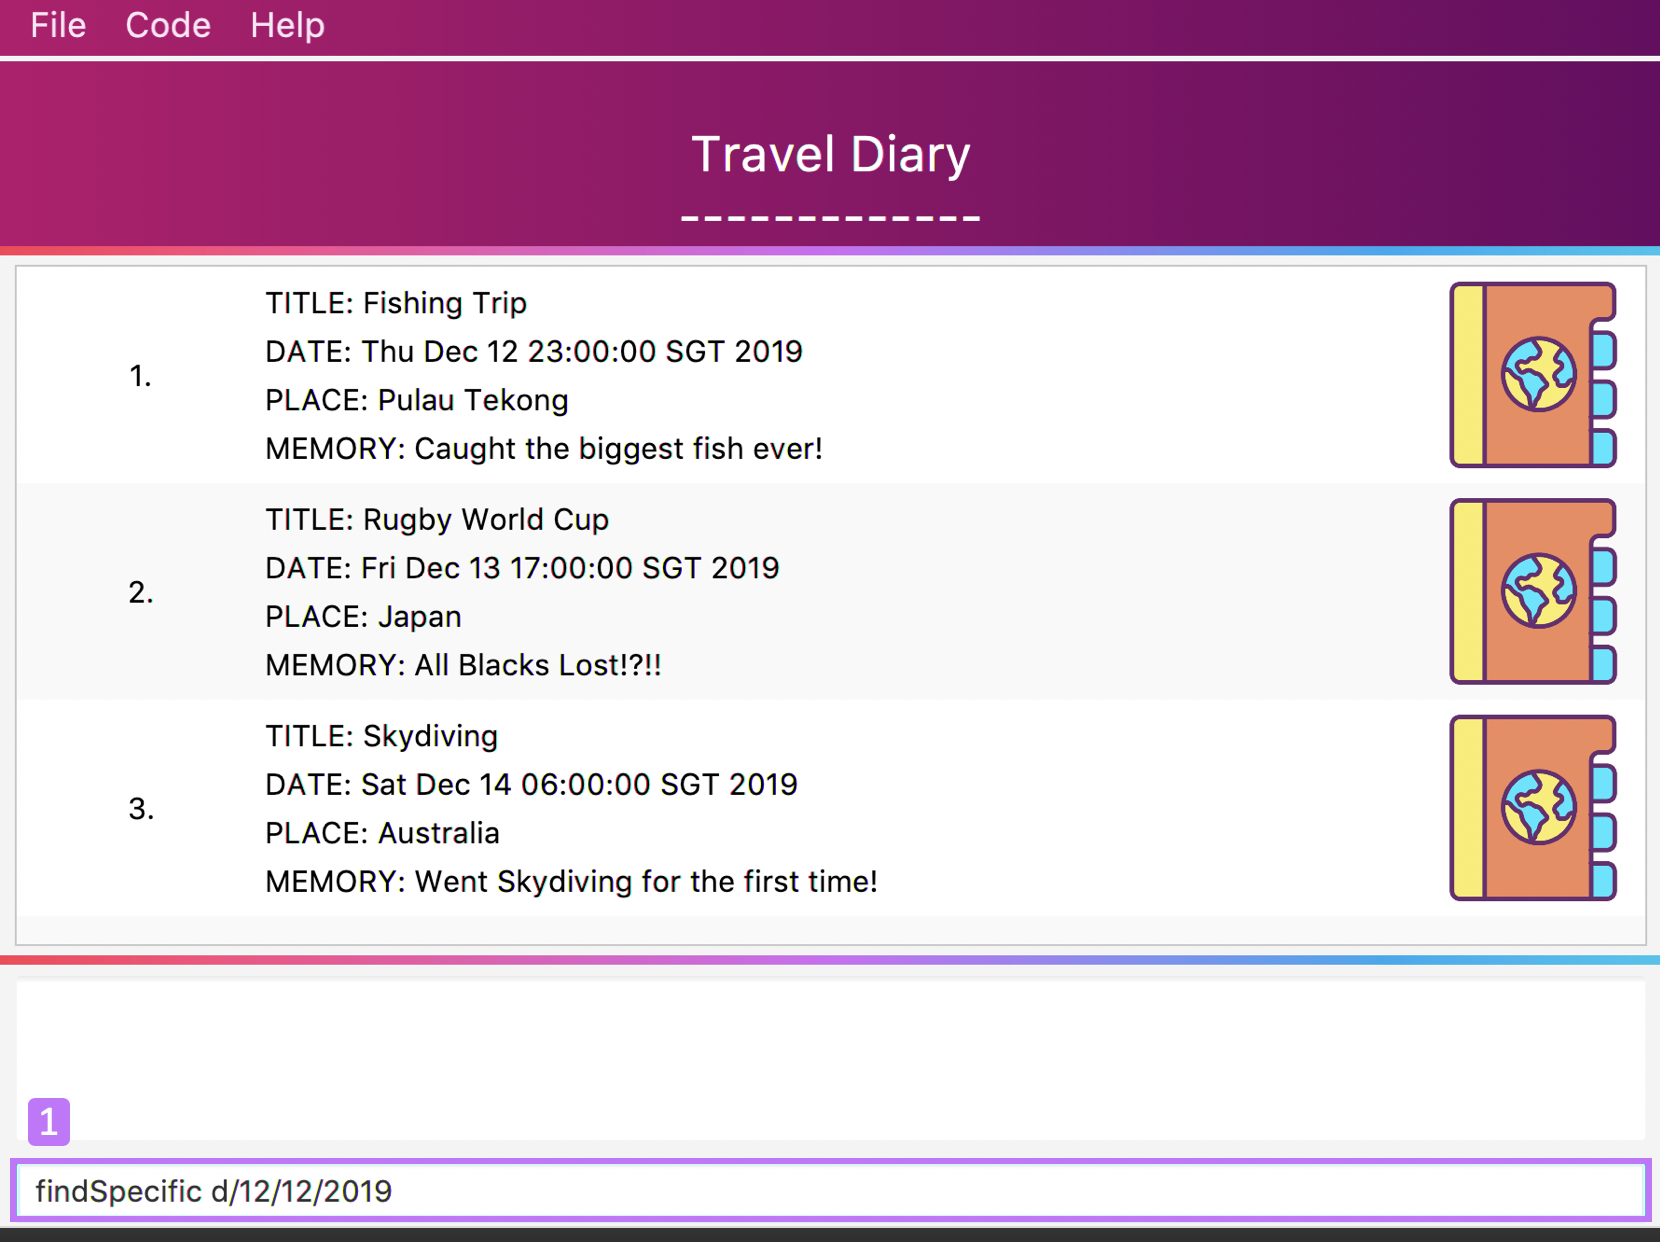
Step 2: TravEzy will tell you if your findSpecific command was successful in the Result Display, as can be seen where the number 2 is, in the picture below.
Step 3: You can see the specific matching Diary Entries in your Diary List Panel, similar to number 3 in the picture below.
9.6. Private personal memories private
There are some personal memories which are for our eyes only. The Diary can help you to private memories from prying eyes.
Format:
private INDEX
Example:
private 4
Can’t private what’s not there! Try to keep the INDEX larger than 0 and smaller than the number of entries in your list!
|
Step by step:
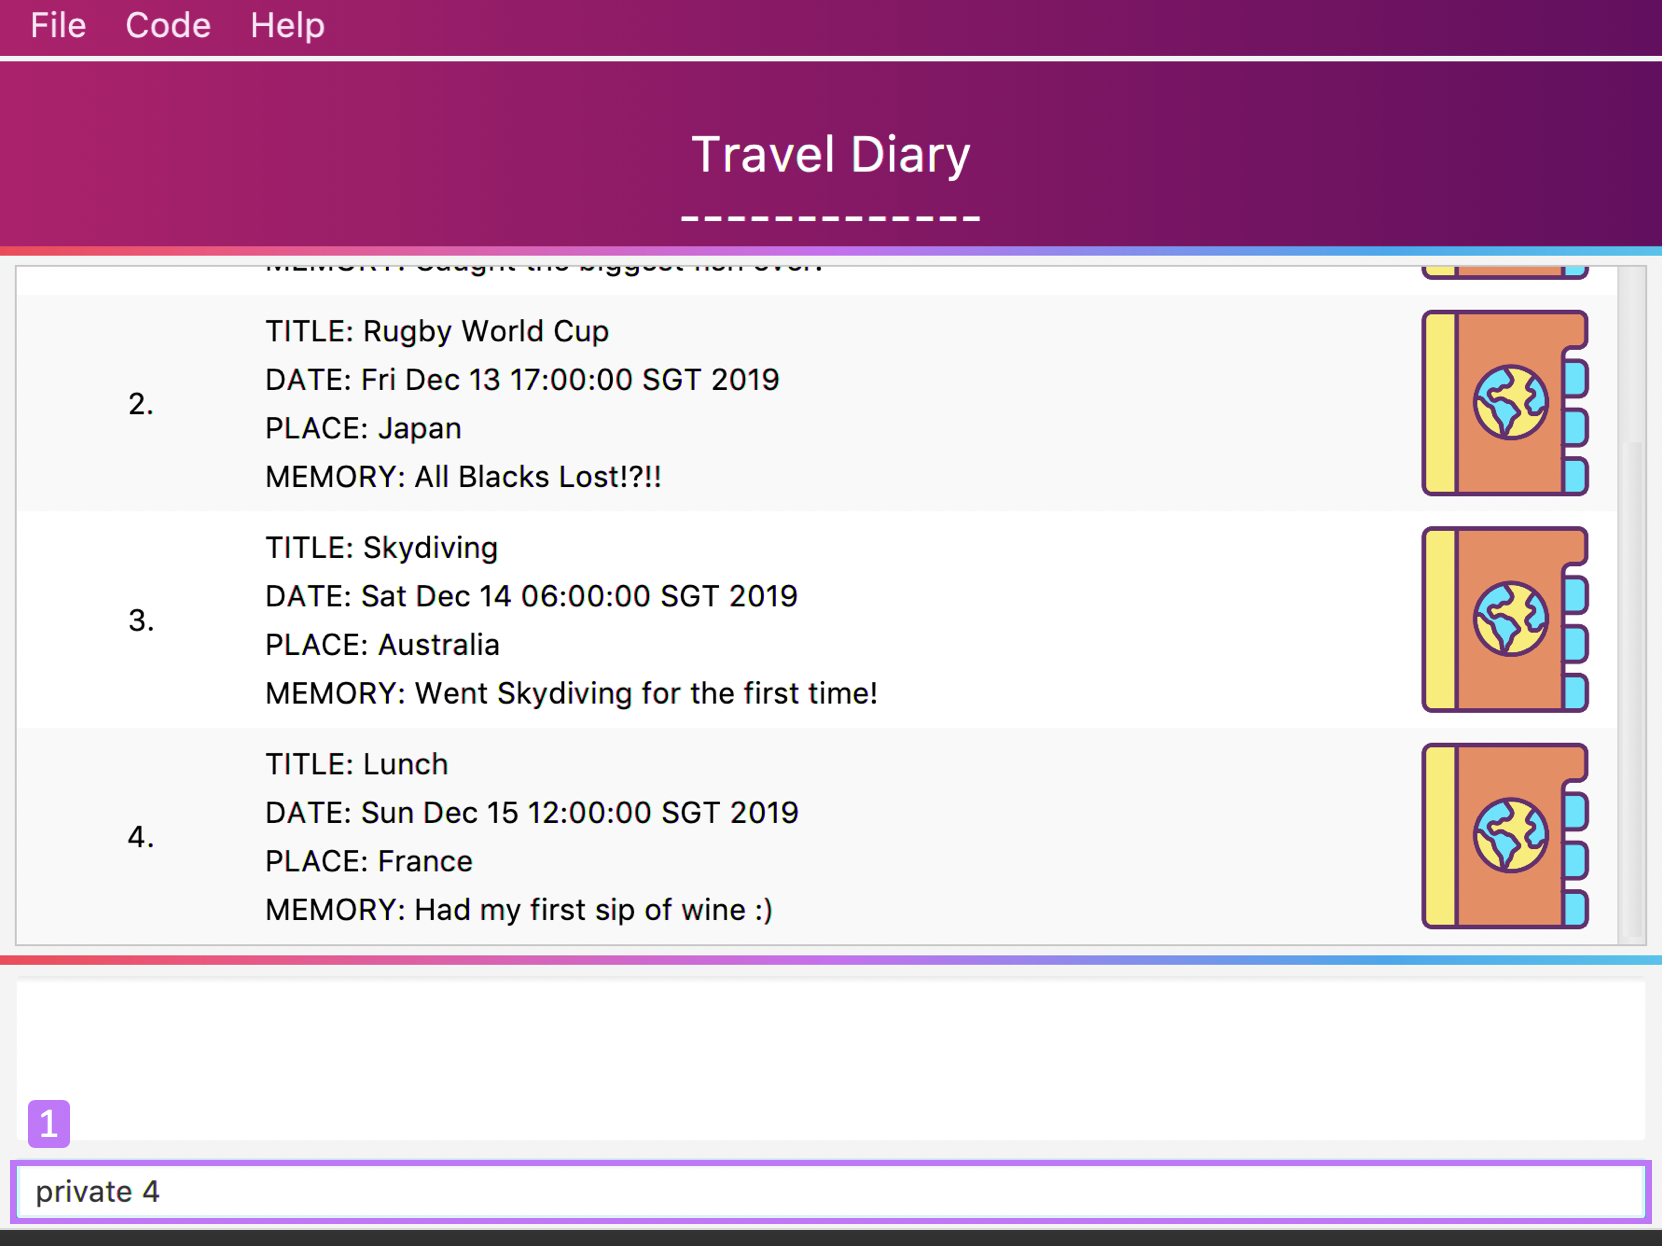
You had your first sip of wine today! Better not let mum find out…
Step 1: Type private 4 into the User Input Box and press Enter on the keyboard. You can refer to the picture below, where the number 1 is.
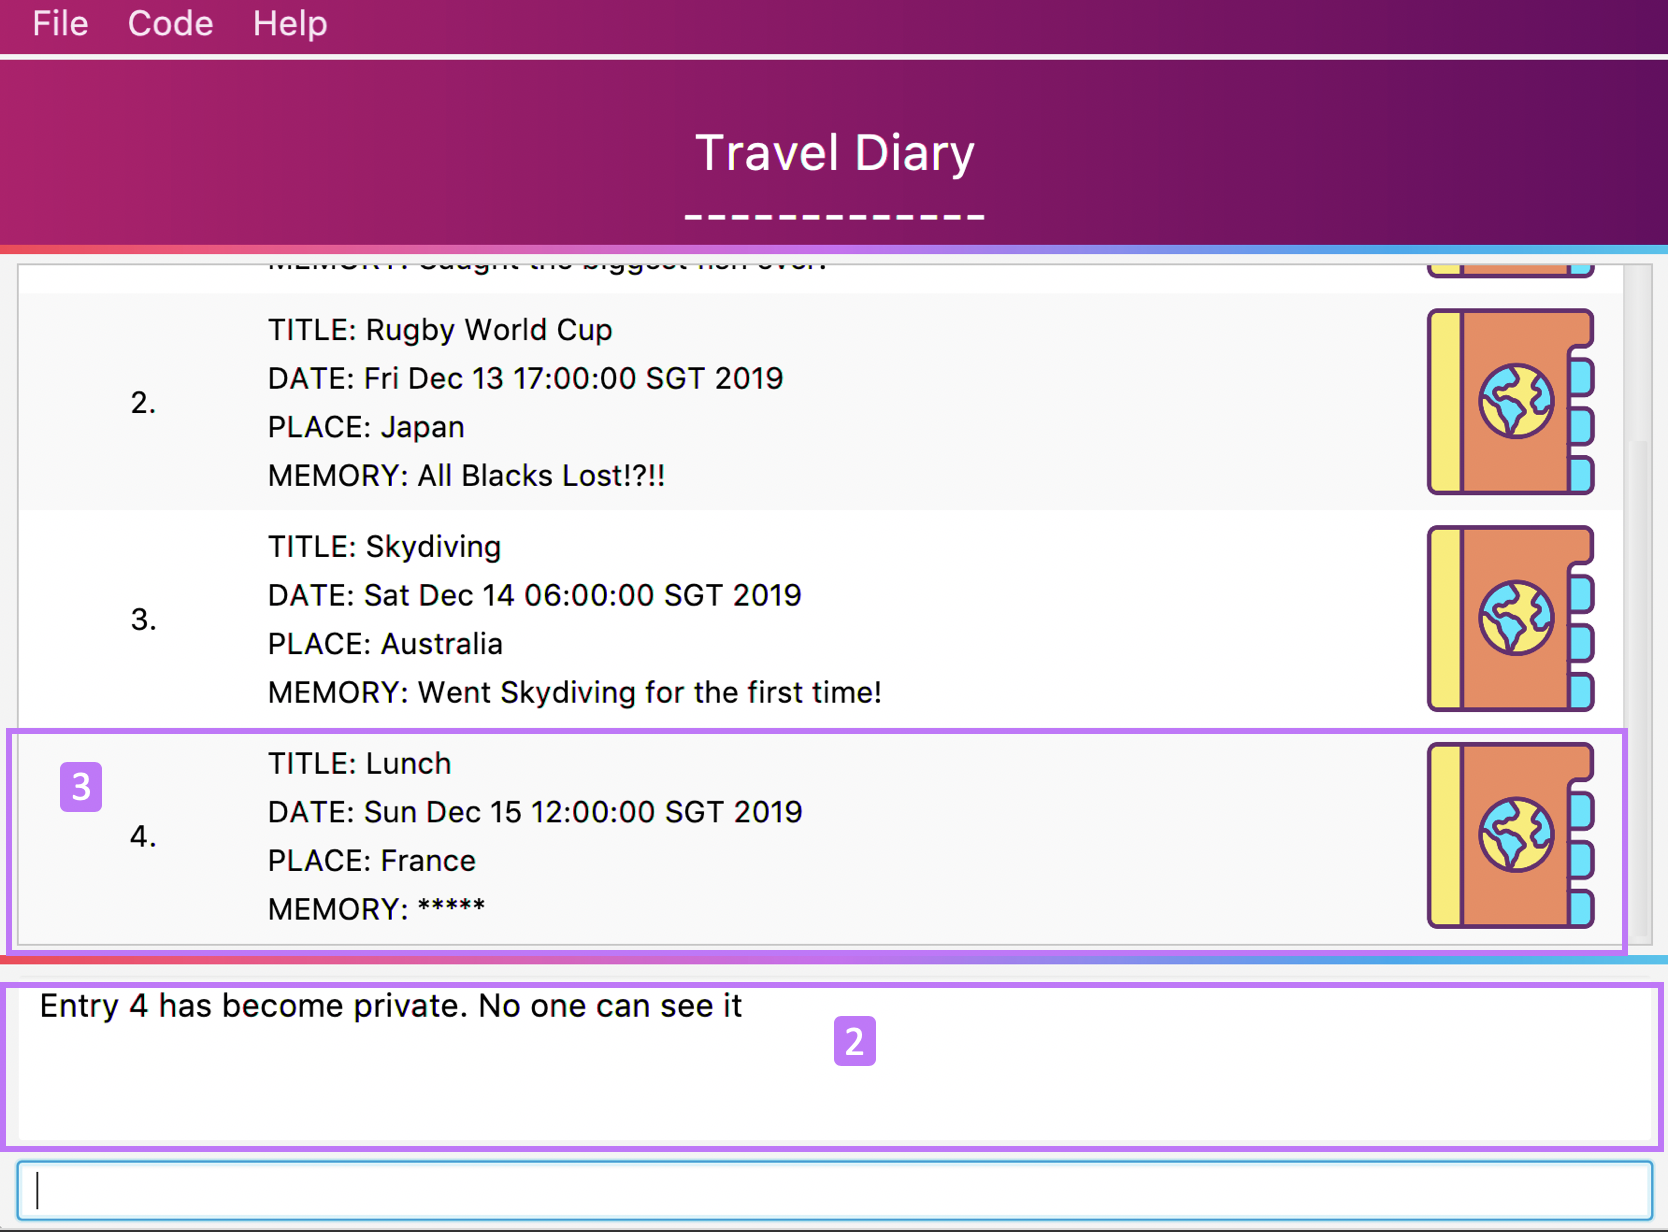
Step 2: TravEzy will tell you if your private command was successful in the Result Display, as can be seen where the number 2 is, in the picture below.
Step 3: You can see your updated Diary List, after the memory has been hidden, similar to number 3 in the picture below.
9.7. Unprivate personal memories unprivate
Once you know you are alone and away from prying eyes, you can look at your private memories safely. The Diary can help you to unprivate those memories.
Format:
unprivate INDEX
Example:
unprivate 4
Ok you’re alone now! How was that wine? :)
Can’t unprivate what’s not there! Try to keep the INDEX larger than 0 and smaller than the number of entries in your list!
|
Step by step:
Step 1: Type unprivate 4 into the User Input Box and press Enter on the keyboard. You can refer to the picture below, where the number 1 is.
=
image::DiaryUnPrivateBefore.png[width=600]
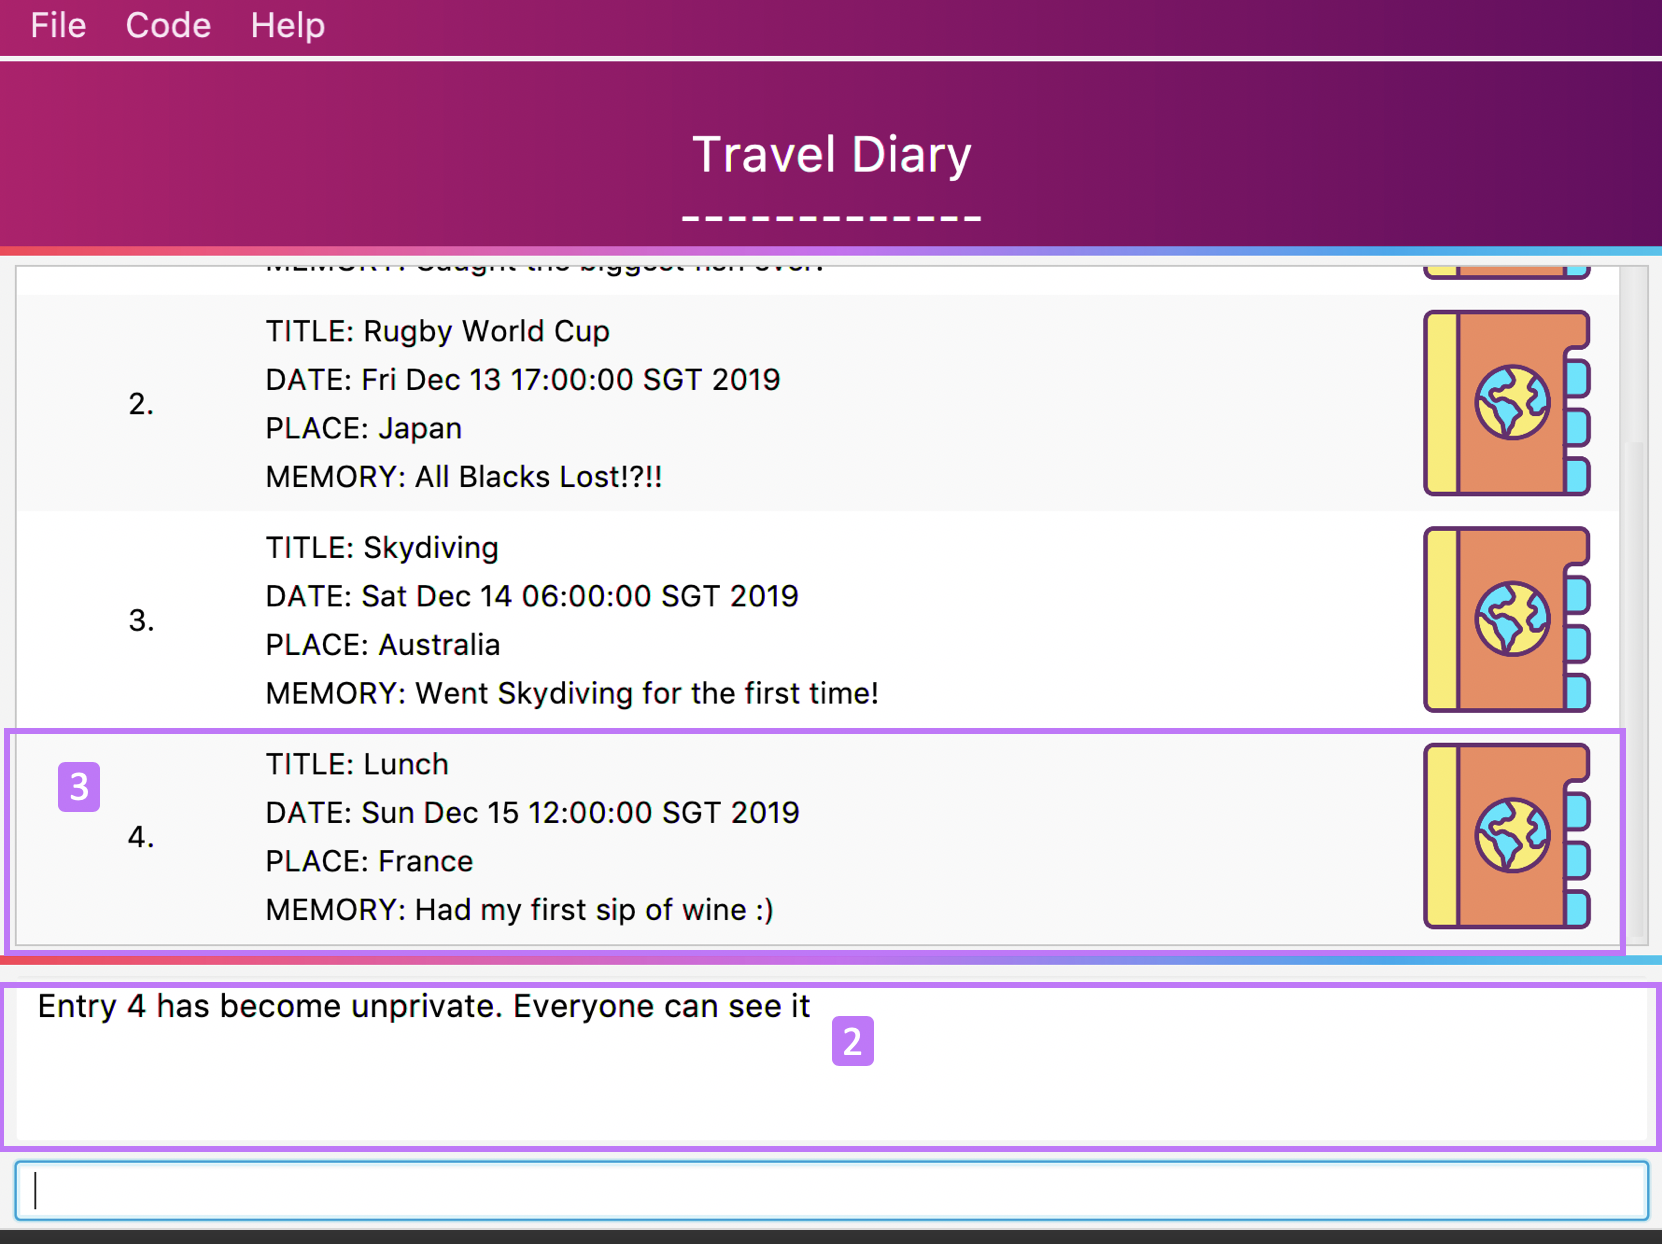
Step 2: TravEzy will tell you if your unprivate command was successful in the Result Display, as can be seen where the number 2 is, in the picture below.
Step 3: You can see your updated Diary List, after the memory is visible again, similar to number 3 in the picture below.
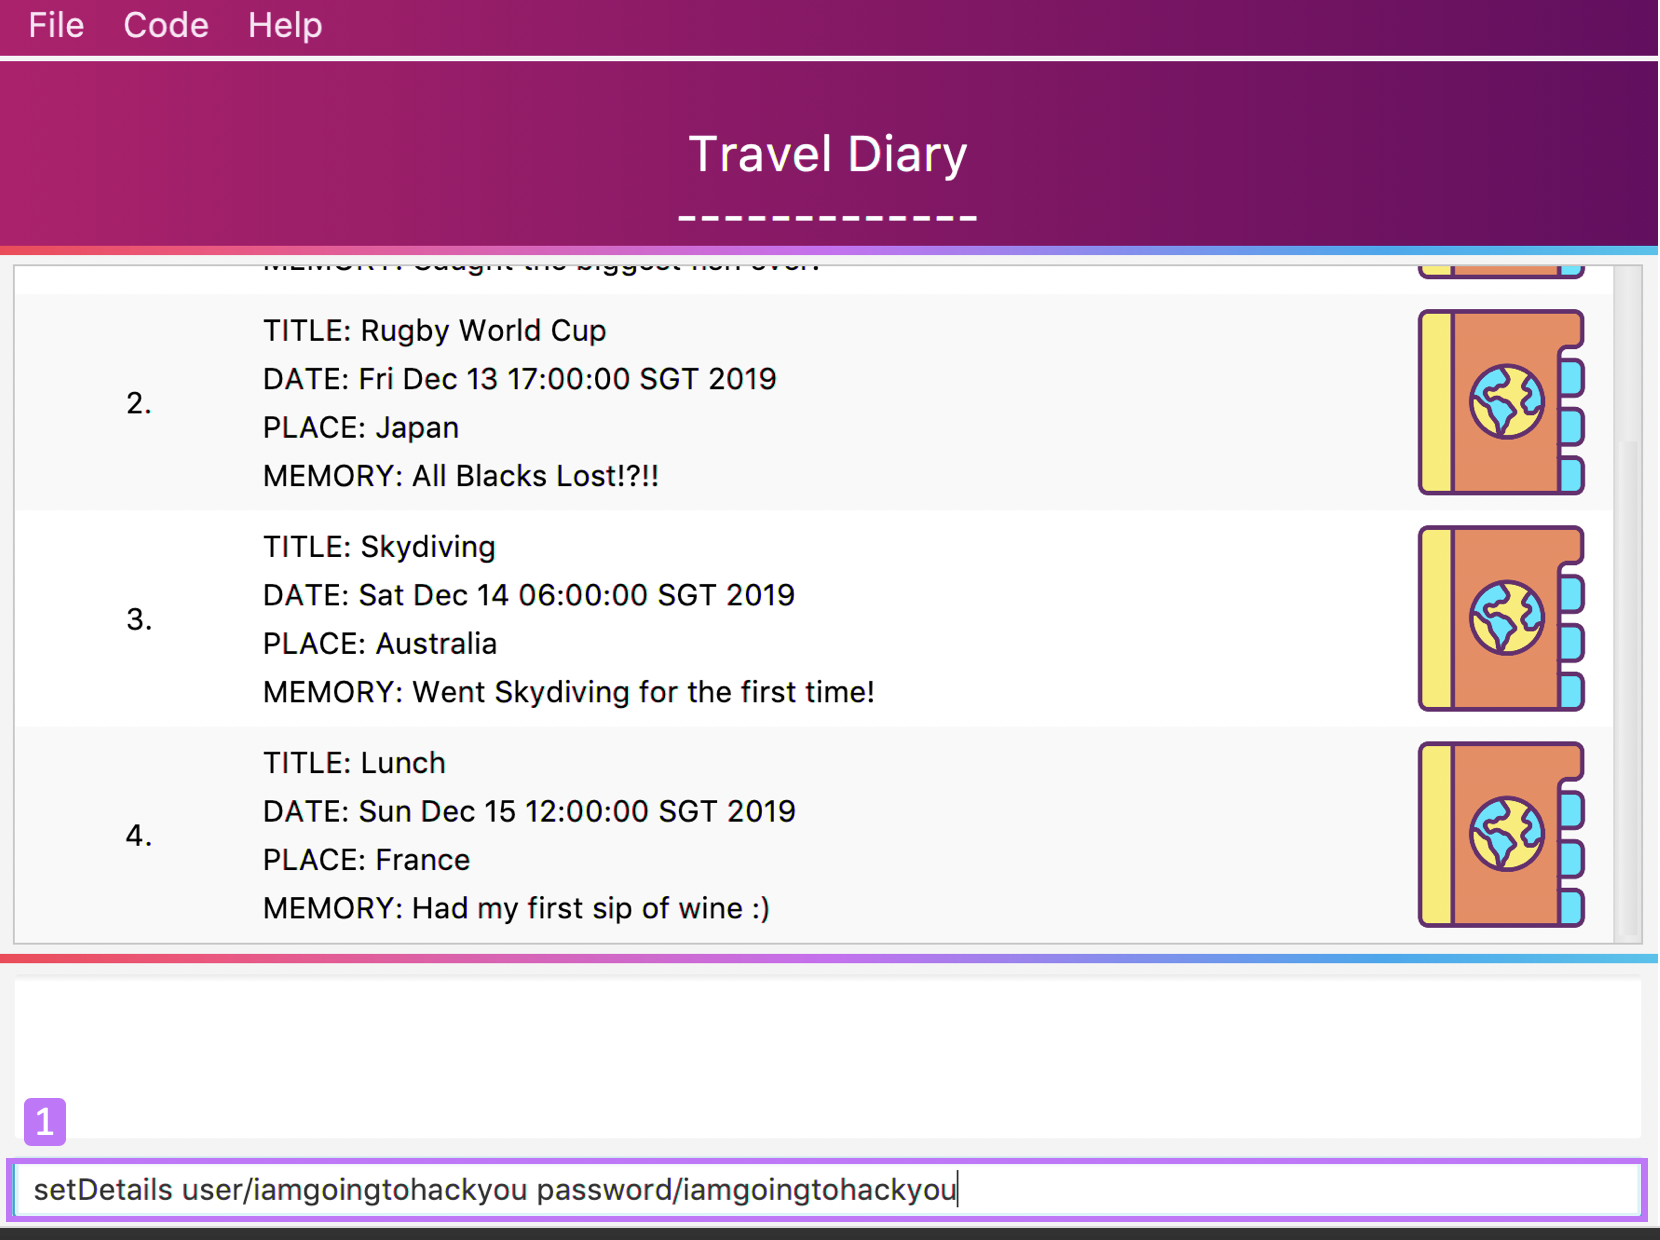
9.8. Keep your diary protected setDetails
You never know who may use your laptop when you’re away. The Diary can help you to protect your memories to stop hackers from looking at your private memories with a username and password.
If you setDetails, you will not be able to use the unprivate command and will have to use the unlock command (See below).
Format:
setDetails user/USERNAME password/PASSWORD
Example:
setDetails user/youcanthackme password/youreallycanthackme
| You can only set your details once! After that, you will have to delete TravEzy if you forget your password and need to unlock entries. This is done to ensure NO ONE misues your personal information |
| Keep your username and password long to keep those pesky hackers out! Minimally, make sure your username and password are alphanumeric and 8 characters long |
Step by step:
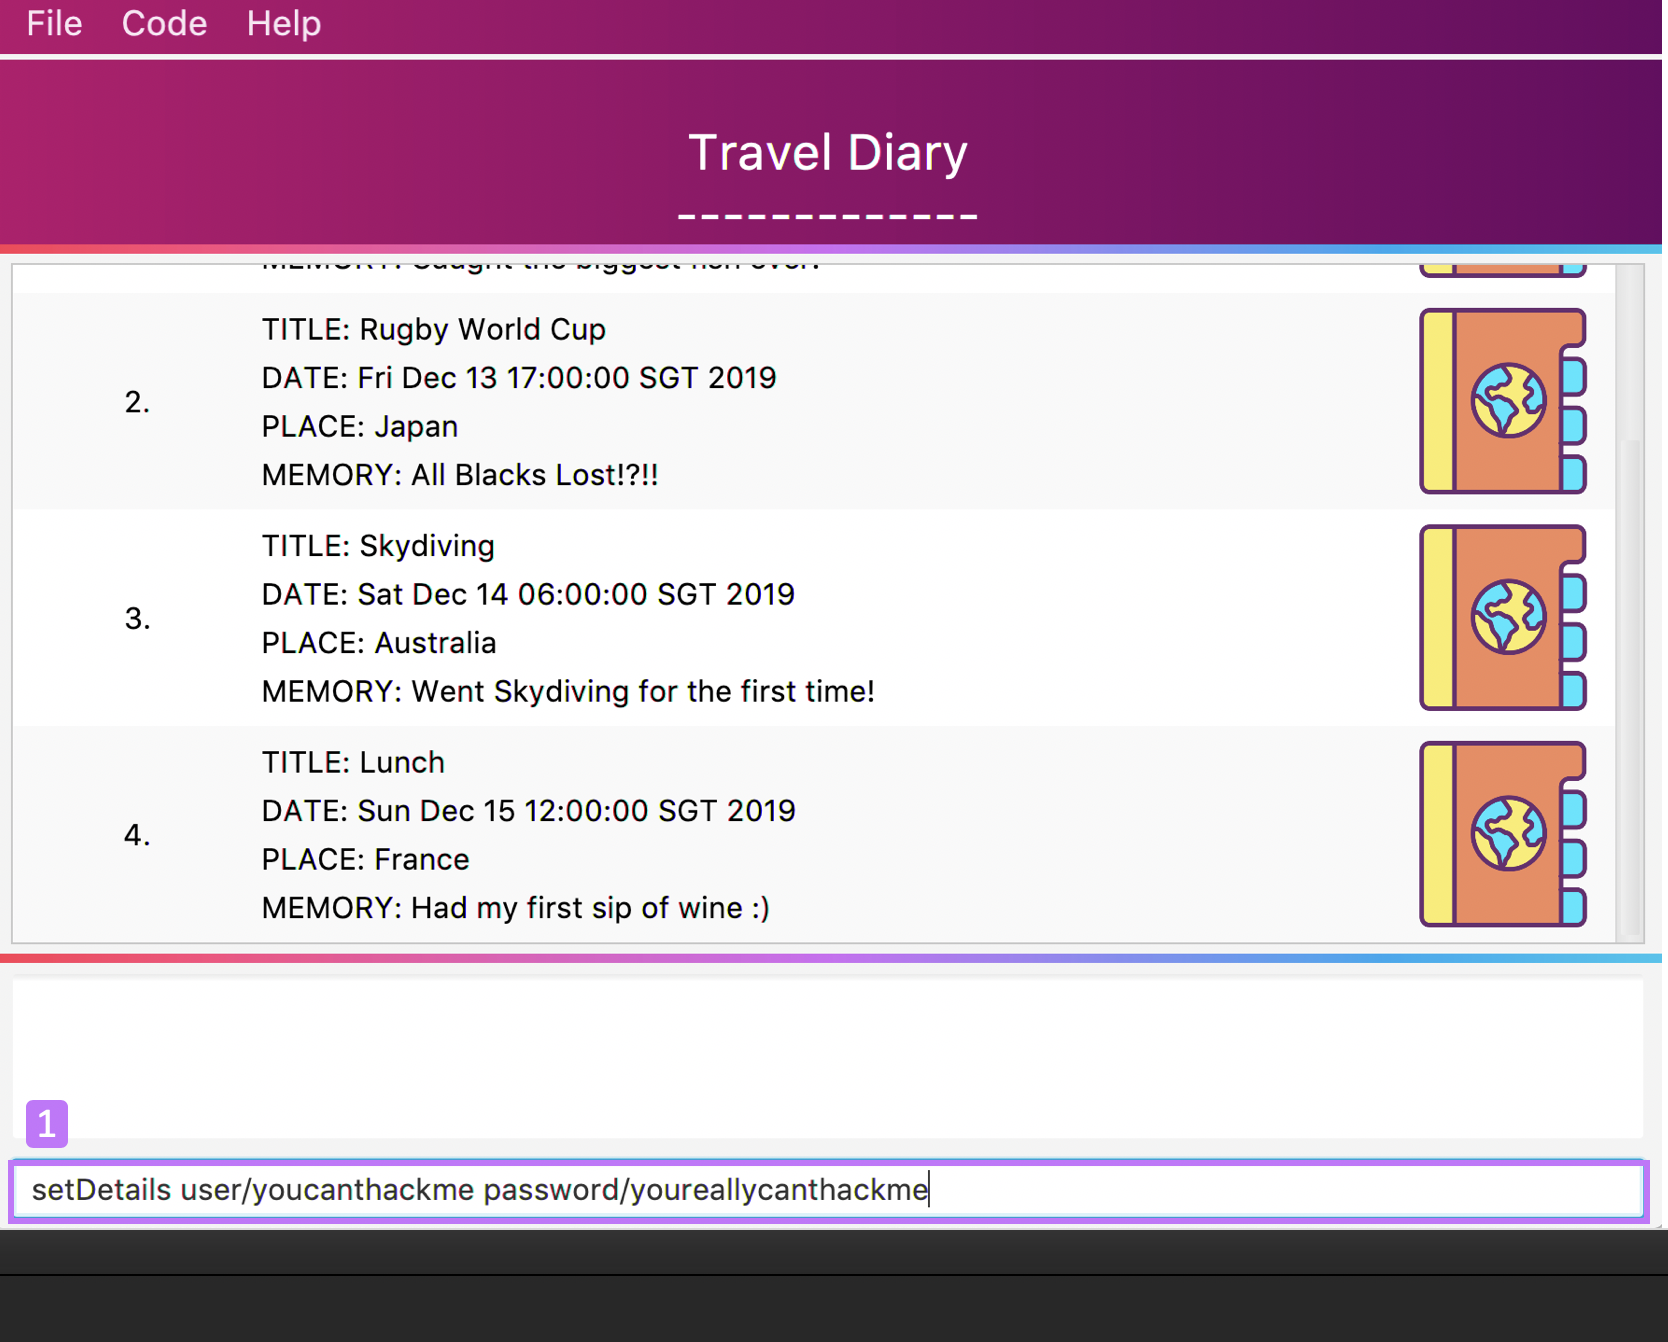
Better set a password to protect your memories against prying eyes
Step 1: Type setDetails user/youcanthackme password/youreallycanthackme into the User Input Box and press Enter on the keyboard. You can refer to the picture below, where the number 1 is.
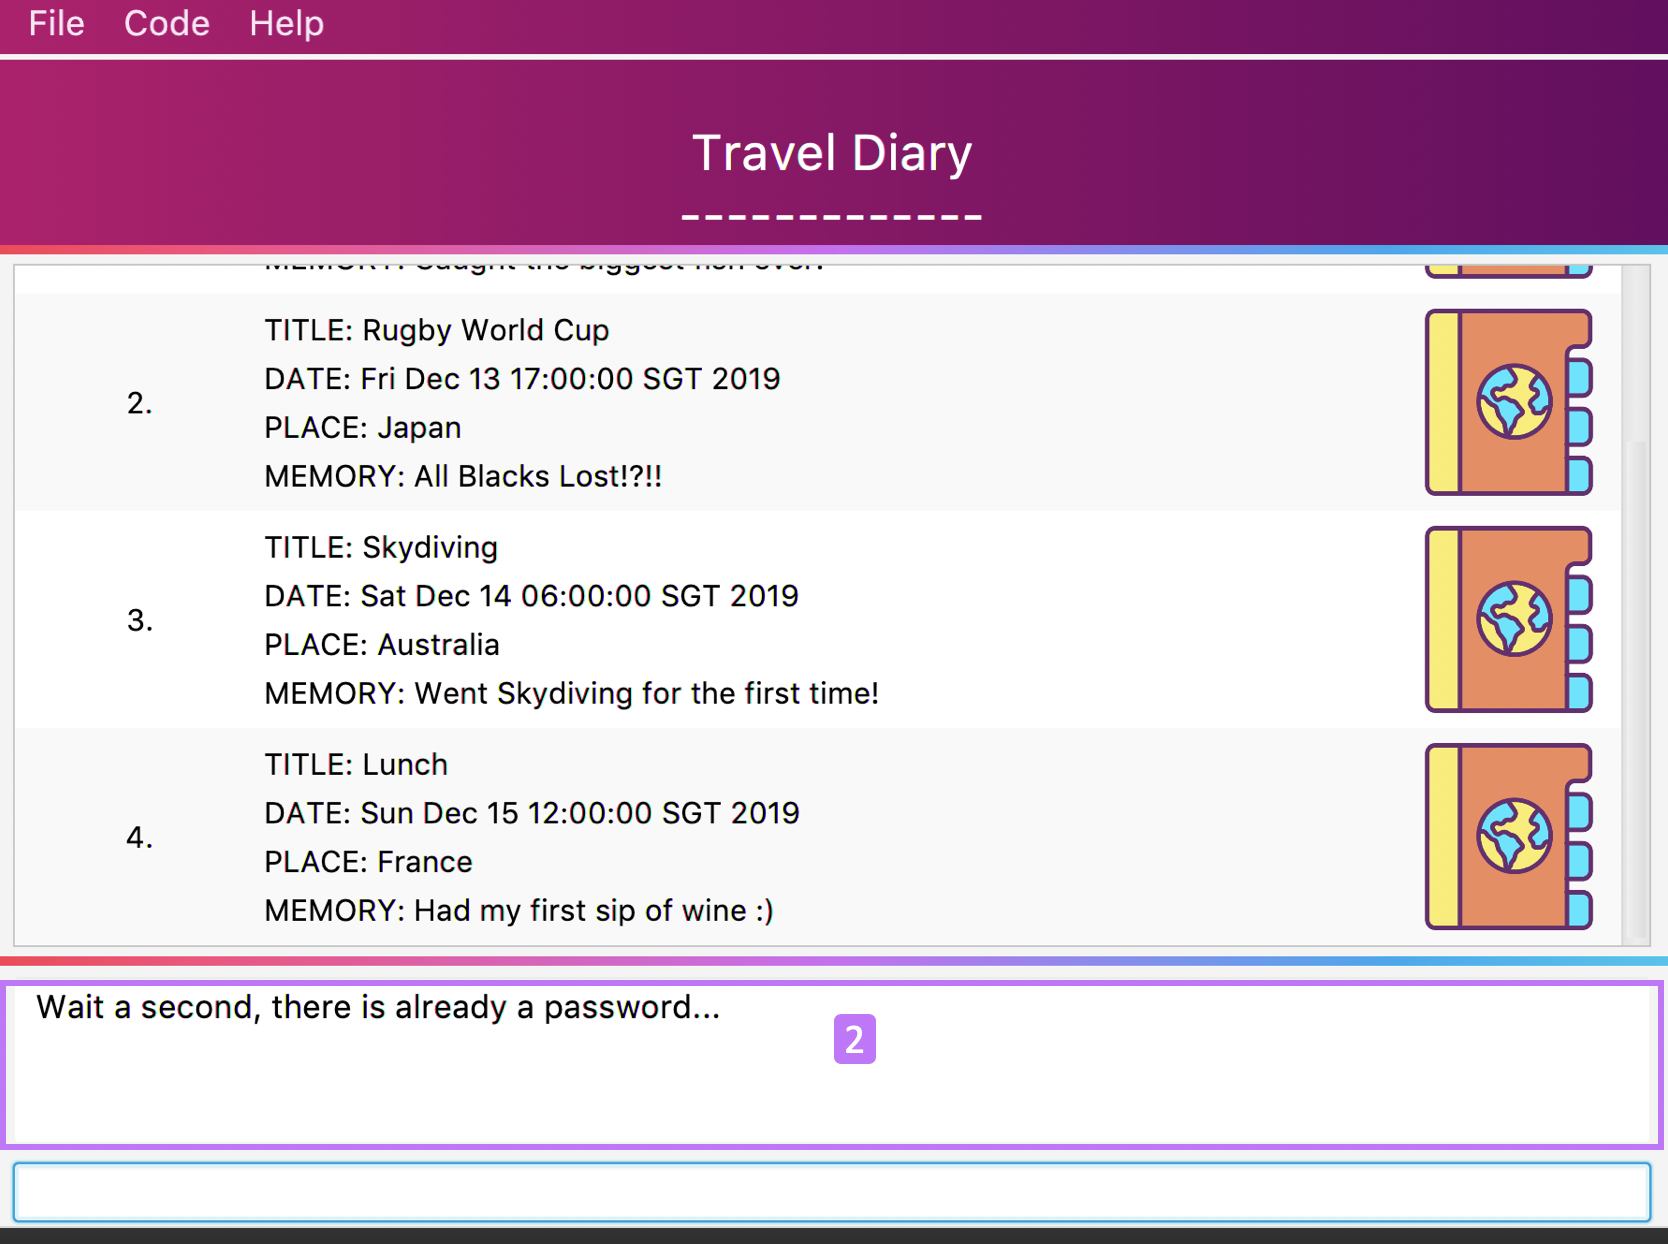
Step 2: TravEzy will tell you if your unprivate command was successful in the Result Display, as can be seen where the number 2 is, in the picture below.

-
Lets say someone tries to hack you
-
TravEzy will protect you if someone else tries to change your details
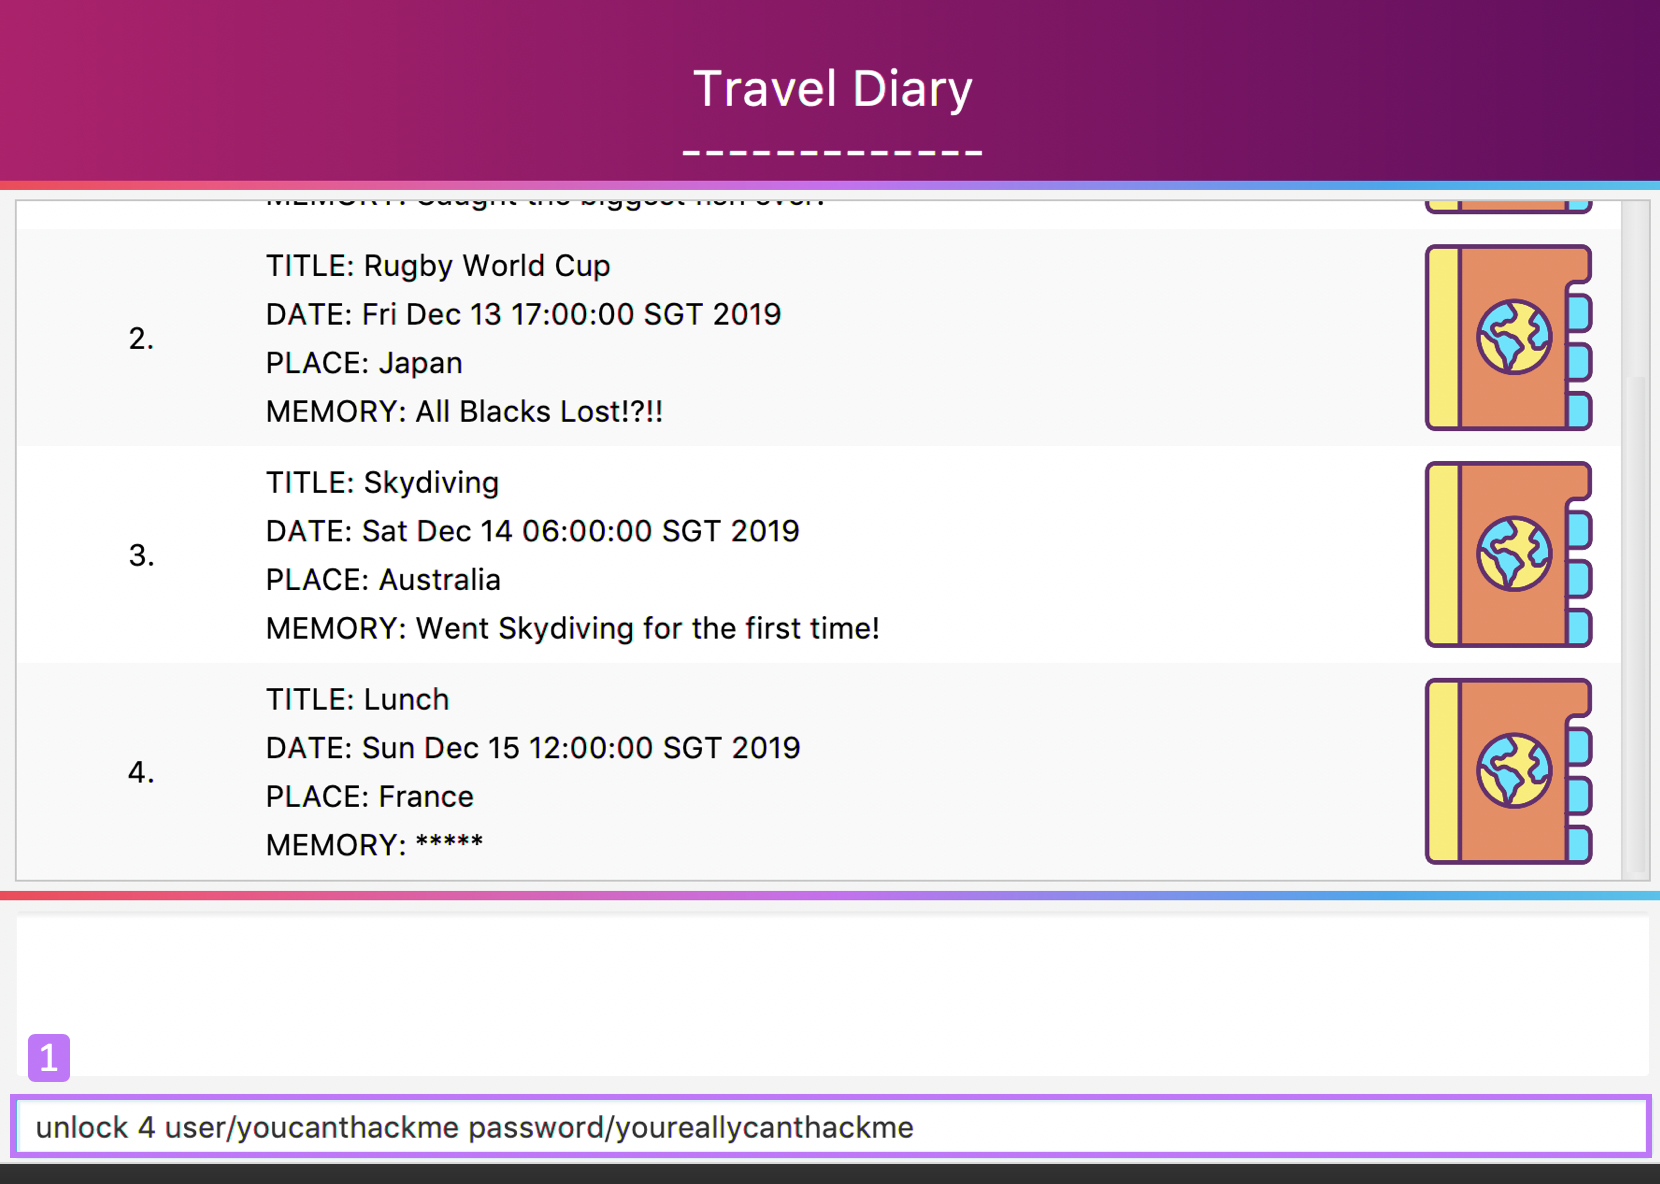
9.9. Unlock your private diary entries unlock
With password protection, we want to ensure no one else can access our memories . The Diary can do this by ensuring only you can see the private memories.
Format:
unlock INDEX user/USERNAME password/PASSWORD
Example:
unlock 4 user/youcanthackme password/youreallycanthackme
Step by step:
Unlock your hidden memories!
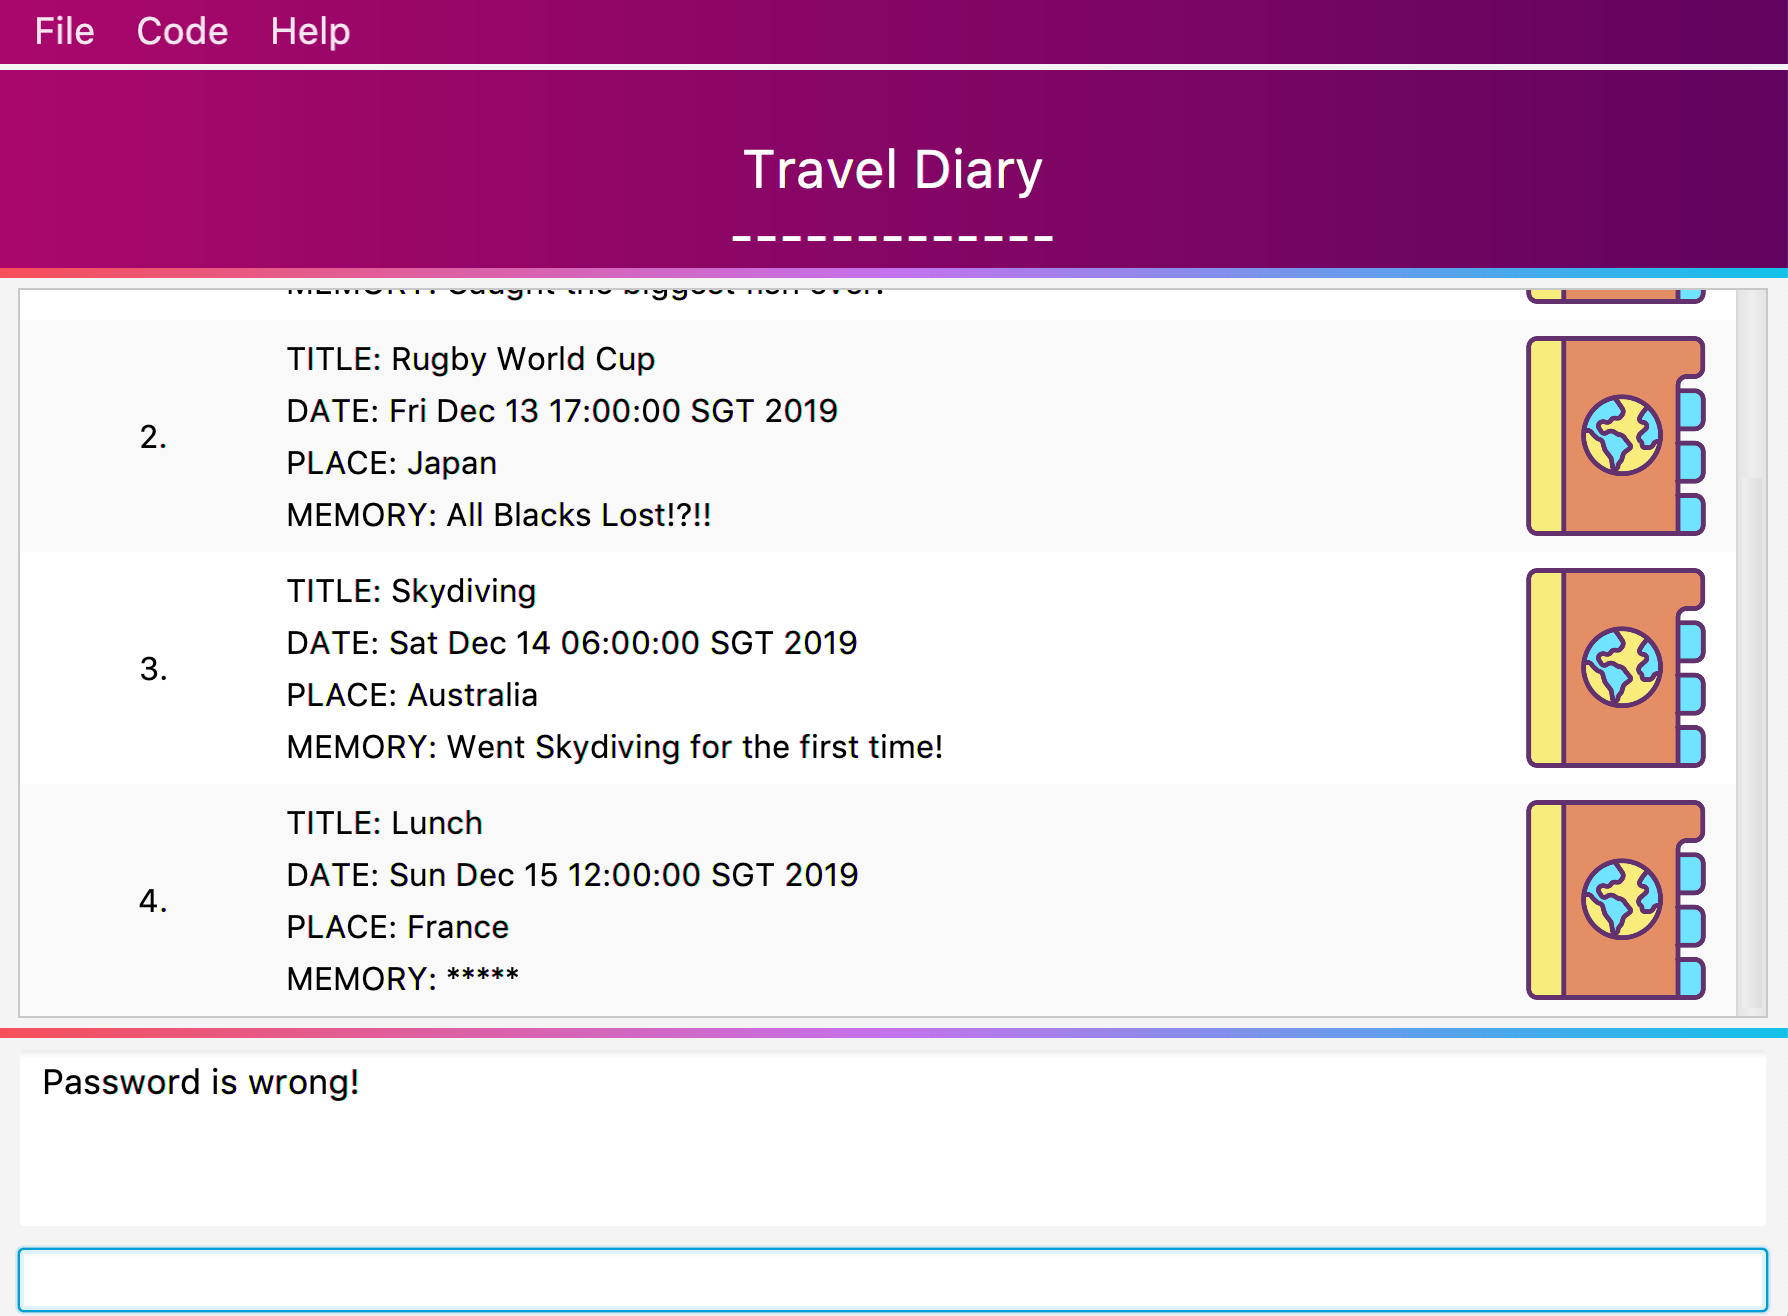
Step 1: Type unlock 4 user/youcanthackme password/youreallycanthackme into the User Input Box and press Enter on the keyboard. You can refer to the picture below, where the number 1 is.
Step 2: TravEzy will tell you if your unlock command was successful in the Result Display, as can be seen where the number 2 is, in the picture below.

-
Lets say someone tries to hack you
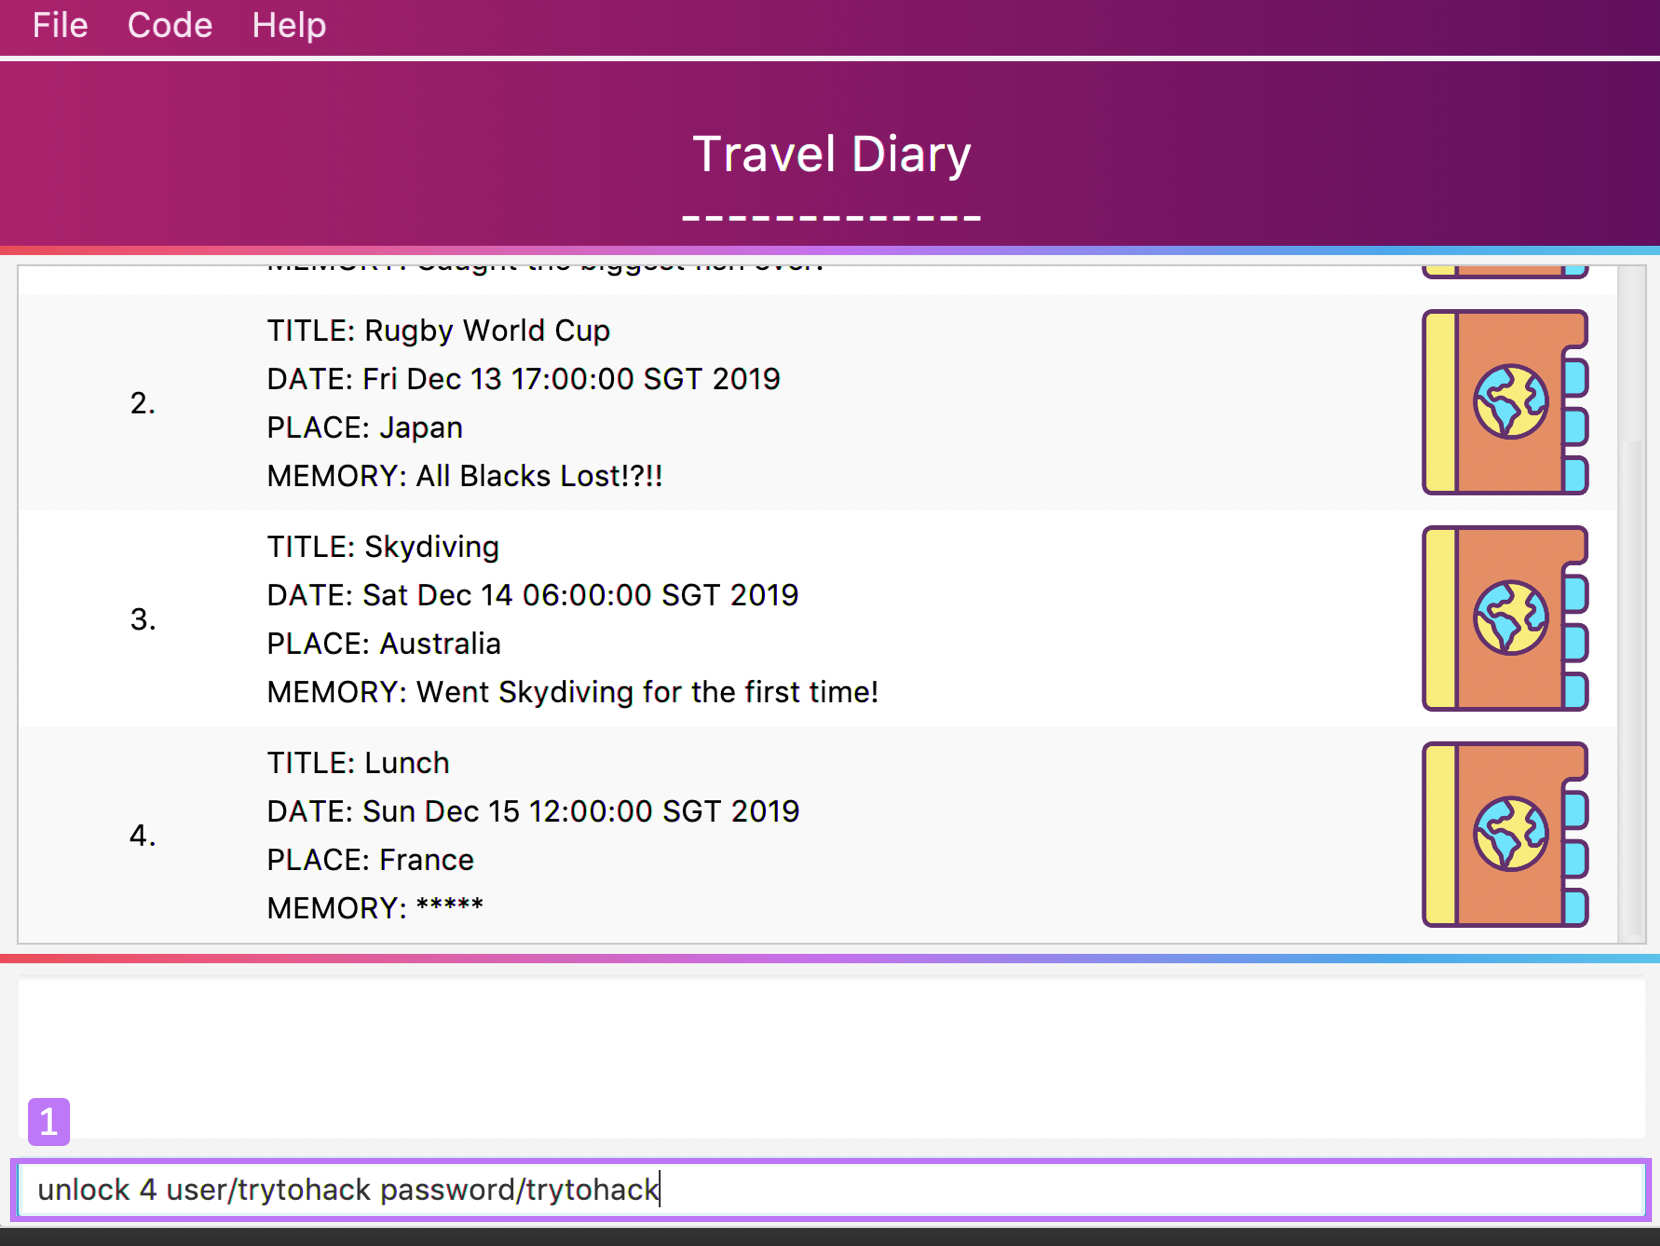
-
TravEzy will protect you if someone else tries to change your details
10. Achievements
You dream to become a top traveller travelling far and wide.. You have used TravEzy extensively and would want to keep track of your travel progress. From each of the different features inside Travezy, you are curious to find out the progress of the goals you have set for yourself. This will allow you to gain insights about your travelling and spending habits to motivate yourself to travel more, spend less and record all your favourite moments!
TravEzy application consist of 5 different features: Address Book, Calendar, Diary, Financial Tracker and Itinerary. For each of the different feature, TravEzy gives you a walkthrough of what statistics you can see for each feature when you are at the achievements page itself.
10.1. Interface
Navigating around the achievements interface:
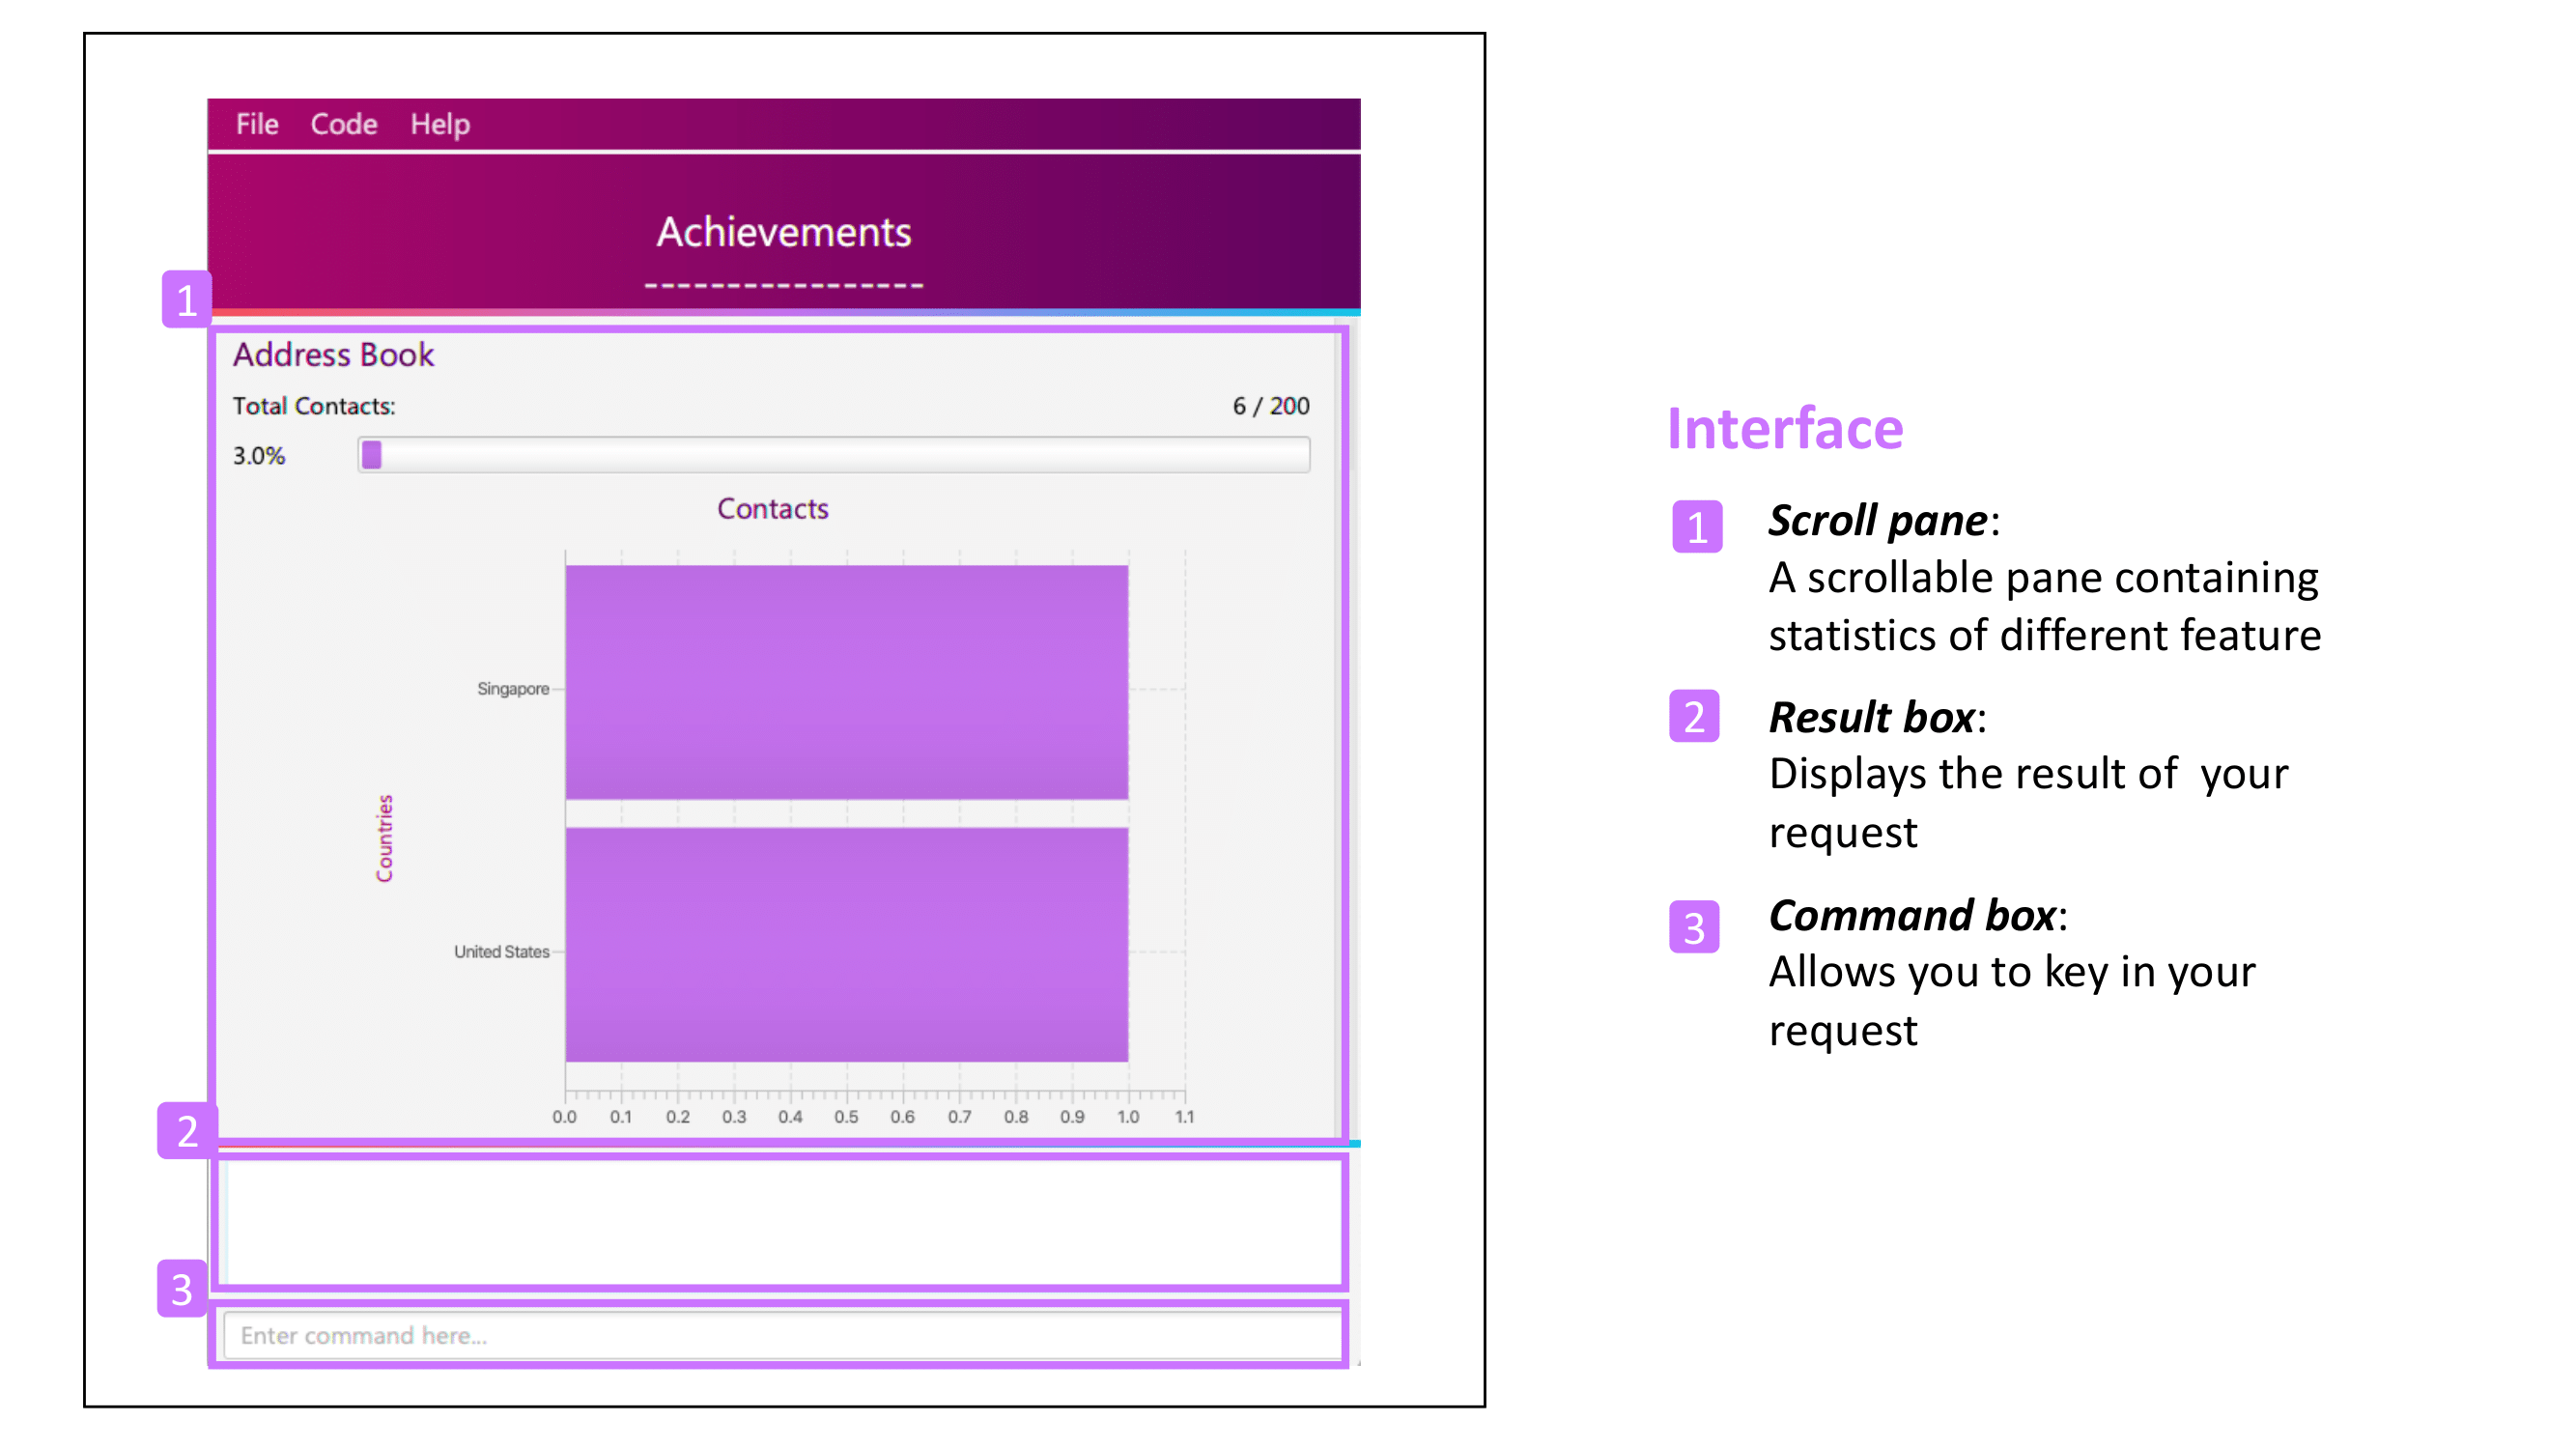
| The statistics for each feature is generated and displayed on the scroll pane upon arriving at the achievements page |
10.2. Statistics
The scroll pane contains the statistics for:
-
Address Book Statistiscs
-
Calendar Statistics
-
Diary Book Statistics
-
Financial Tracker Statistics
-
Itinerary Statistics

10.2.1. Address Book Statistics
In the scroll pane you will be able to see the statistics of the address book feature comprising of the following components:
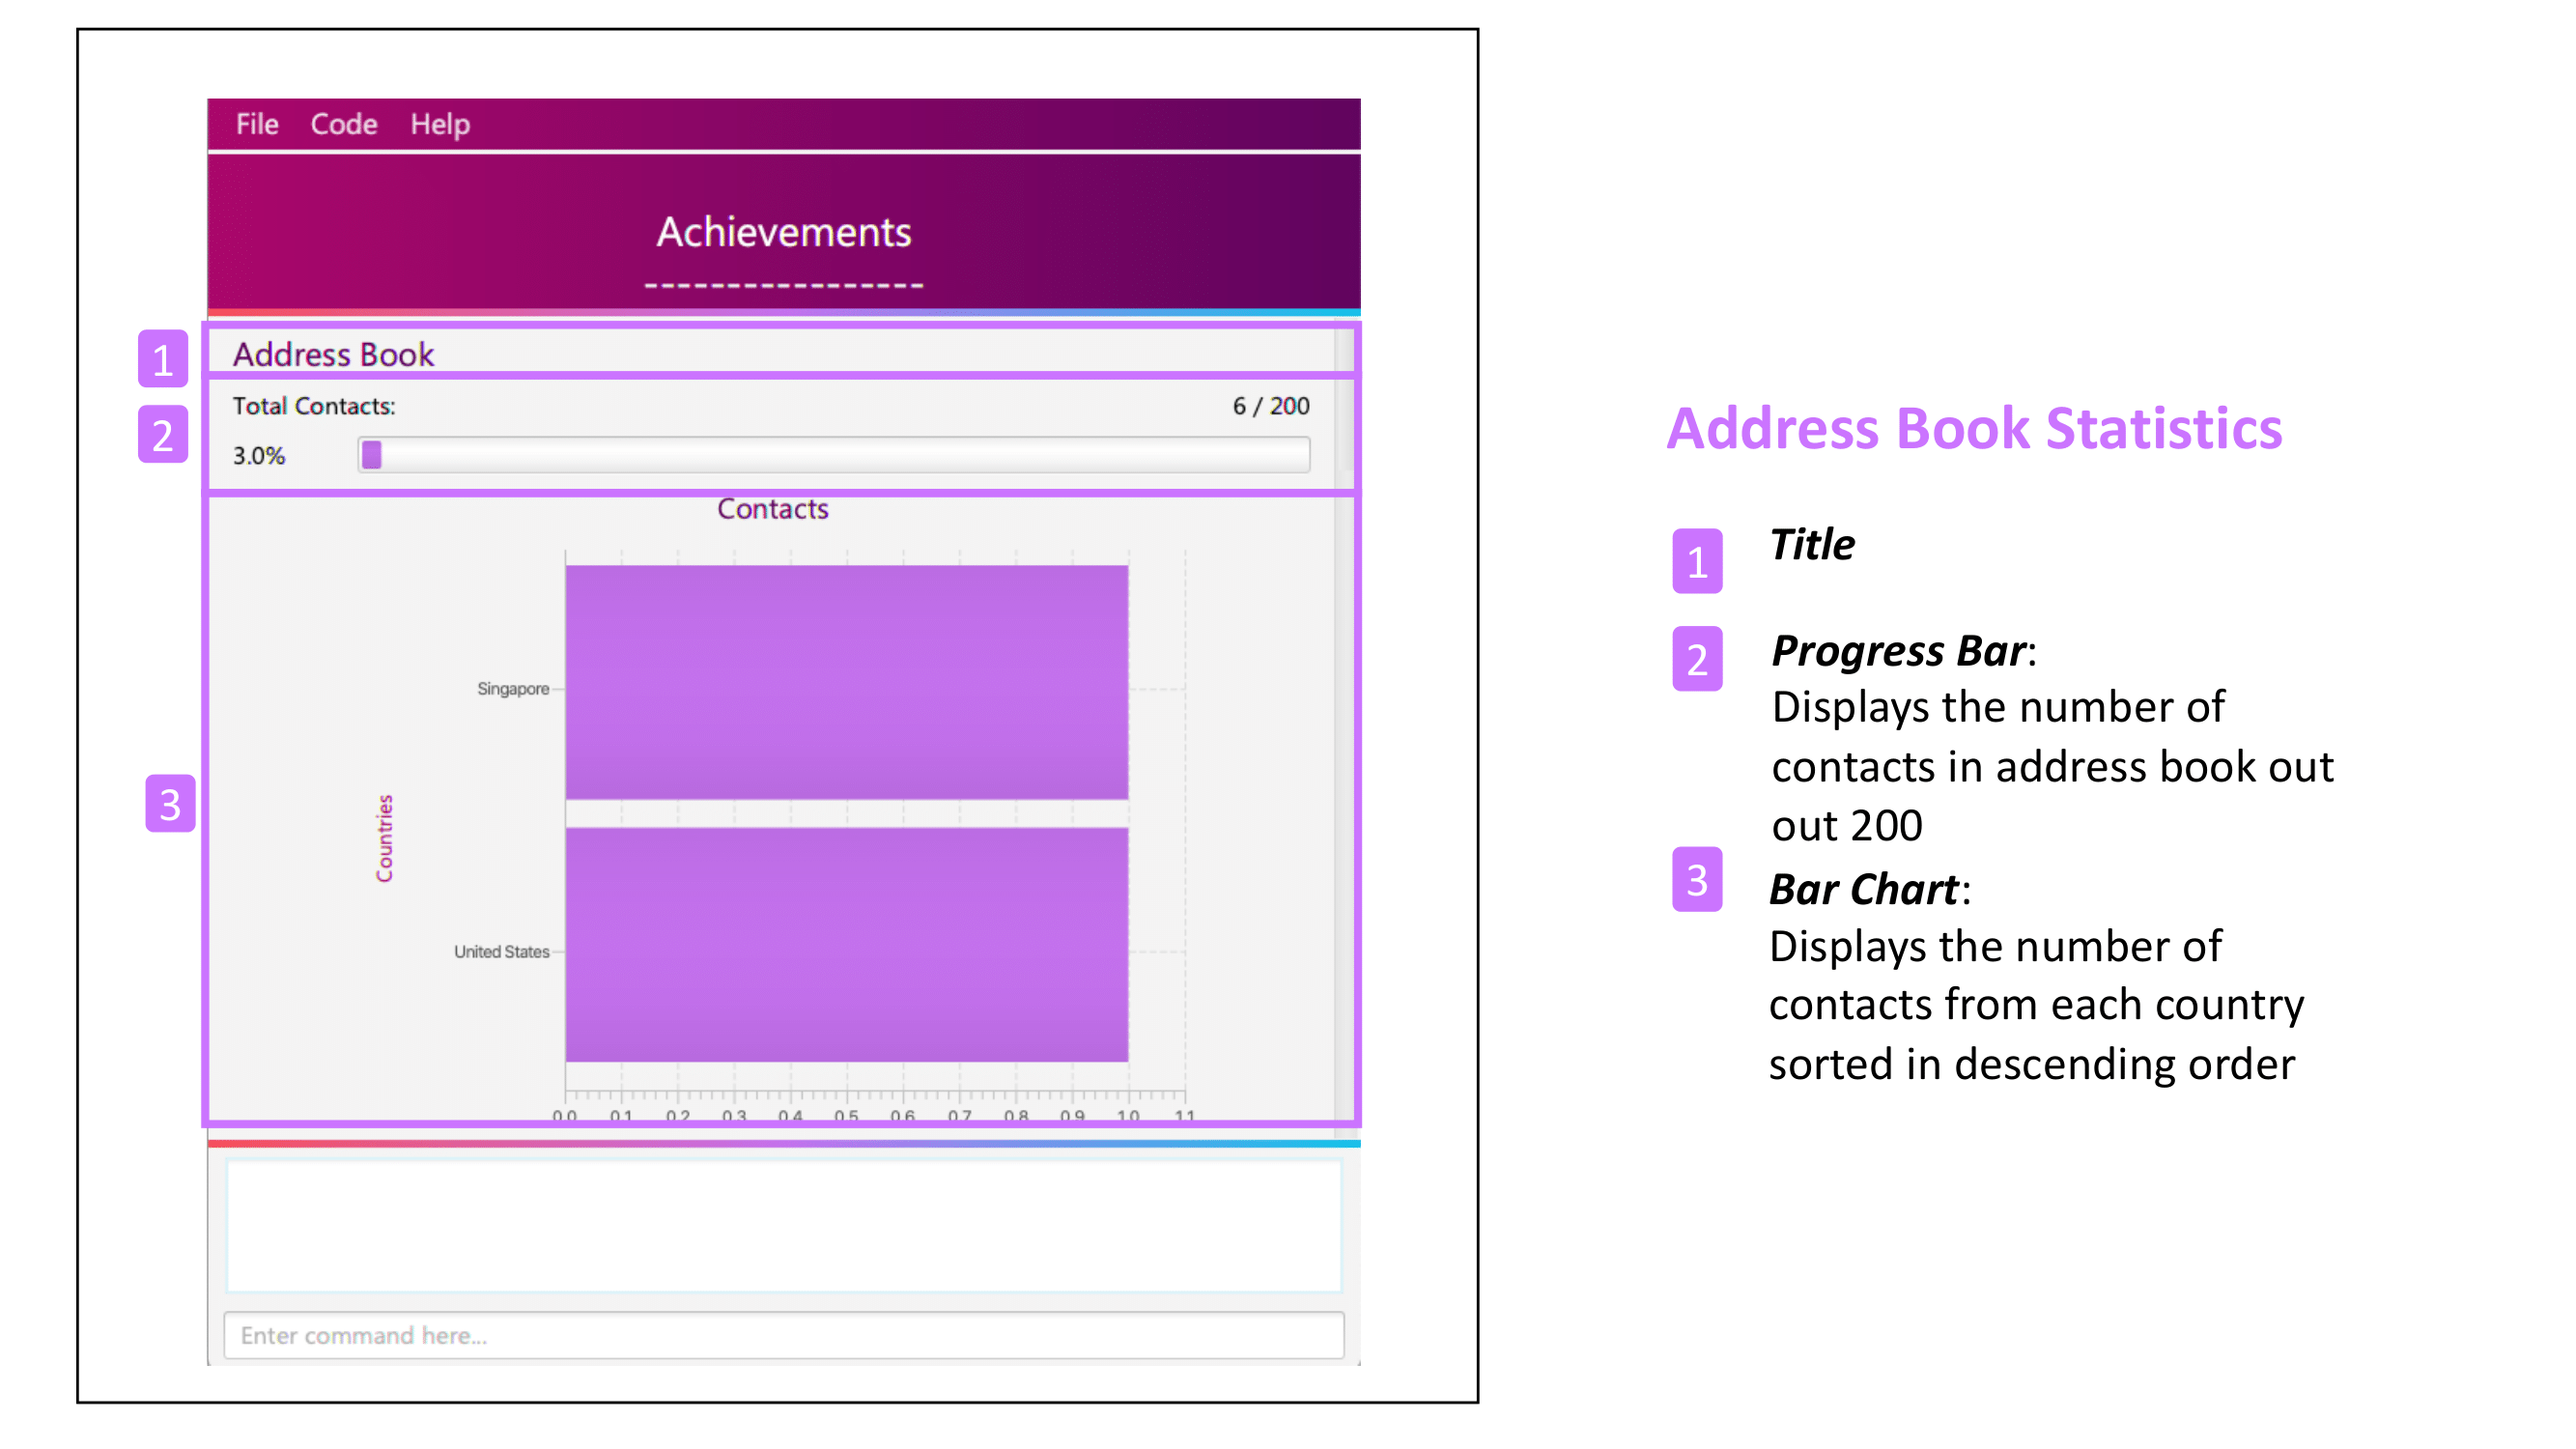
| If the number of contacts in the address book has past the target goal of 200, the progress bar will show 100% instead of the actual percentage. |
10.2.2. Calendar Achievements
In the scroll pane you will be able to see the statistics of the calendar feature comprising of the following components:
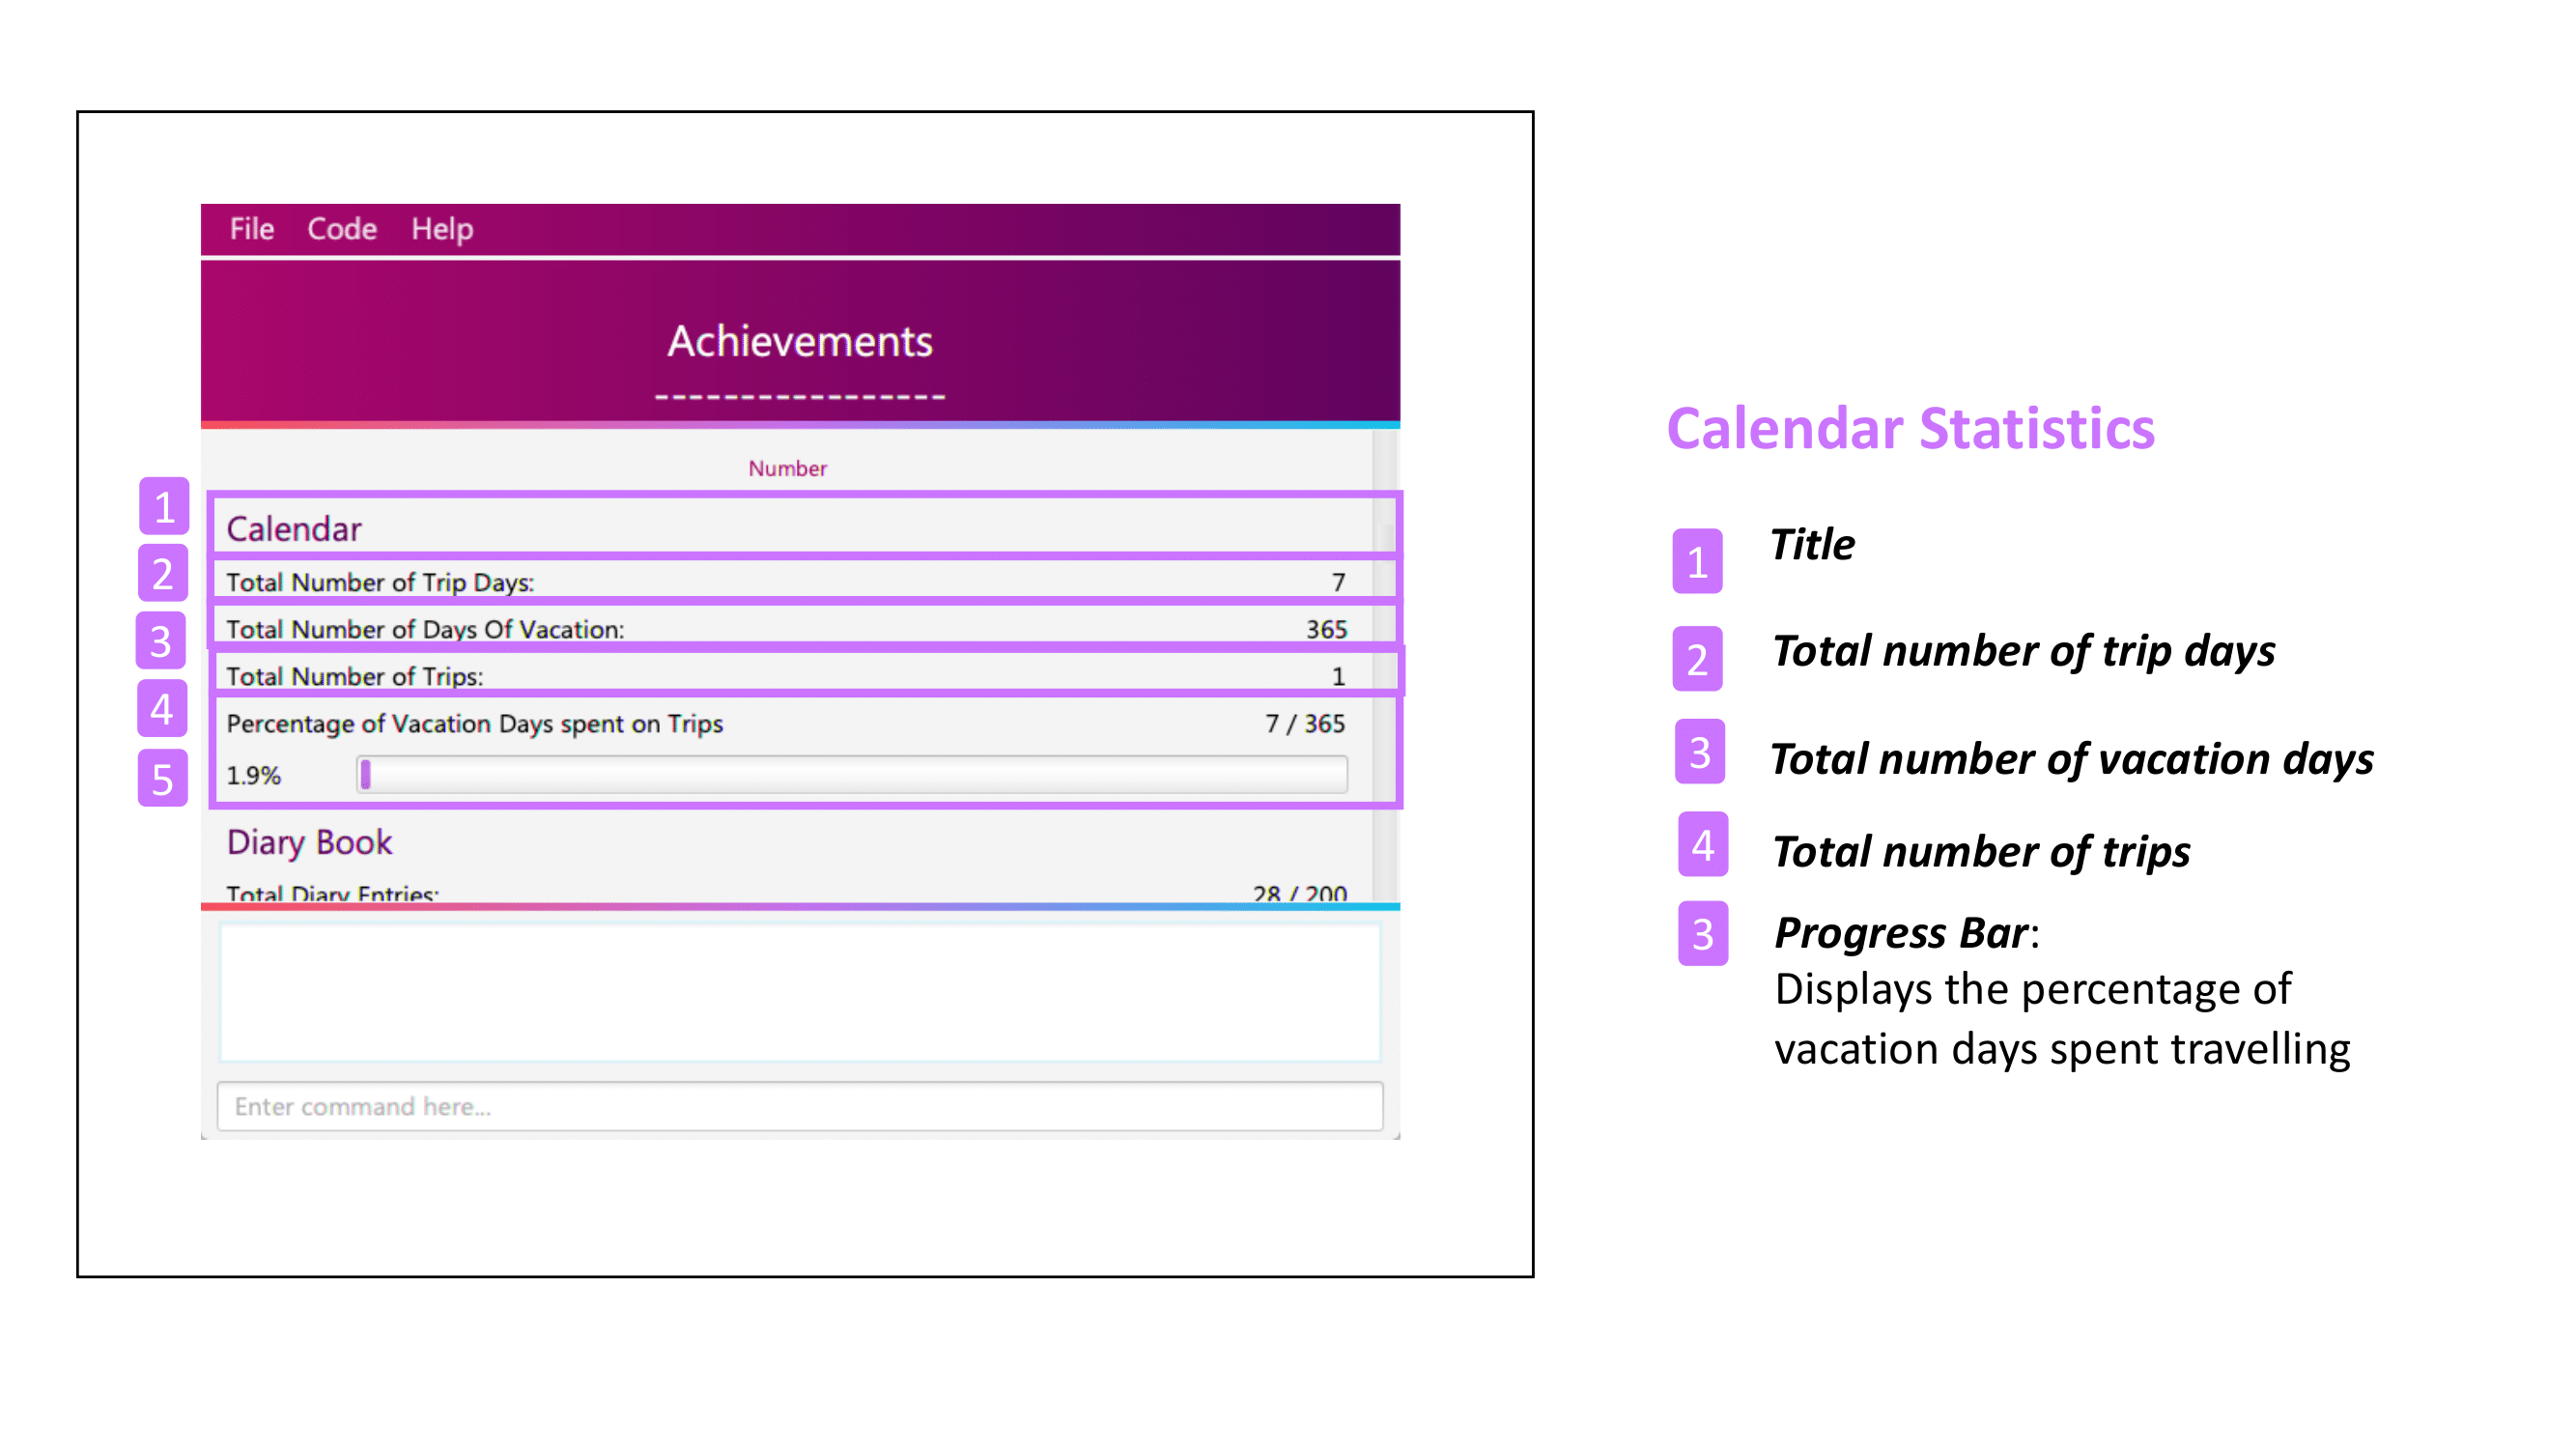
| The progress bar will not be displayed if the number of vacation days is 0. |
10.2.3. Diary Achievements
In the scroll pane you will be able to see the statistics of the diary feature comprising of the following components:
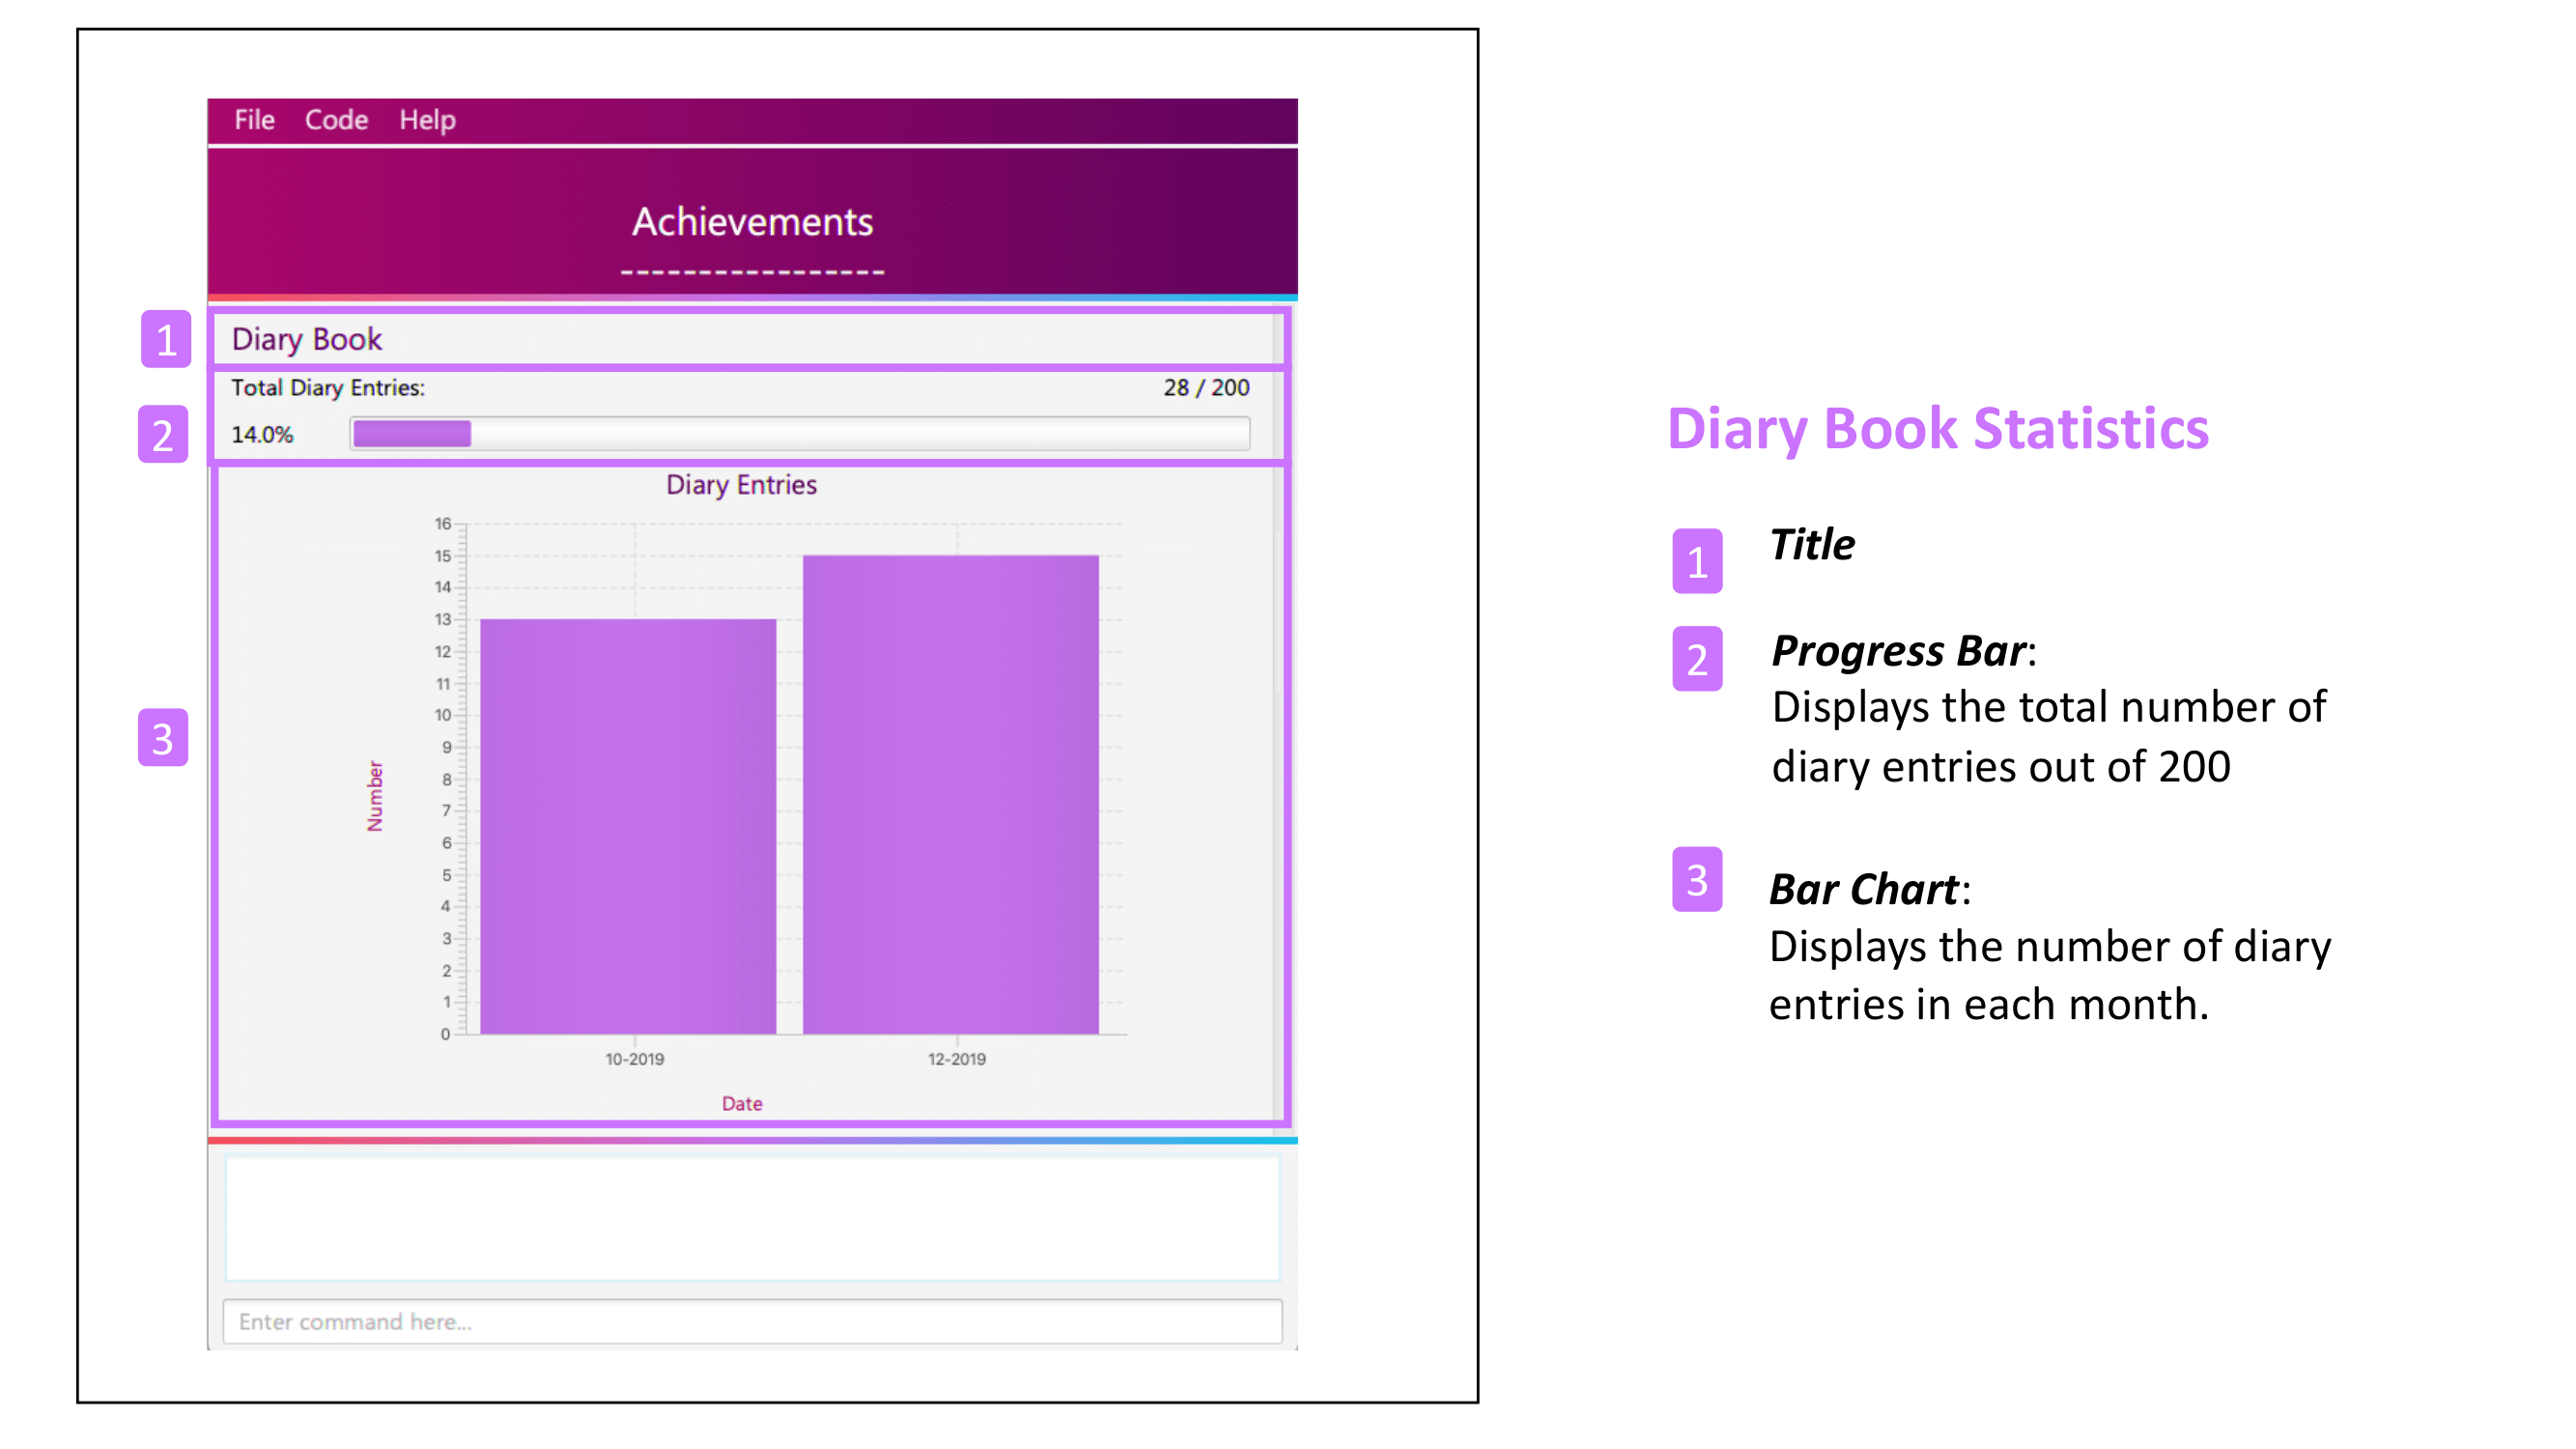
| If the number of entries in the diary book has past the target goal of 200, the progress bar will show 100% instead of the actual percentage. |
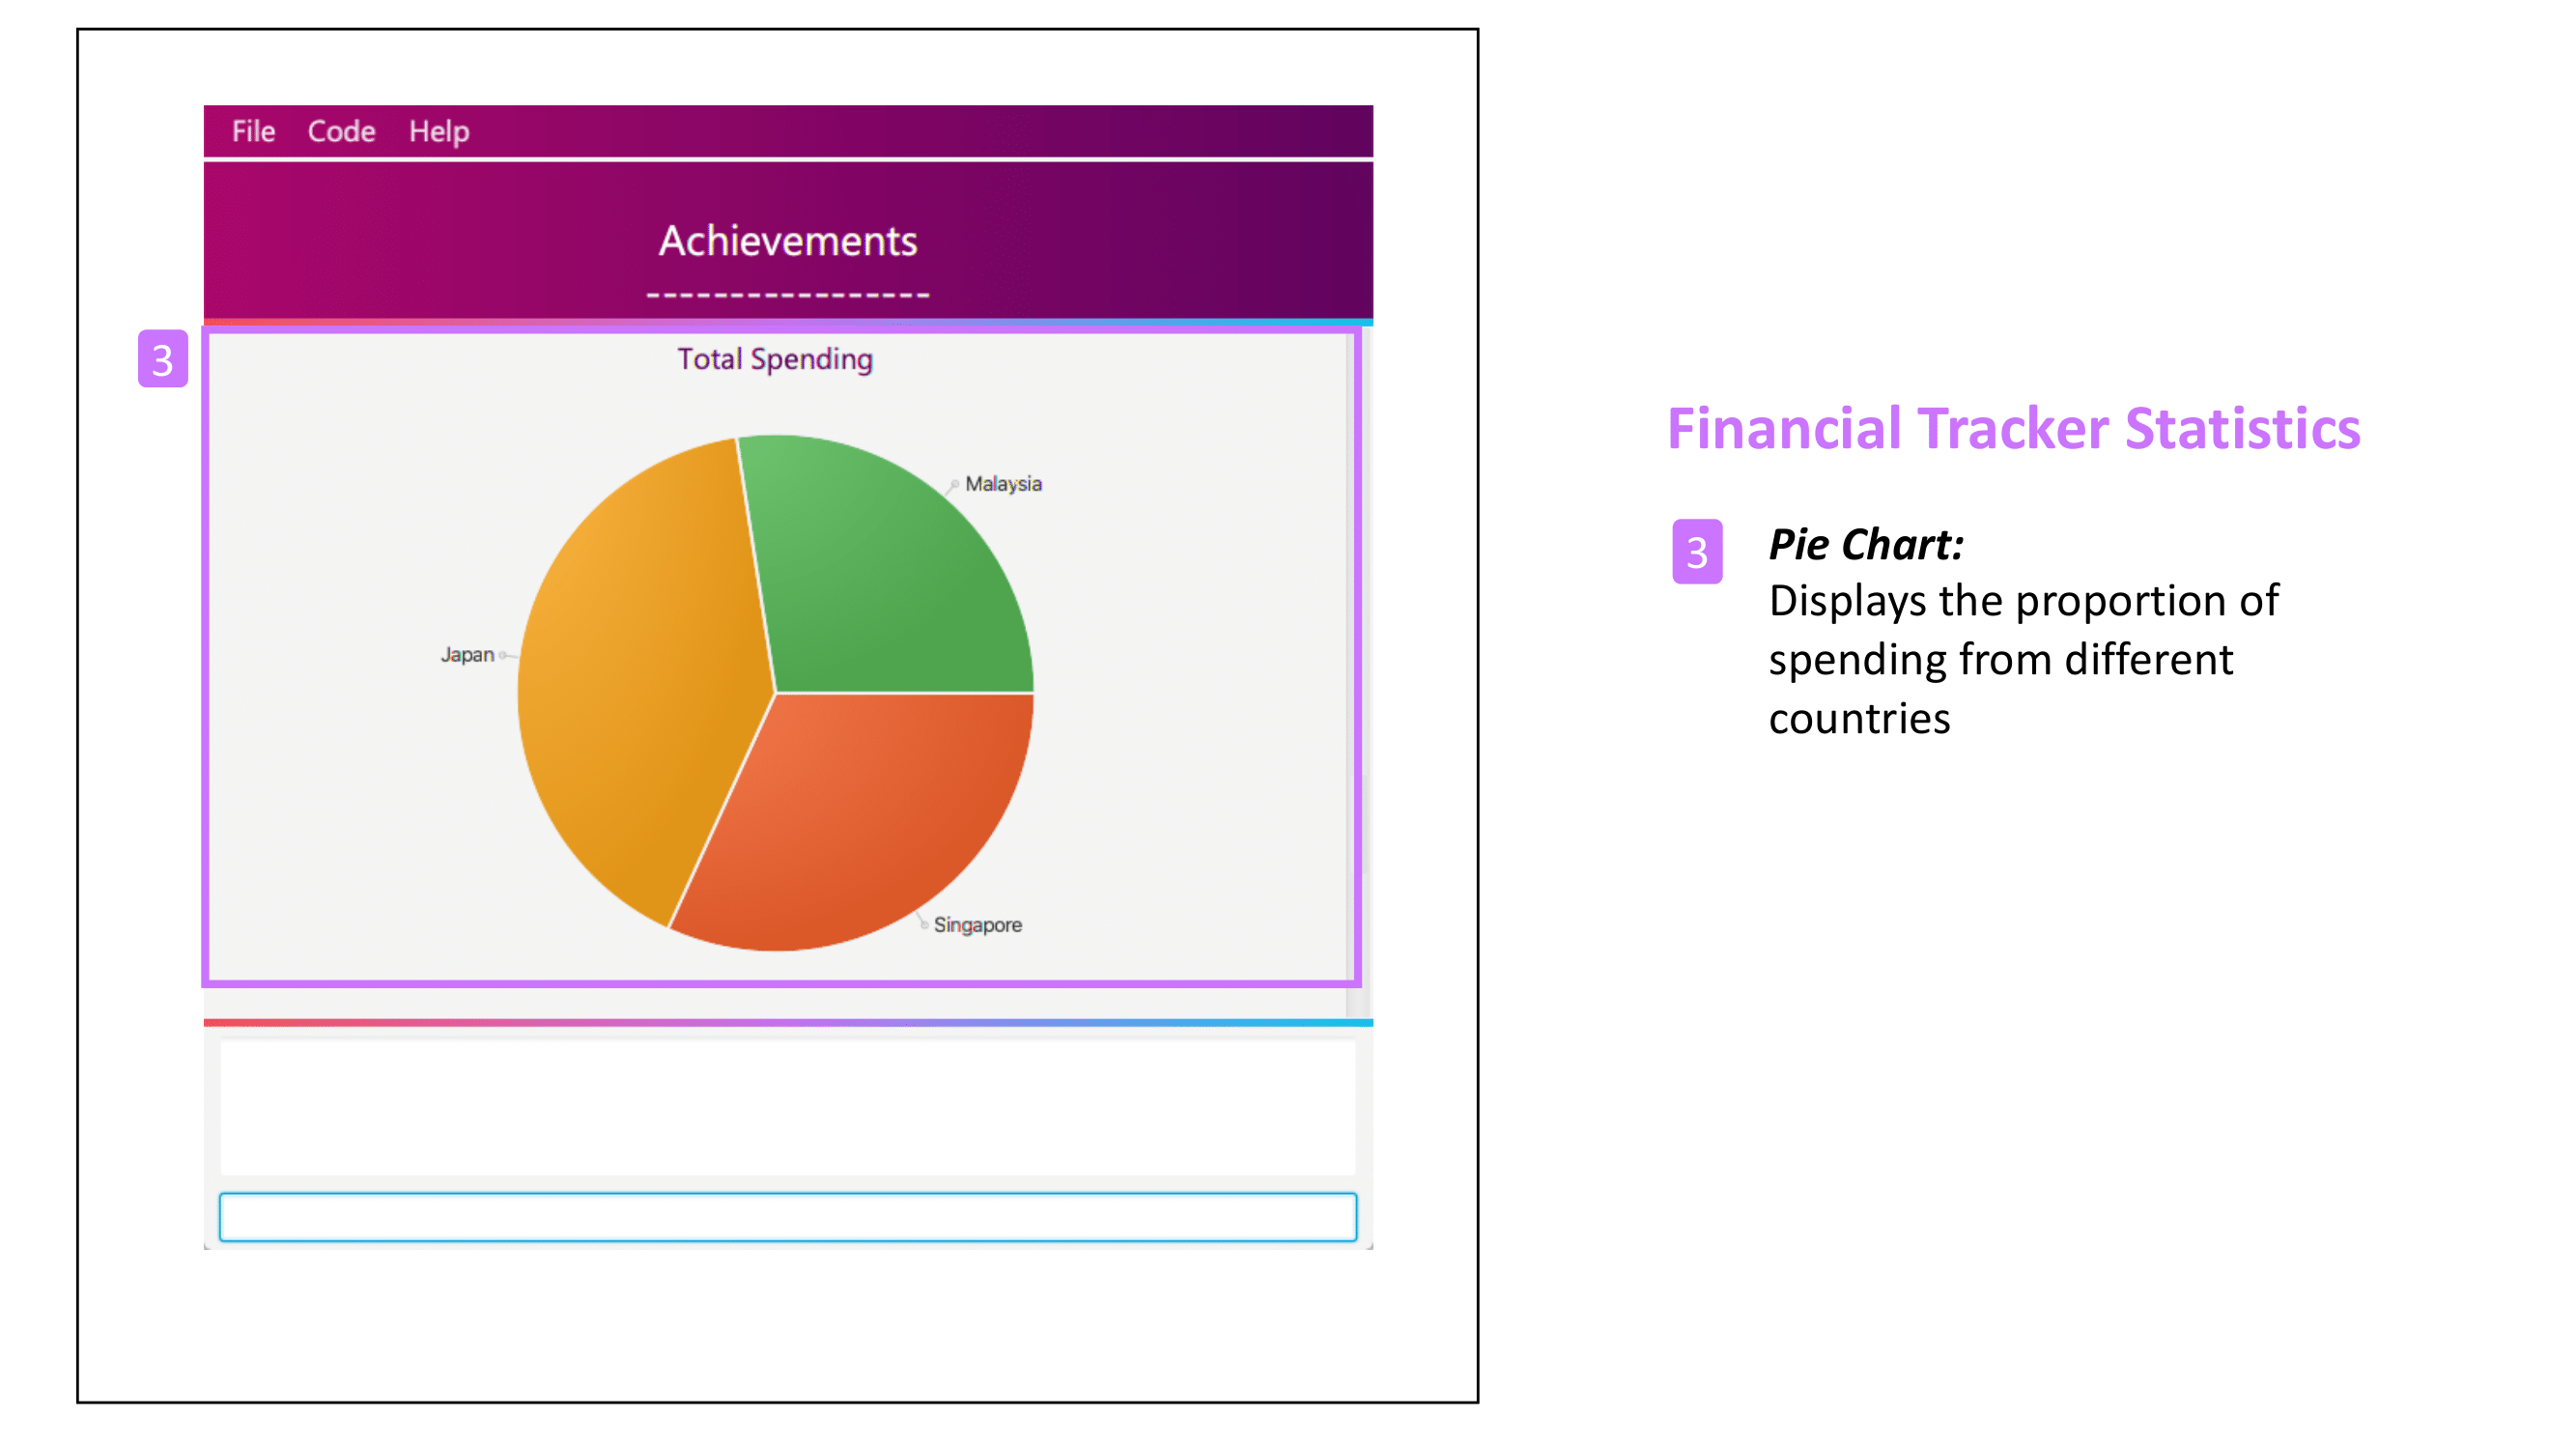
10.2.4. Financial Tracker Achievements
In the scroll pane you will be able to see the statistics of the financial tracker feature comprising of the following components:
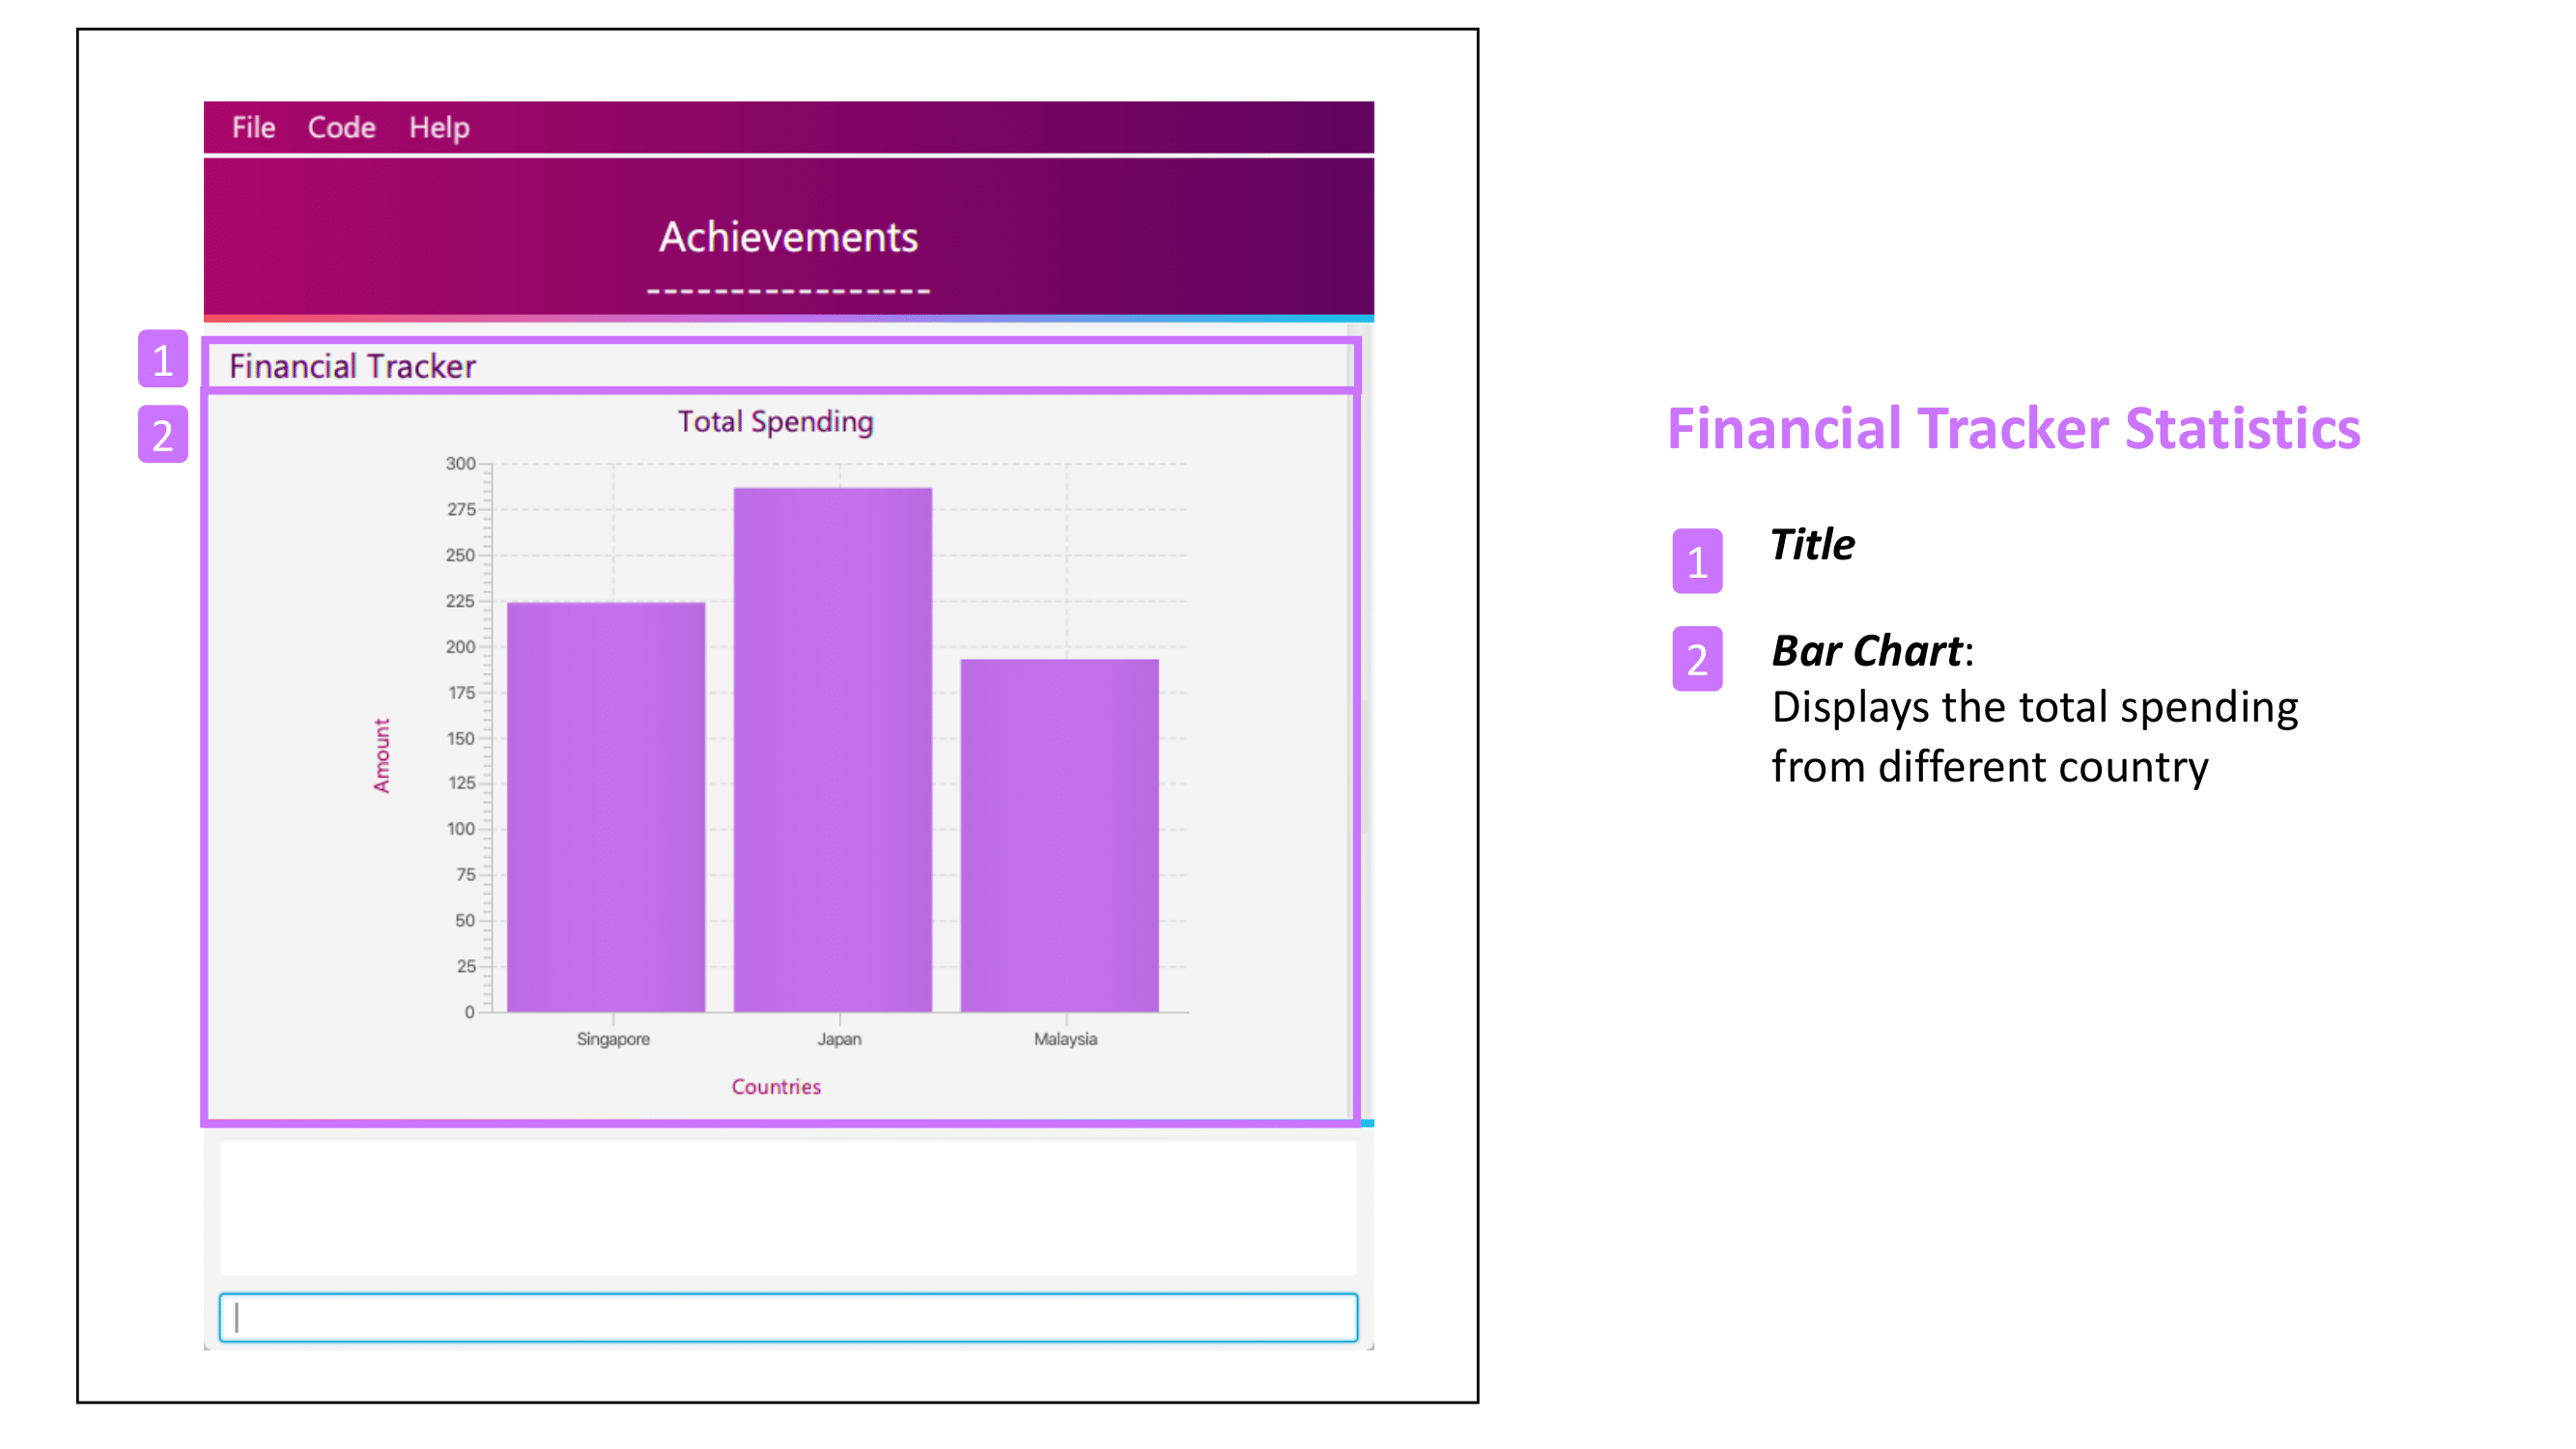
| If the number of entries in the diary book has past the target goal of 200, the progress bar will show 100% instead of the actual percentage. |
10.2.5. Itinerary Achievements
In the scroll pane you will be able to see the statistics of the itinerary feature comprising of the following components:
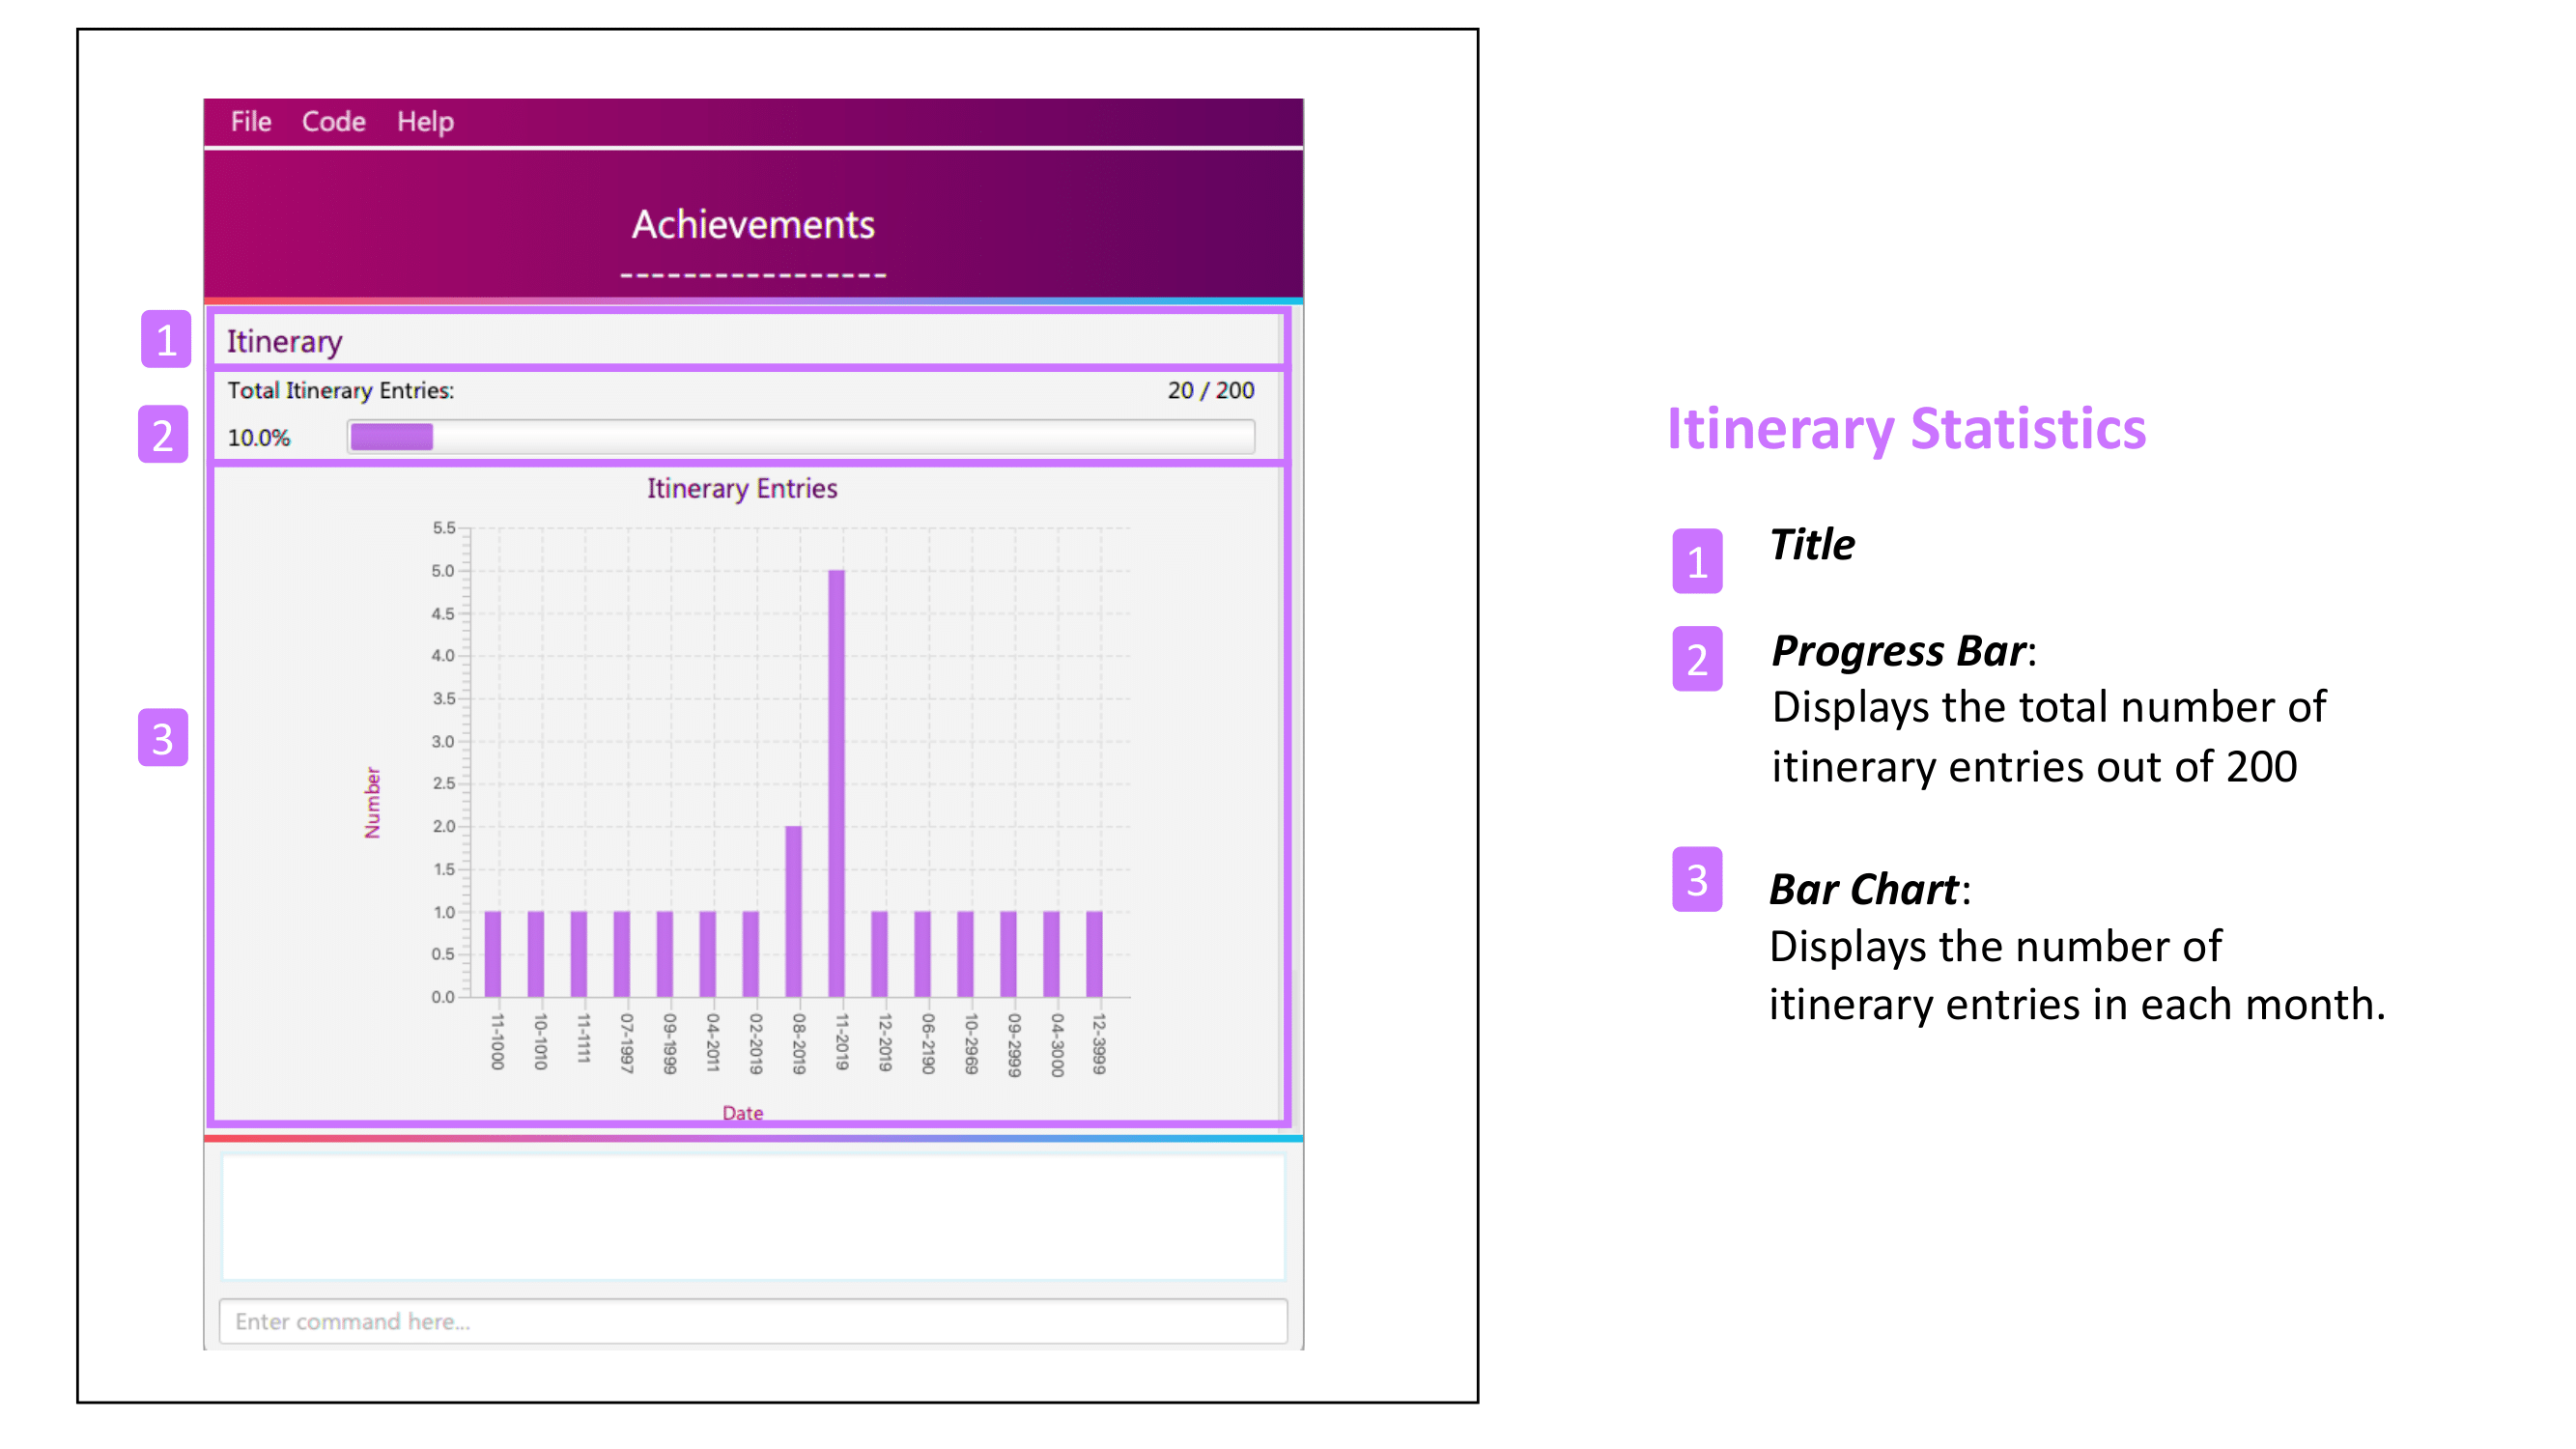
| If the number of entries in the itinerary has past the target goal of 200, the progress bar will show 100% instead of the actual percentage. |
11. FAQ
Q: How do I backup my data onto cloud storage?
A: Locate the data folder in the same directory where you saved you jar file. Compact it into zip file before uploading it onto cloud storage.
Q: How do I transfer my data onto another computer?
A: Backup your data first. Then, download TravEzy in the other computer and put your data folder on the same directory where you saved the jar file. Execute TravEzy and you should see your data has been safely transferred.
Q: Can I change the theme of the application? I prefer to work with a night theme interface.
A: Stay tuned for TravEzy v2.0 for this features! The TravEzy theme also aims to provide user with a UI that they are comfortable with. Hence, we strongly believe giving users the option to personalize their theme is extremely useful and would greatly consider adding it for the upcoming major update on TravEzy! Stay tuned for that!
Q: Who can view my travel posts in my TravEzy?
A: As TravEzy is a single user application, it is not opened to the public, and unable to be viewed by others. You can however, showcase your application in front of your friends to show off your overseas trips.
Q: Is it possible to connect to social media such as Facebook, Snapchat, Instagram?
A: Currently, it is not possible to connect to social media using TravEzy. However, we will consider implementing this feature in the future! Stay tuned for that! 😉
Q: Is there any in-app purchase for this application?
A: NO there isn’t. TravEzy is created from a non-profit organization and we are not here to milk any of your gold coins! It is absolutely free! It cost nothing, zilch, nada, 零, nil, kosong. So what are you waiting for get? Get TravEzy today!
Q: I’m having difficulties uploading the pictures onto the travel diary.
A: At the moment, TravEzy does not have any feature where it allows the user to store their travel photos. However, this will definitely be implemented in v2.0. We intend for the pictures to be stored in the user’s local drive and subsequently in a cloud database which is stored online.
Q: Who can I contact should there be a bug or feedback that I would like to share?
A: Feel free to send an email to the developer team: thetravellerdiary@gmail.com and we will access to your queries within three working days. We also value your feedback and will use it to improve TravEzy. Thank you and we looking forward to serving you better!
Q: Is it advisable to edit the storage files in TravEzy so that the changes will also be reflected when I start the application?
A: TravEzy gives you a caveat and strongly advise against tempering with the storage files in TravEzy as this could result in falsification of the data.
Q: Why are there data which I did not included when I first startup TravEzy?
A: Being a new user, TravEzy will provide you with some sample data to experiment first before you start using TravEzy proper. Hope that you will enjoy using TravEzy.
Q: I’m seemed to be having a bug whereby when given multiple similar prefixes, TravEzy will still accept the input but only takes in the second prefix argument. Is this suppose to work as expected?
A: Yes, TravEzy allows users to implement multiple similar prefixes for some commands so it reduce the trouble to delete the previous prefix argument in order to add in a new one.
Q: What are some of the cool features that are available in TravEzy currently?
A: TravEzy currently boast a plethora of features such as calendar, itinerary, address book, travelling diary, financial tracker and achievements page. All these features work in tandem with each other to give you the best and only the best travelling experience. Not only that, the TravEzy team also decided to spice things up and included some easter eggs scattered throughout the
application for users to discuss and discover. Hope that you have fun finding these cool easter egg features! 🐰🐰🐰
12. Command Summary
Here are summary lists of commands for the different features.
12.1. Calendar
| Command | Function | Syntax |
|---|---|---|
|
Adds a new event to your calendar |
|
|
Deletes an event from your calendar |
|
|
Shows the requested month view |
|
|
Lists your events |
|
|
Checks whether you are available to travel during the specified time |
|
|
Suggests suitable time periods to travel |
|
12.2. Itinerary
| Command | Function | Syntax |
|---|---|---|
|
Add an event entry to the itinerary |
|
|
Delete a certain entry from the itinerary |
|
|
Edit a certain entry from the itinerary |
|
|
Mark an event as done from the itinerary |
|
|
List all the events that are currently in the itinerary |
|
|
Clears the whole event list in the itinerary |
|
|
Give user the current time and date. Also shows the events for today |
|
|
Pops up the help window for the itinerary page |
|
|
Gives a list of the past user input to the itinerary page for that session |
|
|
Search the whole event list and filter out events which meets the search condition |
|
|
Sort the event list based on the sorting condition |
|
12.3. Address Book
| Command | Function | Syntax |
|---|---|---|
|
Adds a person to the address book |
|
|
Clears all entries from the address book |
|
|
Edits an existing person in the address book |
|
|
Deletes the specified person from the address book |
|
|
Finds persons whose names contain any of the given keywords |
|
|
Shows a list of all persons in the address book. |
|
|
View help |
|
12.4. Financial Tracker
| Command | Function | Syntax |
|---|---|---|
|
Adds an expense to the Financial Tracker |
|
|
Edits an existing expense in the Financial Tracker |
|
|
Deletes the specified expense from the Financial Tracker |
|
|
Clears all your expenses in your current country’s expense list |
|
|
Undo your previous action |
|
|
Switch to another country’s expense list |
|
|
Sort your expense list based on amount, type, date, time or default |
|
|
Generate an overview of your expenses statistics |
|
12.5. Travel Diary
| Command | Function | Syntax |
|---|---|---|
|
Add a diary entry to the diary |
|
|
Delete a certain entry from the diary |
|
|
Show all entries |
|
|
Find entries which match your input |
|
|
Find entries which match your input, according to the prefix |
|
|
Private a certain entry |
|
|
UnPrivate a certain entry |
|
|
Set your details to protect your entries |
|
|
unlock a hidden memory |
|